FACT24 ENS+
Release Notes
Portal Version 3.29
Portal Version 3.28
Portal Version 3.27
Portal Version 3.26
Portal Version 3.25
Portal Version 3.24
Portal Version 3.23
Portal Version 3.22
Portal Version 3.21
Portal Version 3.20
Portal Version 3.19
Portal Version 3.18
Portal Version 3.17
Portal Version 3.16
Portal Version 3.15
Portal Version 3.14
Portal Version 3.13
Portal Version 3.12
Portal Version 3.11
Portal Version 3.10
Portal Version 3.9
Portal Version 3.8
Portal Version 3.7
Portal Version 3.6
Portal Version 3.5
Portal Version 3.4
Portal Version 3.3
Portal Version 3.0
Portal Version 3.2
Getting started
Setup
Managing ENS+ users
Creating your organizational structure
Caller IDs
Address registry
Categories
Dictionary
File manager
Download Center
Your Account
Two-factor authentication (2FA)
Configuration
Persons & Groups
Alarm configuration
Alarms
Launch Forms - Configuration
Message templates
Calendar
Location profiles
Geolocation profiles
Whitelists
Jobs
Events
Telephone quickstarts
Survey
Alarm Templates
Alarm Flow
Interfaces
Operating Cockpit
Alarm Cockpit
Activate and stop alarm
Launch Forms - Trigger
Ad hoc alarm
Alarm monitor
Chat
Phone Conference
Video Conference
Surveys
Reports & Statistics
Loneworking
FACT24 Mediagateway
Microsoft Teams Bot
Web login for persons
Add-on modules
FACT24 ENS+ Incident Management
Telekom Settings Cloud of Things Narrow Band Interface
FACT24 ENS+ External API (REST) – Functionality Scope
FACT24 AI
Migration to ENS+
FACT24 CIM
Release Notes
New functions through FACT24 CIM release V.27.01
New functions through FACT24 CIM release V.26.01
New functions through FACT24 CIM release V.25.03
New functions through FACT24 CIM release V.25.02.01
New functions through FACT24 CIM release V.25.02
New functions through FACT24 CIM release V.25.01
New functions through FACT24 CIM release V.24.03
New functions through FACT24 CIM release V.24.02
New functions through FACT24 CIM release V.24.01
New functions through FACT24 CIM release V.23.02
New functions through FACT24 CIM release V.23.01
Getting started
FACT24 CIM starter - crucial steps
FACT24 CIM essential
FACT24 CIM advanced
Introduction
Start Page
Admin workspace
The FACT24 CIM Roles
Navigation
Search
Levels
Contacts
Locations
Working with incidents and alarms
Tasks and Action Cards
Chat (previously Case Manager)
Task Manager
Action Cards
Functions of Action Cards
Pre-defined Action Cards
Logs
Reports and Statistics
Templates
Risk Analysis
Mobile App (FACT24 ENS+ and CIM)
App Releases
App-Version 3.28
App Version 3.26
App Version 3.24
App Version 3.22
App Version 3.21
App Version 3.20
App Version 3.17
App Version 3.16
App Version 3.15
App Version 3.13
App Version 3.12
App Version 3.10
App Version 3.9
App Version 3.8
App Version 3.7
App Version 3.5
App Version 3.3
App Version 3.2
Download & Basics
FACT24 ENS+ App Section
Basics and Login
General Settings
Account
Location Services
Group Management
Triggering Alarms
Editing Alarms
Active Alarms
Chat in the ENS+ Application
History
Reports
Emergency Plans
Lone Worker Protection
Special Smartphones
FACT24 CIM App Section
Support
Table of Contents
- All Categories
- FACT24 ENS+
- Loneworking
- Lone worker dashboard
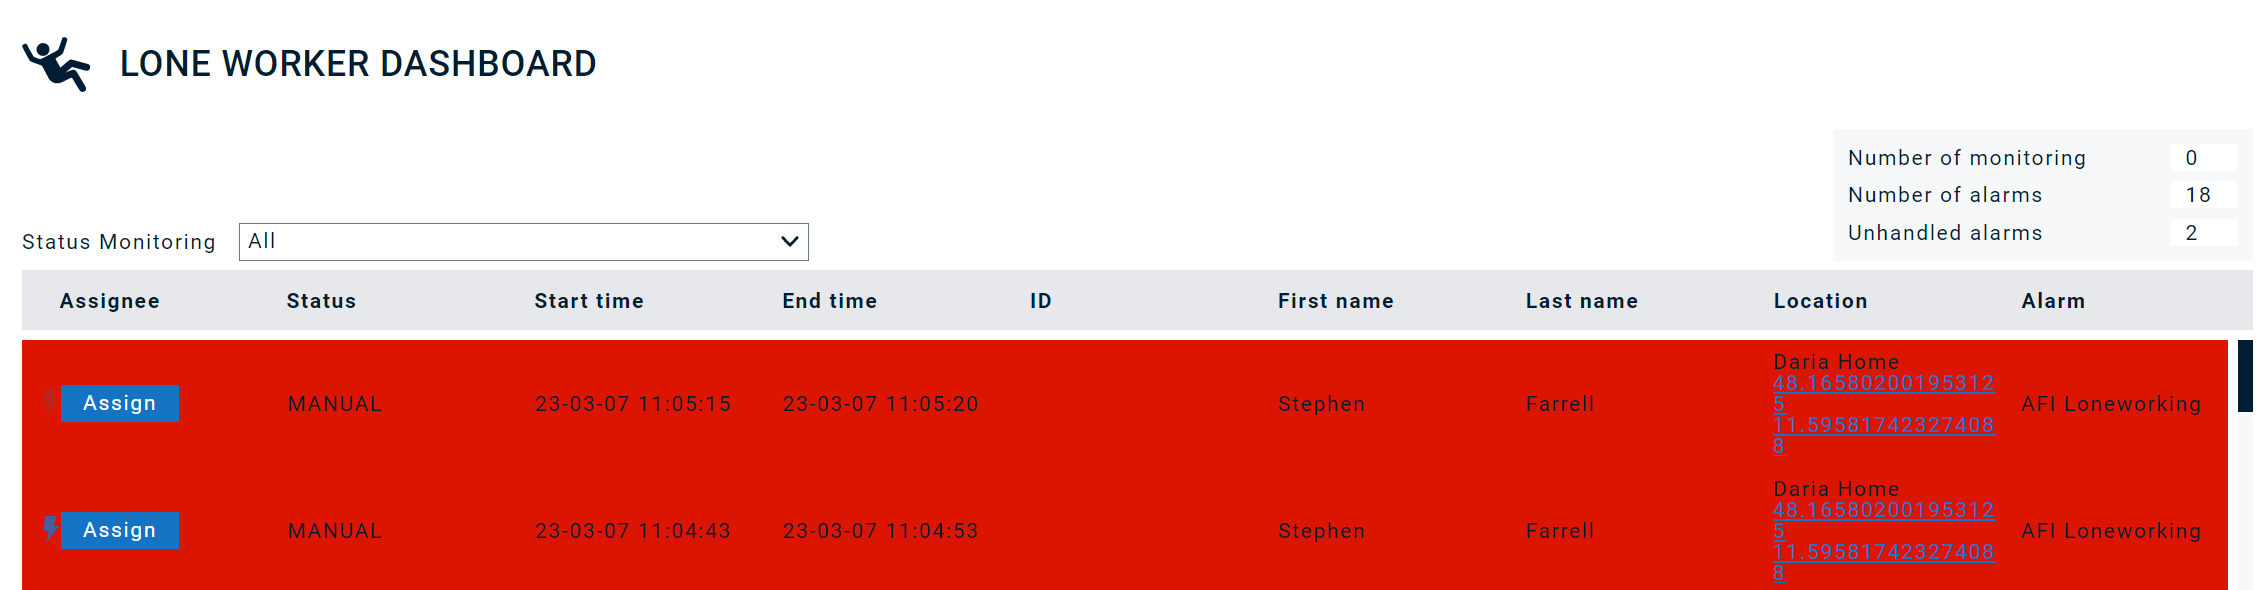
Lone worker dashboard
The Lone worker dashboard is used to display monitoring and alarms of loneworkers and accessible via the operating cockpit.
Monitor
The "Status Monitoring" selector can be used to select for which status the participants are to be displayed:
- All: The monitored participants and the participants who have an alarm are displayed.
- Alarms: Only participants who have had an active alarm within the last 60 minutes are displayed.
- Monitoring: All participants who are currently or have been in active lone working monitoring within the last 60 minutes are displayed.
In the overview on the right side is a summary of all current open lone worker monitorings:
- Number of monitoring sessions: Here the sum of all active single monitors is displayed.
- Number of alarms: Is the sum of all open alarms in the system. An incident must be edited and closed so that it is no longer visible in the lone worker dashboard.
- Unprocessed alarms: This displays all current alarms that have not yet been as-signed to a user for processing.
Table fields:
- Assignee: An incident can be assigned to a Web user; this user is displayed in this field.
- Status: Display of the current status of the person.
Registered
The person is actively logged into the system and is working alone.
Left
The person has finished working alone within the last 60 minutes.
Manual
There is an active deliberate alarm which has been Launched within the last 60 minutes.
Man-down
There is an active situation alarm which has been Launched within the last 60 minutes.
NO_MOVEMENT
There is an active quiescent alarm which has been Launched within the last 60 minutes.
Timeout
The solo work was not finished regularly. There is a time alarm within the last 60 minutes.
Panic
There is an alarm, which has been caused by pull-ing the pull line (loss alarm). This alarm was Laun-ched within the last 60 minutes.
Technical
There is a technical malfunction on the end device. This means, for example, that the battery level has fallen below the defined threshold value or that there is a loss of connection to the terminal device.
- Start time: Here you can see when the loneworking was started.
- End time: Here you can see when the loneworking will be or has been finished.
- Employee ID: A defined ID of the employee.
- Surname: The last name entered for the employee.
- First name: The first name entered for the employee.
- Place: The localization information. Depending on the status, this can be the information of an NFC tag, a Bluetooth beacon or the GPS information.
- Alarm: Here is the information which alarm is launched or was launched. This can vary depending on the configuration, for example if different alarm scenarios are defined for each localization point.
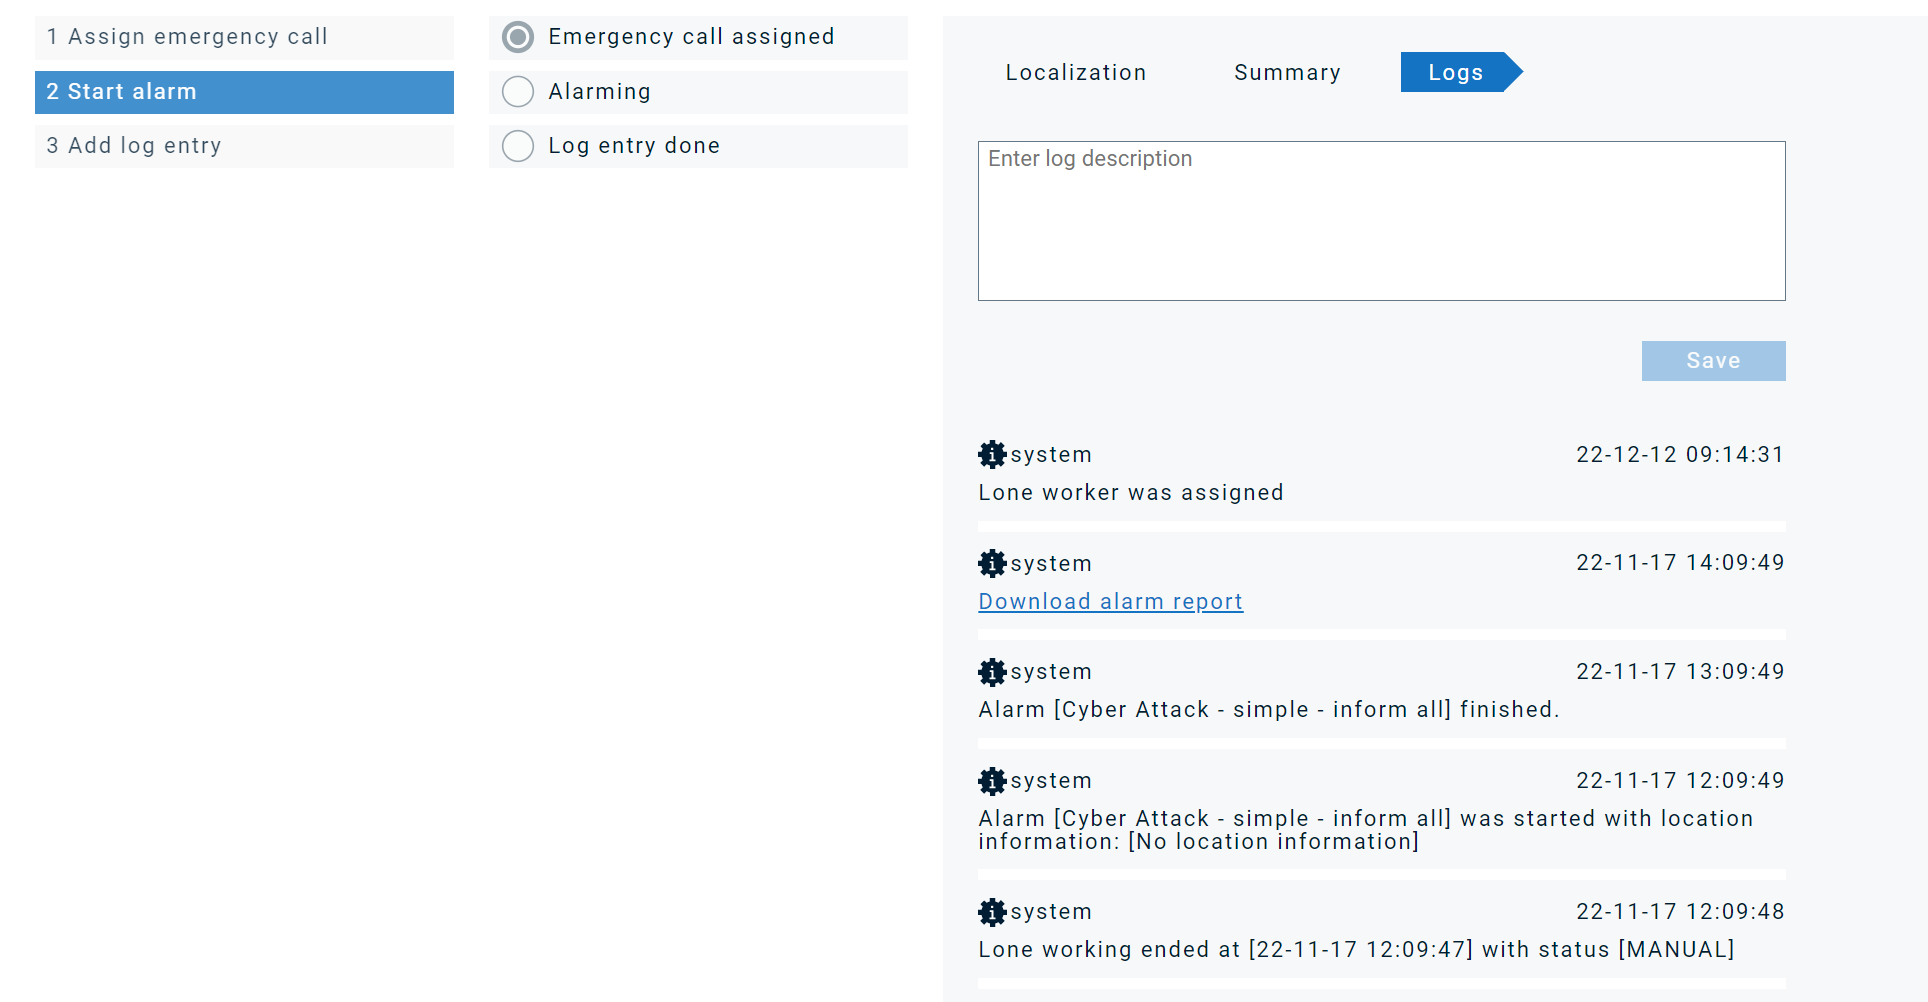
In the event of an alarm, the affected event flashes red in the display and a notification tone is played. As soon as a user accepts the incident, the red display is deactivated, and the sound is stopped.
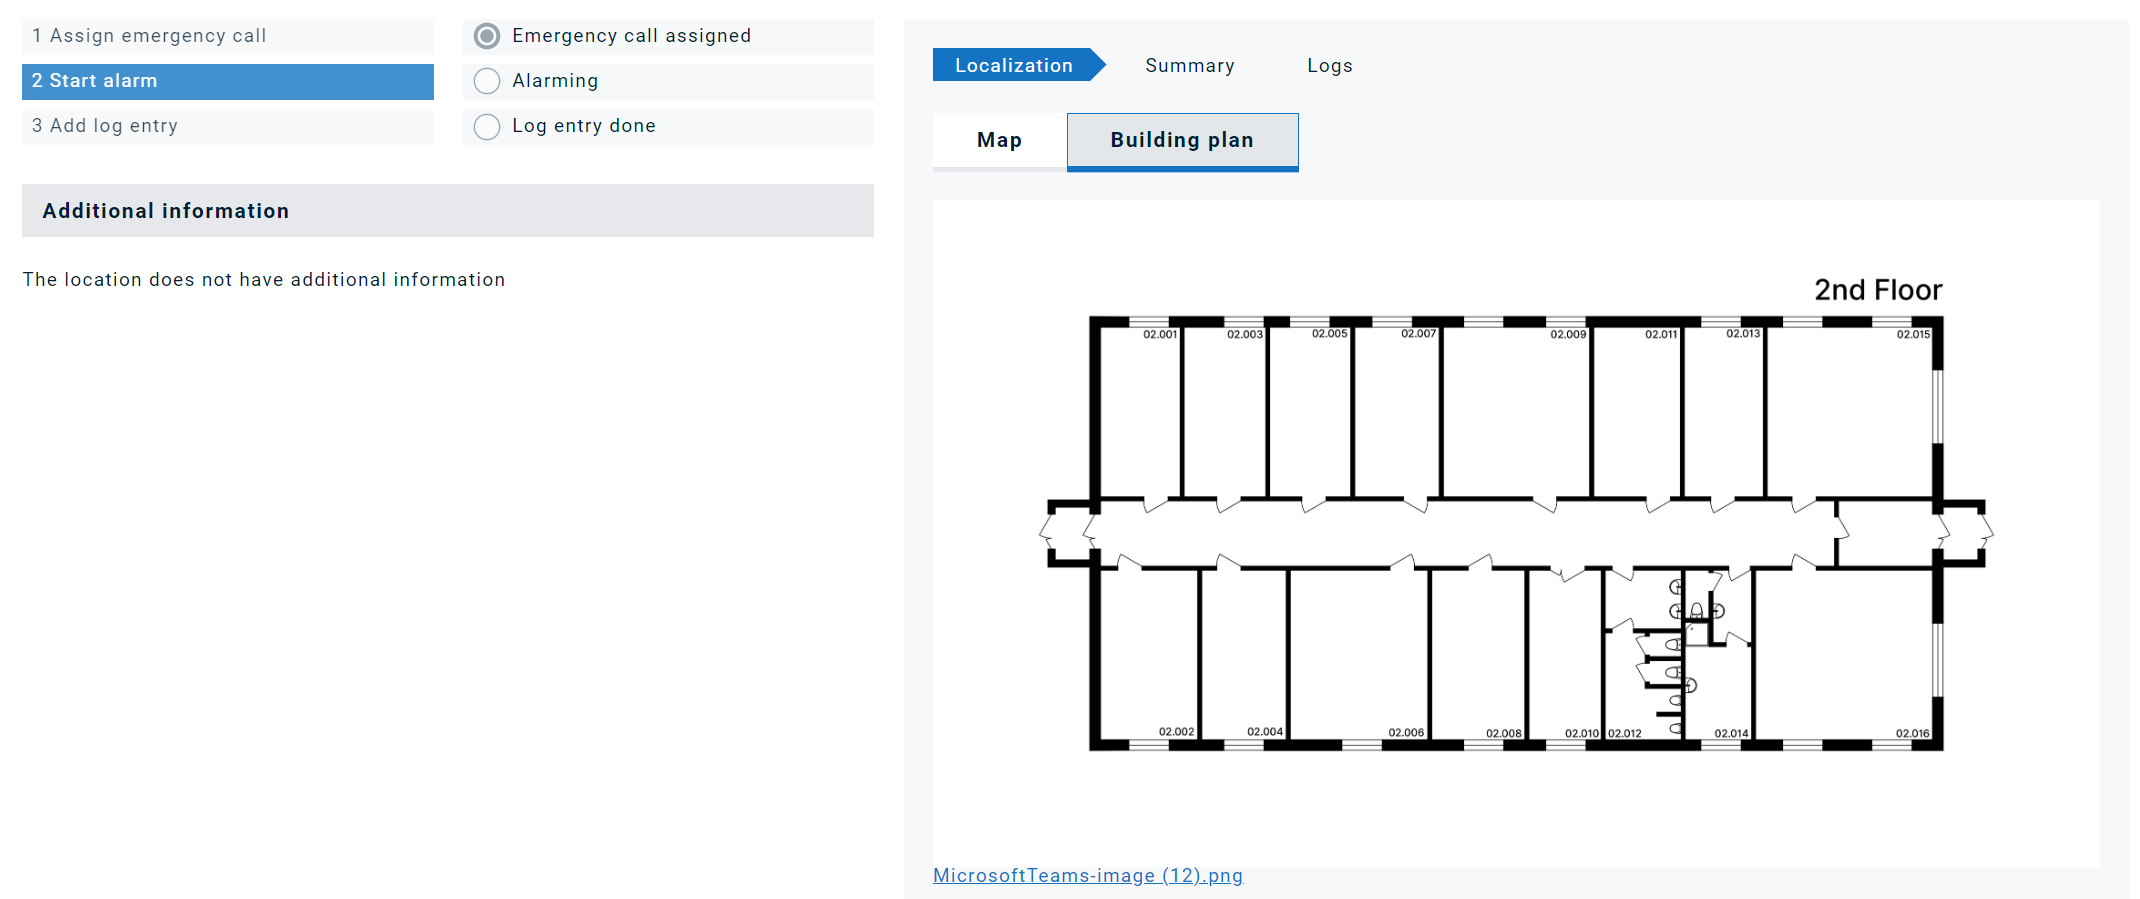
In the detailed view, additional information about the respective event is displayed. If GPS data has been transmitted in the event of an alarm, it is visualised using Google Maps. In addition to the GPS data, a building plan for a positioning object (NFC, BLE Beacon, Gateway, WLAN) can be stored in the location profile and then be displayed.

React
The following steps are necessary to react to an incident:
- Accept the incident (only possible for web users)
- Click on the summary of the incident
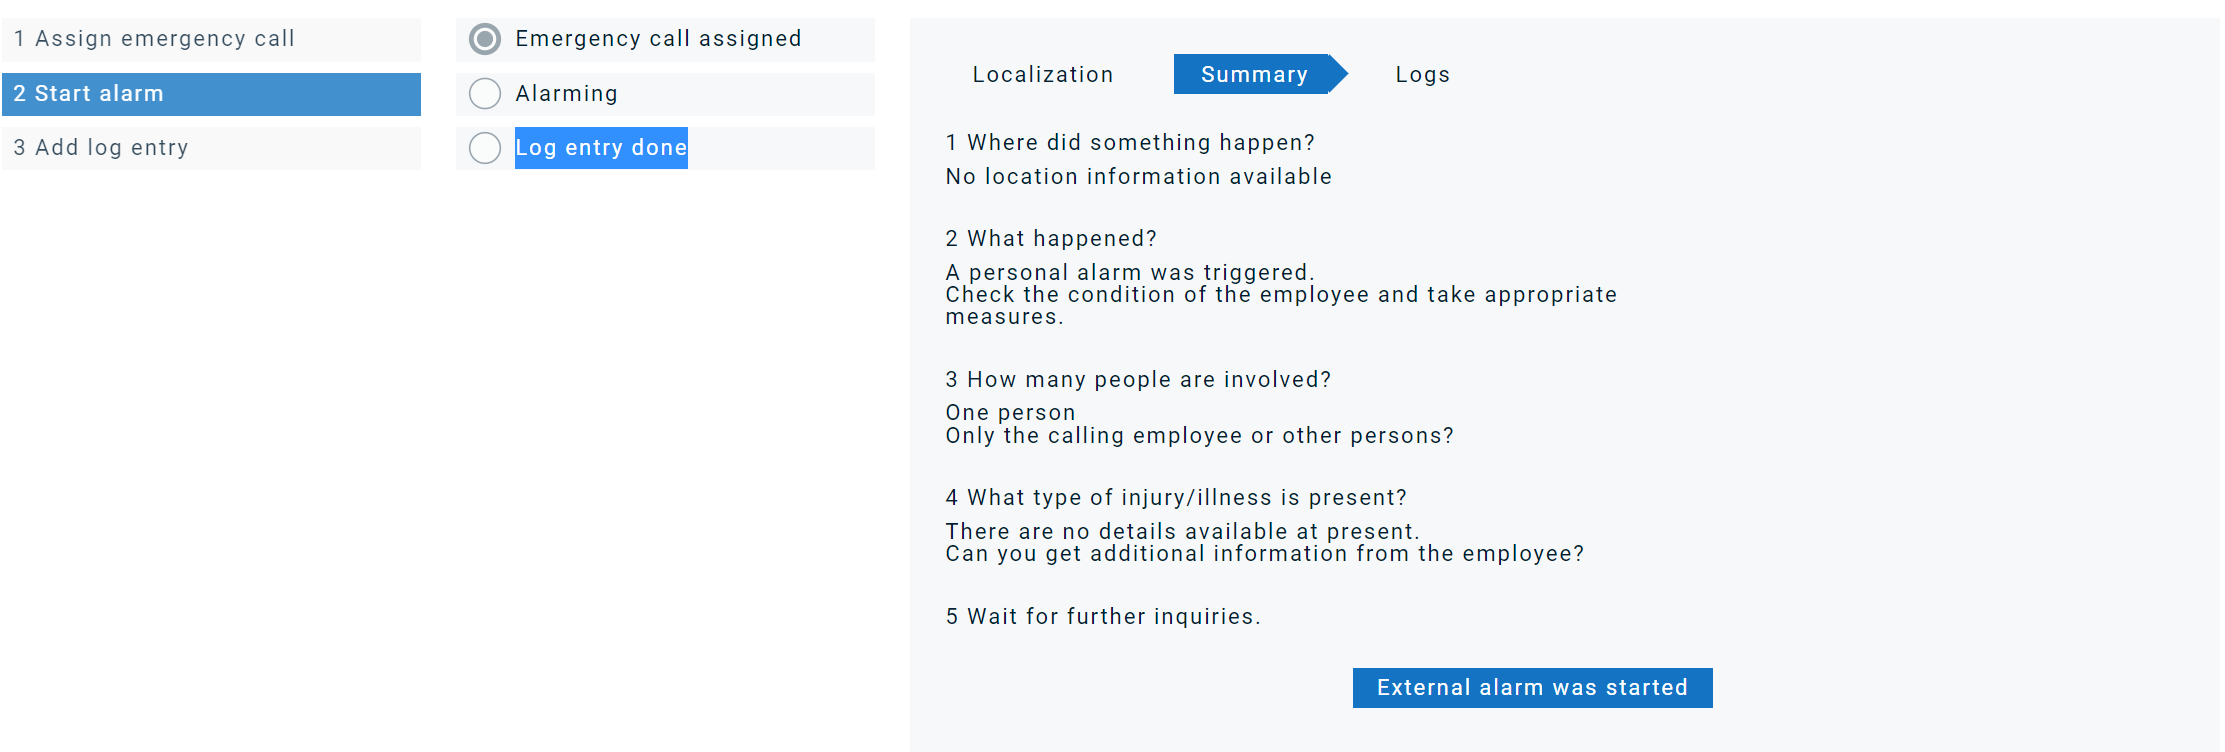
- Execute the individually defined steps in case of an alarm. These are the organizational measures in case of a single workstation alarm. After the measures have been carried out accordingly, the web user must click on the button «External alarm carried out». The hook for the alarm is set. A system entry is also created as logbook information.
- Create a logbook entry to complete the process. After the entry has been made, the process can be completely terminated by clicking the «Complete Incident» button. The entry will be saved in the reports of the loneworker.