Table of Contents
Persons
Key information
In this menu the persons are administrated. New persons can be created by clicking on «Add». There are only few mandatory fields when creating persons in the web interface:
- Family Name
- Given Name
- Language
- PIN: The PIN is required as a one-time password to log into the Mobile App. The portal automatically generates a 4-digit PIN. This can be changed manually. Once a person signs into the Mobile App for the first time, the person will be asked to set a password and the PIN will no longer be required for logging into the Mobile App.
- Organizational unit: You can only select from the organizational units you as a user have access to.
- At least one device.

Please also note the following general information on the concept of persons:
→ A Person can be a member of many alarm groups.
→ A Person can be a member of a higher-level alarm group.
→ A Person can have up to 16 devices.
→ Communication channels can be selected / deselected for each alarm group.
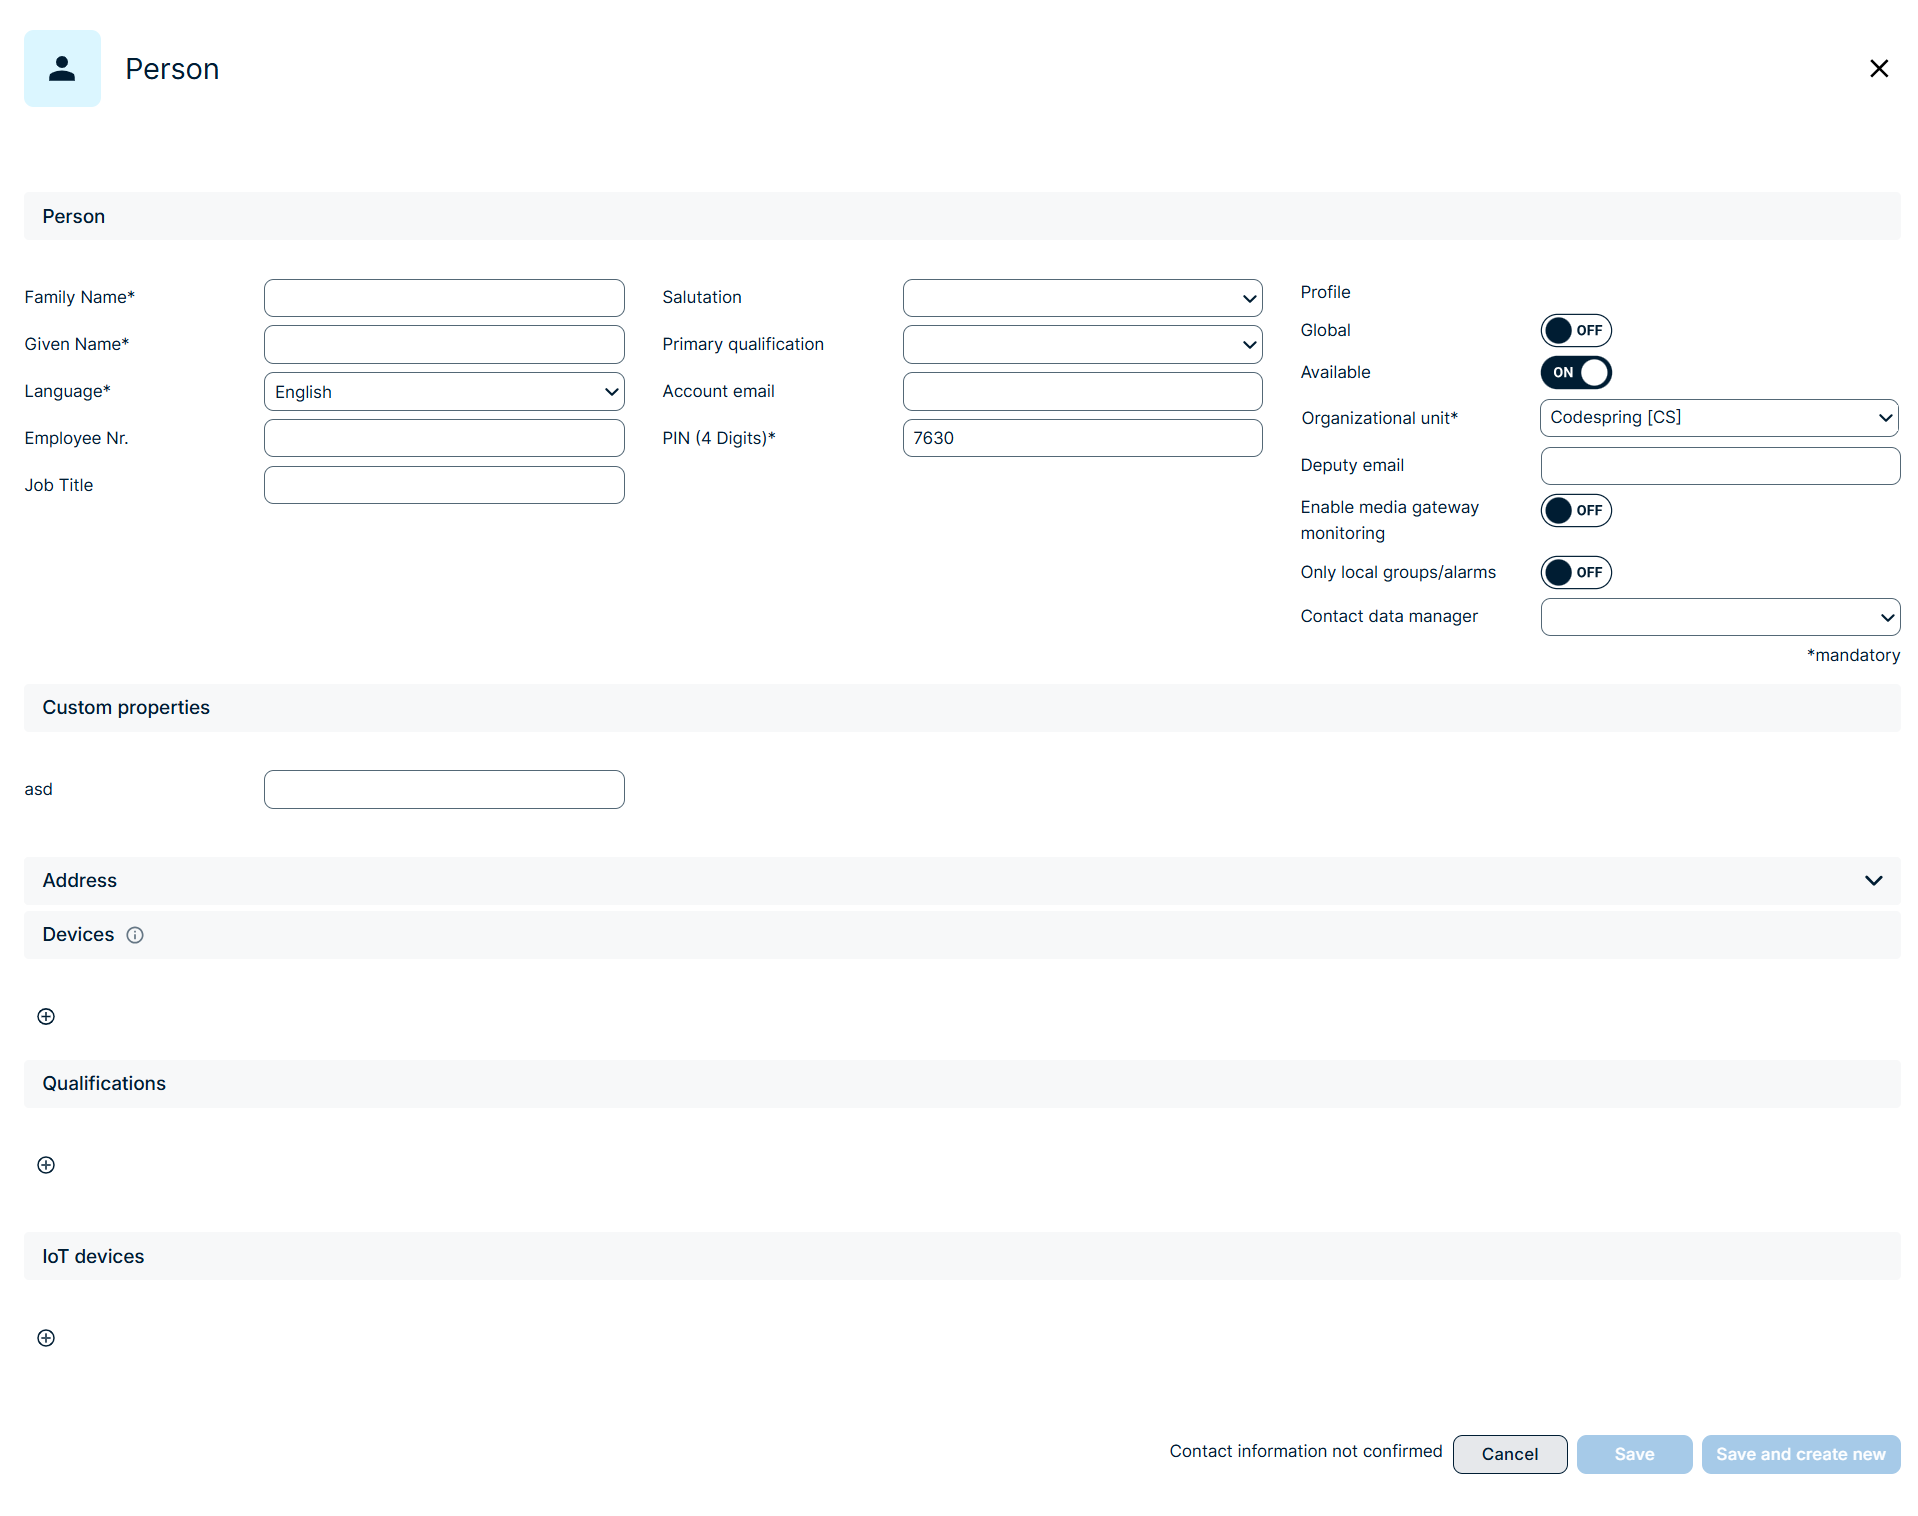
Detailed Person Configuration
- Employee Number: This has to be unique across your account. It is required as unique identifier of the person if you would like to use the csv import functionality for persons and groups.
- Job Title and Salutation will support you in later finding the right persons for your groups and alarms quickly and reliably.
- Primary qualification: You can define one primary qualification per person. The qualifications you can select from have to be pre-configured in the qualification configuration. You can use this qualification to search for persons and to set qualification-based alarm goals in the alarm configuration. Furthermore, you can use all these fields to assemble filter-based groups.
- Account e-mail: It is possible for employees to maintain their data in self-management. For this purpose, the email address of the person must be entered. This person can then log into the web portal to confirm and edit his or her personal data and read the portal news feed. In addition, the person has the option of entering a secret telephone number and email address. These can be used by operators and administrators for alarming, but the phone number and mail address won't be visible to them. Please note that for a first-time login, the person just has to click ‘forgot password’ to generate a new password - no "password email" will be sent automatically. An email address must also be entered here if this person is to be used as a deputy for a deputy escalation.
- Create user: You can - but of course don’t have to - create a linked user for this person. You would directly be taken to the user configuration from here when clicking on the button.
- PIN: see above
- Device password: This password has to be set for a person to be able to log into the ENS+ Microsoft Teams Bot or the mobile app. Of course, the person can set an individual secret password. Just for resetting the password without having an account email set this field can be filled by a user in the web interface.
- Profile: Through a profile, you define which functionalities beyond receiving alarm notifications a person can access via mobile app and / or Desktop client, such as the ability to trigger certain alarms, check-in and out of groups, and access specific emergency documents. You can select from the list of profiles, which are configured and available in the organizational unit set for this person.
- Global: If you switch ‘Global’ to ‘on’, the person will also be visible for users from all other organizational units. Users of these other organizational units can then add this person to their groups and alarms, however, they cannot edit any personal settings.
- Available: If notify is switched off, the subscriber does not receive any alarms. However, it is possible to overwrite the offline status of a person within an alarm.
- Deputy email: Enter the email of the deputy here, which you can find in the 'Email of the user account' field. This deputy would be notified as part of an alarm escalation, if “deputy escalation” is enabled for this alarm. Please note that only a global person can be selected as deputy, if the person him/herself is set to “global”.
- Contakt Data Manager: Each person can be assigned a contact data manager (a user) who is responsible for maintaining that person’s contact details. The Customer Data Manager role is configured in the user settings.
Adress configuration
You can configure up to two addresses per person:
- Assign an address from the central address registry.
- Add an individual address for this specific person.
They will support you in later finding the right persons for your groups and alarms quickly and reliably. Furthermore, you can use the fields of the individual address to assemble filter-based groups (fields of address from address registry will be available in filter-based groups soon).
Device configuration
You have to configure at least one device (and max. 16) to notify this person and you can select each device type multiple times.
Group and alarm settings influence if and when these devices will be notified during a specific alarm process. Here in the person configuration, you can exclude a device entirely by selecting “-“. This device won’t be used in any alarm.
For alarms with alarm type “personal device priority” you determine the sequence of devices here in the person configuration. “0” is highest priority, while “15” would be lowest priority if all 16 devices were configured. You can set different priorities for your working hours if this is enabled for your account. Please note that automated device management is then only possible via API and no longer via csv import. If you use a Media Gateway, please also note that a differentiation of priorities for working hours is not available for local persons.

You can select from the following device types:
Phone Channels The format for external phone numbers is always country code + area code + main number, e.g., for mobile +49176xxxxxxxx | Mobile, Job Mobile, Other Mobile, Home, External Phone, Secret Mobile, Secret Phone, Fax Internal Phone: Internal phone extension Private Phone: in more recently created accounts replaced by secret phone |
SMS Channels For sending short messages (format as for external and mobile) | SMS, Other SMS, Secret SMS , Job SMS Private SMS: in more recently created accounts replaced by secret SMS |
Email Channels Only one email adress can be added per email device. So please do not concatenate them. | Job Email, Other Email, Email, Secret Email |
Notification Channels | Application (iOS and Android): to use the Smartphone Client, i.e., the mobile app. Recommendation: Authentication via email address or mobile phone number. Only one application can be created per person. AC (Windows 7 and Windows 10): PC Client, only available, when booked. Messenger: For connecting the FACT24 ENS+ Microsoft Teams Bot, only available when booked. |
Pager | Only if this is available for the account. To the Swiss network: +41 xxxxxxxxx To the German network: seven-digit number |
Media Gateway In connection with a local media gateway, the following additional alarm channels are available. The communication channels are configured accordingly in the media gateway. | IM_Dect: For messaging, for example, Dect systems (ATAS, OAM, OM AXI, SNOM, RTX…) IM_XML: For messaging IP terminals (ALE, Cisco, SNOM) IM_SIP: For messaging to PBX devices (ALE, Innovaphone, Unify...) IM_Div: For further interfaces (Paging,…) |
Device Error Message
The system displays a warning or error message if a configured channel is not ready for communication.
This helps administrators identify configuration issues directly when reviewing or editing a person.
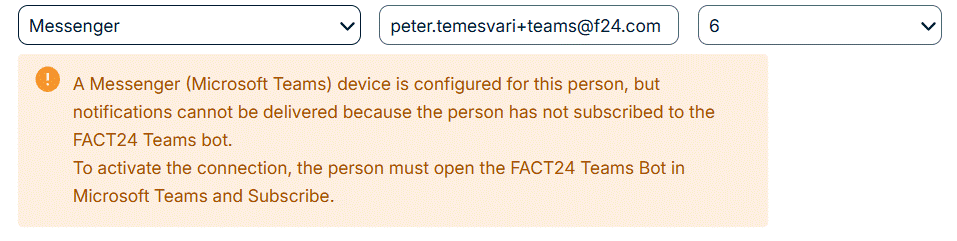
Messenger Channel
For the Messenger channel, it is not sufficient to configure the Messenger device on the person page.
The user must also be subscribed to the service. This subscription can happen either explicitly or implicitly, depending on if the Teams bot was installed before or after the Person configuration.
If the Messenger channel is configured for a person but the user is not subscribed, messages sent through this channel can’t be delivered.
More information on the MS teams Bot
Application Channel
For the Application channel, the user must not only install the FACT24 app on their mobile device, but also log in to the app.
If the app is installed but the user is not logged in, messages sent through the App channel can’t be delivered.
More information on the FACT24 App
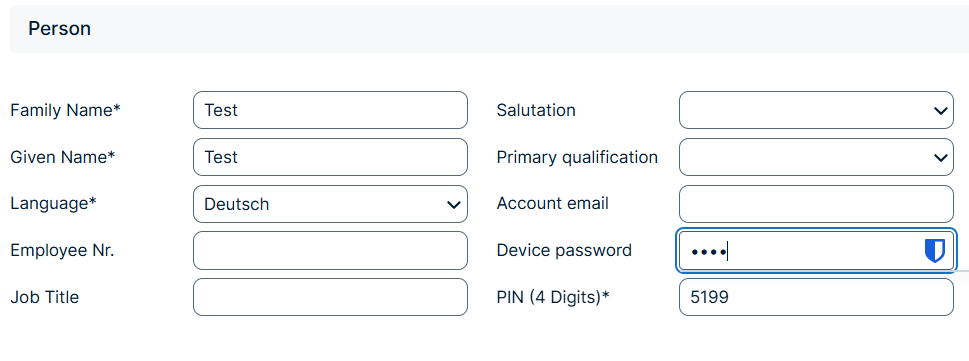
PC Client
Step 1: PC Client login details
Under 'Persons' you can select the ‘PC Client’ as a device and assign it a number/ID.
The device can now receive notifications.

Step 2: Set a password
When editing the person's details, you can save a device password to log in to the PC client.
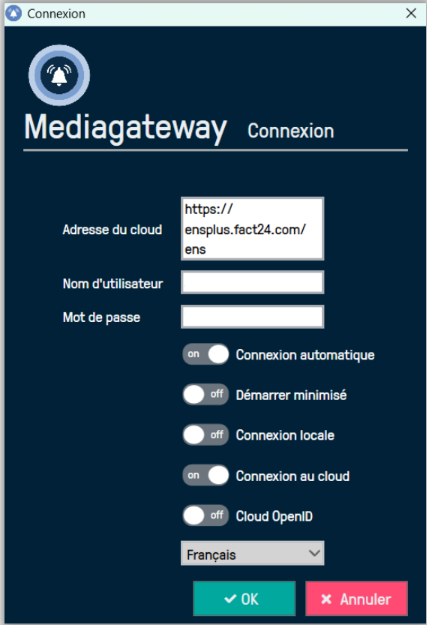
Step 3: Download the EXE file
Once the EXE file has been downloaded, log in using the credentials (set in steps 1 & 2).
Step 4: Triggering an alarm via the client PC
To trigger an alarm via the PC Client, you must set the Launch Media to “System alarm” in the alarm configuration in FACT24 ENS+.

Step 5: Settings for alarm triggering
In the profile and then under ‘Desktop Client’, you can configure alarm triggering for each PC client.

Qualifications:
The system supports the assignment of up to 30 additional qualifications to a person. These additional qualifications can be used for filtering for persons, e.g., to assign them to a group or directly to an alarm, and for the Incident Board. However, for qualification-based alarm goals, only the primary skill is decisive.
IoT Devices:
The system supports the direct assignment of IoT devices like Bluetooth Buttons and LORA Emergency Buttons by adding their Hardware ID. If at least one such device is assigned to a person, a profile has to be selected for this person. If the IoT device then transmits location information, the assigned alarm is initialized. If no or unknown geo-information is transmitted to the system, the default alarm configured in the profile will be started.
Summary: Use of Mobile App for persons
Duplicate Phone Numbers:
When executing an alarm, duplicate phone numbers for each device type will now be consolidated during the alarm flow and just alerted once in order to avoid being considered fraud by telephone providers. Any devices that don‘t get notified for this reason will be marked as „duplicate“ in the alarm log.
Person | Mobile | Telephone Number | If all of the devices are alerted with one alarm, you may see the following statuses: |
Person A | Job Mobile | + 49 177 12345678 | Notified |
Person B | Job Mobile | + 49 177 12345678 | Failed -> If you check the detailed alarm log you will find “Duplicate” as information |
Person C | Private Mobile | + 49 177 12345678 | Notified -> It is the same phone number but used as different device type |
Group assignment
Once a person has been created and saved, it can be assigned to different groups. An overview of the group memberships then appears in the respective person:

In the lower area the group membership of a person can be viewed and configured. On the left side, all groups are displayed that have already been assigned to a person. On the right side are all groups that can still be assigned to a person. By clicking on one or more groups and using the buttons in the middle, the person can be added to groups and removed from groups.
A POP-UP window opens during assignment. In this window it is defined on which devices a person within a group is alerted. If not all communication channels are configured, they are displayed in red. The communication channels can be individually selected for each group.
Export and import via csv
Export
To create an export of the existing persons, you can switch to the person configuration via the configuration menu. For an export, at least one person must be available. For the export, the desired persons can be selected via the respective checkbox on the left, or the entire person list can be selected via the checkbox on the left in the table header.
By clicking the button "Export and send via email," the creation of the CSV file is initiated and sent to the email address associated with the logged-in user.
To open the CSV file, we recommend importing it into a spreadsheet program, e.g., Excel. It is advisable to copy the original file and work on the copy.
Follow the steps below (example using MS Excel 365):
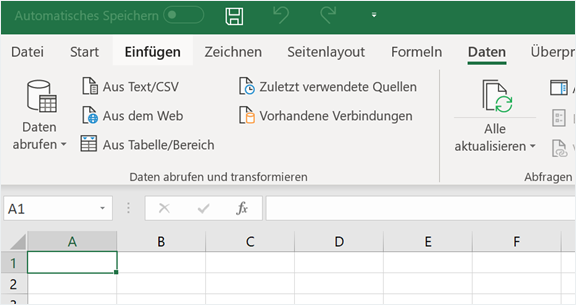
1. Open Microsoft Excel with a blank workbook.
2. Switch to the "Data" tab.
3. Select the function "From CSV/Text."
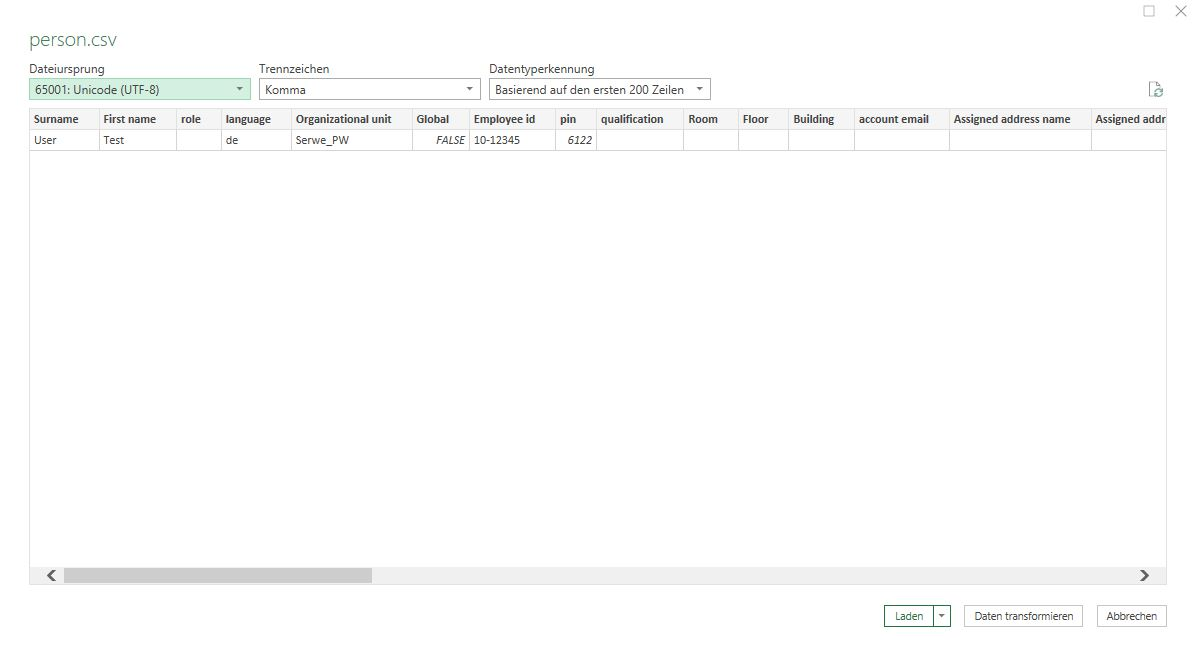
4. Choose the previously exported file "Persons.csv."
5. In the preview, set the file origin to "Unicode (UTF-8)," then click "Transform Data."
6. Select the entire table content.
7. Switch to the "Transform" tab and select "Text" under "Data Type."
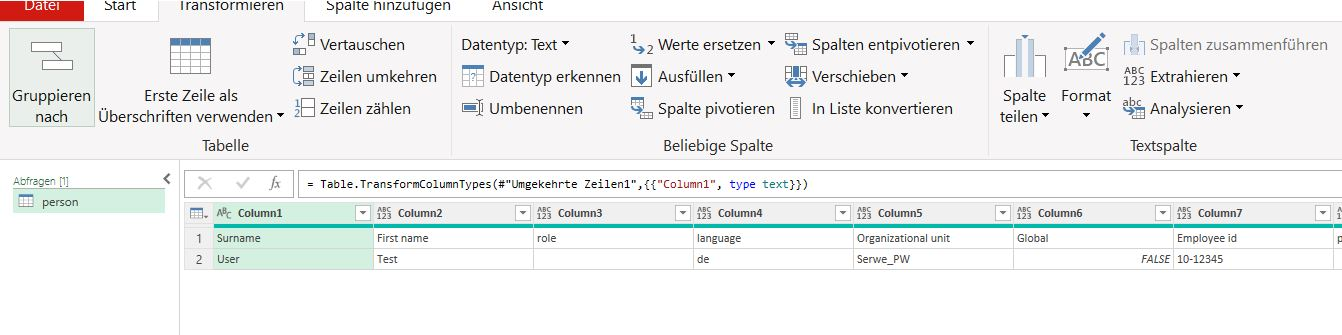
8. Confirm the query by selecting "Replace All."
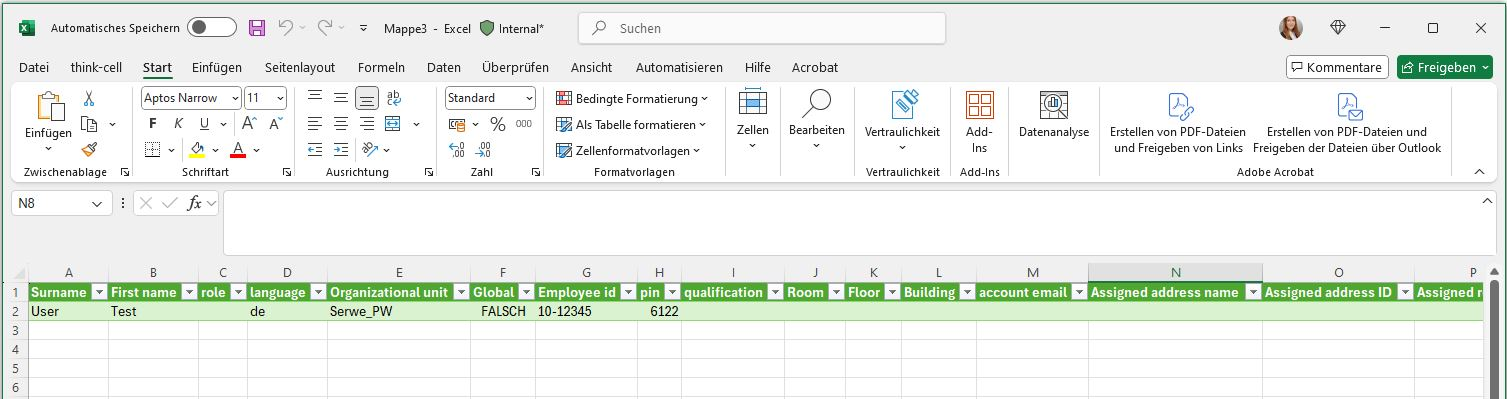
9. Complete the transformation by switching to the "File" tab and selecting "Close & Load."
10. You now have a finished Excel table with the exported data, which can, for example, be saved in xlsx format.
Import
Please note that only users with the following roles are able to import persons:
- Principal
- Configuration
- Organizational Unit Administrator
- Config Groups
If you are a user in the root organization, you can not only import persons for the own organizational unit but also for all subordinate organizational units. You can find more information about organizational units here.
The maximum file size you can import is 10 MB. If you need to import a larger file to create, for example, people or other types of entities, you must first split the file in Excel.
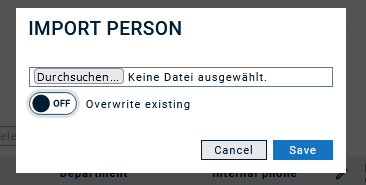
If you click on "Import person" you can browse and upload your import file. You have the option to either just add persons or to update existing ones by clicking "overwrite existing". It is not possbile to delete persons via csv file.
The application automatically reviews the file format and will give back an error message if it is not csv.
Depending on the amount of persons to be imported, the import process can take up to several minutes. The logged in user will receive an email with a summary after the import has been completed.
How a valid csv file is structured
In order to avoid mistakes, we recommend to export a csv file first and then replace the existing values by the desired ones. The csv file consists of a header and the person-related rows. You can change the text of the header fields arbitrarily - just keep in mind that you always have to have the exact same number of fields. Then you have one row per person with the following information:
Header | Comment |
Surname* | max. 150 characters |
First name* | max. 150 characters |
Role | max. 150 characters |
Language* | de = German, en = English, fr = French, it = Italian, pt-br = Portuguese (Brasil), nl = Dutch, sv = Swedish, es = Spanish, ru = Russian |
Organizational unit* | Please note that the organizational unit already has to exist in the application. You find information on how to create new organizational units here. Note: In order to assign a person to the root organization, please fill in the actual name of the organizational unit and not "ROOT". The system won't recognize "ROOT" as a valid organizational unit. |
Global | true / false - decides whether a person is imported as a global person or not. |
Employee id* | max. 150 characters - this number is the identifier if person data should be overwritten. It also serves as the identifier for group imports. It is a mandatory field when using the csv-import while it is not mandatory for creating a person in the web interface. |
PIN* | 4-digit number |
Qualification | max. 150 characters - please note that the qualification already has to exist in the application. You find information on how to create new qualifications here. |
Room | max. 150 characters |
Floor | max. 150 characters |
Building | max. 150 characters |
JobTitle | max. 150 characters |
Account email | Valid email address. Please note that each email address can only exist once in the system. Persons have the possibility to maintain their own contact data via this email address. |
Assigned address name Assigned address ID Assigned room Assigned floor Assigned building | If assigning an address from the central address registry is enabled for your account, these fields will be added to the csv export and import. (If not, you can ignore these fields). Please make sure that Assigned address name and ID match with an existing address in the registry. Note that each address ID is unique in the account. |
Device_01 – Device_16 | Following device types are supported: Phone channel MOBILE = external mobile number INTERNAL_PHONE = internal phone extension EXTERNAL_PHONE = external phone number JOB_MOBILE OTHER_MOBILE HOME FAX = Fax PRIVATE SMS channel SMS = mobile number for SMS OTHER_SMS= Mobile number for other SMS SECRET_SMS PRIVATE_SMS Email channel JOB_EMAIL OTHER_EMAIL Notification channel APPLICATION = login name for mobile app (has to be unique in system) AC = Alarm Client (PC-Client) MESSENGER = MS Teams Bot Pager Additional for local interfaces IM_XML, IM_DIV, IM_SIP, IM_DECT = messaging interfaces |
Value_01- Value_16 | Internal phone numbers = 3-5 digit phone number External phone numbers = Format is country code, area code, phone number, e.g., +4917661093462. The number has to have between 10 and 15 digits. EMAIL = email address APPLICATION, AC = any unique identifier (e.g., email address) ATAS, eSMS, OMAXI, Ascom OAP = 3-5 digit phone number |
Group_0 | Name of Group - note that group already has to exist in the application. You find information on how to create new groups here. |
ChannelType_0 | Here you can define the device types that shall be used for the person for the respective group. All device types are added within one row. They are separated by "I". To give you an example: MOBILE | INTERNAL_PHONE | EXTERNAL_PHONE | APPLICATION | SMS | EMAIL | FAX | AC | IM_XML |
Import persons (create new)
The following fields are mandatory. If there is no data for them, they have to be filled with dummy data:
Surname | Doe |
First name | - |
Language | de |
Organizational unit | Test organizational unit |
Employee id | 1234 |
pin | 0000 |
In addition, every person has to have at least one device, and max. 16 devices. Each device has to have a valid value (e.g., phone number or email address). Every person can have an unlimited number of groups, but at least one device for each group has to be provided.
The following conditions have to be met for an import to be successful:
- All mandatory information is provided.
- All fields have to be in one row and without any space between entries.
- The csv file must use "," as a separator and UTF-8 coding. (You can use e.g., Notepad ++ to review and change these settings).
Exemplary values - when address from address registry is disabled for your account:
First row
Surname, First name, role, language, organizational unit, Global, Employee id, pin, qualification, Room, Floor, Building, account email, Device_1, Value_1, Device_2, Value_2, Device_3, Value_3, Device_4, Value_4, Device_5, Value_5, Device_6, Value_6, Device_7, Value_7, Device_8, Value_8, Device_9, Value_9, Device_10, Value_10, Device_11, Value_11, Device_12, Value_12, Device_13, Value_13, Device_14, Value_14, Device_15, Value_15, Device_16, Value_16, Group_0, ChannelType_0
Second Row
Mustermann, Max, Team Süd Remote Techniker, de, Testaccount, false, 1234567890, 0815, 3rd Level Support, 123, EG, F24 Hagen, max.mustermann@f24.com, MOBILE, +4917171717171, SMS, +4917171717171, OTHER_SMS, 91760053, EMAIL, max.mustermann@f24.com, APPLICATION, max.mustermann@f24.com, AC, max.mustermann@f24.com, EXTERNAL_PHONE, +492331976420, INTERNAL_PHONE, 420, , , , , , , , , , , , , , , , , , , , , Mustergruppe, EXTERNAL_PHONE|MOBILE|SMS
Structure when address from address registry is enabled
Surname, First name, role, language, Organizational unit, Global, Employee id, pin, qualification, Room, Floor, Building, account email, Assigned address name, Assigned address ID, Assigned room, Assigned floor, Assigned building, Device_1, Value_1, Device_2, Value_2, Device_3, Value_3, Device_4, Value_4, Device_5, Value_5, Device_6, Value_6, Device_7, Value_7, Device_8, Value_8, Device_9, Value_9, Device_10, Value_10, Device_11, Value_11, Device_12, Value_12, Device_13, Value_13, Device_14, Value_14, Device_15, Value_15, Device_16, Value_16, Group_0, ChannelType_0, Group_1, ChannelType_1, Group_2, ChannelType_2, Group_3, ChannelType_3
Overwrite or update existing persons
In order to identify existing persons, their Unique Employee id and organizational unit will be taken into account. If there is a match between imported and existing person, the following fields can be overwritten or remain empty. If they are empty, the original value will remain stored:
- Surname
- First name
- Language
- PIN
If group and channel type are imported, they will be added to the list already stored. To give an example: If the person is currently assigned to two groups, and only one group is existant in the csv-import, it will be added. So then the person is assigned to three groups.
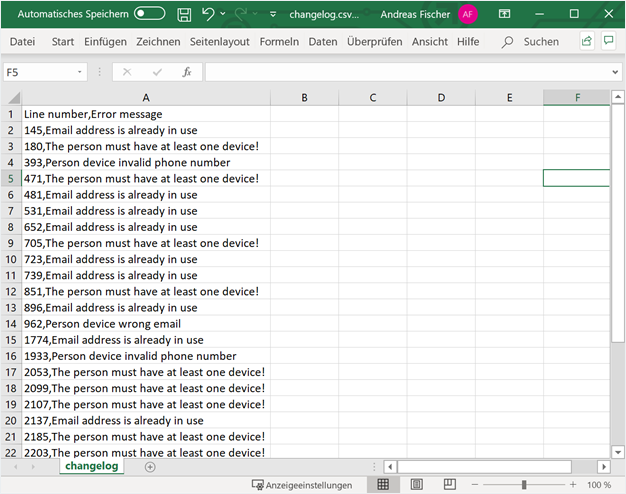
Import Summary via email
You will receive a summary of the import via email. If an error occured, you will receive a detailed report as csv-attachment called "changelog.csv". It contains all row numbers with an error and the according error message.
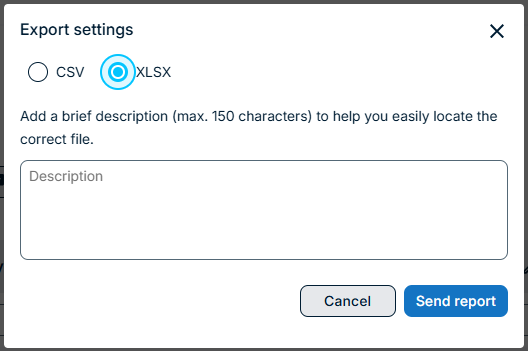
Export and import via xlsx
Wherever CSV export (and import) is available, XLSX export (and import) is also supported.
The structure of the data in the Excel file is identical to that of the CSV file.