Table of Contents
Admin workspace
In the Admin Workspace you will find the Incident Overview administration where you as an Administrator can define different attributes for the users of CIM Essential.
Incident type
Select the Incident type tab.
In the list you can view the elements registered as incident types that have been created so far. Each row contains Name, Description and whether the Incident type is Active or not.
Click ( New ) to create an Incident type. Fill out the following elements:
- Active Checkbox – Click to select the checkbox and activate the incident type, or click it to reset and deactivate the incident type.
- Name – Shows the name of the incident type. The text can be edited.
- Description – Shows a short description of the incident type. The text can be edited.
To change and/or deactivate an incident type, go to the list view and press for the incident type you want to change. Click the Active checkbox to deactivate. Change name and description in the free text-fields.
Incident potential
In the list you can view the incident potentials that have been created so far. Each row contains Name, Description and whether the Incident potential is Active or not.
Click ( New ) to create an Incident potential. Fill out the following elements:
- Active Checkbox – Click to select the checkbox and activate the incident type, or click it to reset and deactivate the incident potential.
- Name – Shows the name of the incident potential. The text can be edited.
- Description – Shows a short description of the incident potential. The text can be edited.
- Set icon – Click to select or edit the icon shown in the List view together with the name of the incident potential. If an icon has already been selected, it is displayed next to this button.
NB: Remember to sort the incident potentials from low to high.
The ordering of elements on the Incident type and Incident potential lists determines the order in which incident types and incident potentials are displayed in the selection controls in the dialog box for registering or editing incidents.
The ordering of incident potentials is particularly important when you work with action cards for incidents. The actions in an action card are created with incident potentials in mind, so that each action will only be available when the incident reaches a certain potential. Actions created for a low potential are also available for higher potentials/severities, but not vice versa.
The higher up a potential is displayed in the Incident potential panel, the lower this potential is with regard to severity.
If an incident potential is deactivated, the actions that were created for that incident potential will become available for any incident potential.
Incident workspace links
Add ( external links or edit ( existing links. These will be shown in the Incident workspace for all new incidents registered. Users can also add their own links in their own Incident workspace.
Position
When you manage your Crisis Mangement team in the Incident Workspace, you can assign positions to different users. To define the positions go to the Incident Overview in the Admin Workspace, and the tab Position.
To add a Position: Write a name in the free text-field and click OK to save it. The new element will appear at the bottom of the list.
To edit a Position:
- In the Phase tab, on the row that shows the positions name, click and then Edit . In editing mode the field has a yellow background color, and the Cancel button is shown next to the OK button.
- Edit the text.
- Click OK to save the changes and leave edit mode.
Resources
Define the types, statuses and attributes for resources. Users will add resources on the Incident detail workspace based on this settings.
- To add a new type of resource write the name and click OK
- Define Statuses and the color. Default statuses are Standby, Available, Under way, In operation and Released. Click in the upper right corner to add a new status.
- Define the Fields that the user can fill out. These are the defaults, which can be edited in the free text field to suit your needs:
- Name
- Type
- Quantity
- Assignment
- Contact
- Status
- From
- To
- ETD (Estimated time of departure)
- ATD (Actual time of departure)
- ETA (Estimated time of arrival)
- ATA (Actual time of arrival)
- Comment
Stakeholders
Define the Statuses and the Fields for the stakeholder information. These settings will be applied to the form where users register stakeholders in the Incident overview.
Levels
Define what roles and teams can see of each others information.
- Customise names: The system has three levels by default - Strategic, Tactical and Operational. Change the names in the free text fields. The customized level names will be displayed in the CIM interface as:
- Form controls for assigning level to elements.
- All places where the level of an element is displayed (e.g. action cards, list view and details for Running log and Situation Reports).
NB! This will not affect menu names.
- Access control: Customize the access to information, based on the level of the current user and the level set on content items. For example:
- Members of the Strategic team (=users with roles allocated to the Strategic level) will have access to content items (log, reports, action cards, etc.) that belong to the Strategic level.
- Members of the Tactical team (=users with roles allocated to the Tactical level) will have access to content items (log, reports, action cards, etc.) that belong to the Strategic, Tactical and Operational level.
- Members of the Operational team (=users with roles allocated to the Operational level) will have access to content items (log, reports, action cards, etc.) that belong to the Operational level.
- Allocated roles: To access content tagged with a level, a user has to have a role associated with that level. The Crisis Management role is allocated to the Tactical team. This means that the CIM Crisis Management role will be able to see level-related content as assigned in the Access Control table for levels. If the user has a role allocated to a level, this level will be preselected when the user creates content (log items, reports, messages). Drag and drop the boxes to the wanted role(s).
Focus priority
The Focus priority values will be shown in the Focus areas management window which is accessed from the Incident details window. This allows you to define different priorities for the desired focus areas.
Select the Focus priority tab in the Incidents administration window.
To add a focus priority: Write a name in the free text-field and click OK to save it. The new element will appear at the bottom of the list.
To edit a focus prority:
- In the Phase tab, on the row that shows the focus priority name, click and then Edit . In editing mode the field has a yellow background color, and the Cancel button is shown next to the OK button.
- Edit the text.
- Click OK to save the changes and leave edit mode.
Phase
Select the Phase tab in the Incidents administration window.
To add a phase: In the Phase tab, in the field Phase, write a phase name and click OK to save it. The new element will appear at the bottom of the list.
To edit a phase:
- In the Phase tab, on the row that shows the phase name, click and then Edit . In editing mode the field has a yellow background color, and the Cancel button is shown next to the OK button.
- In the Phase field, edit the text.
- Click OK to save the changes and leave edit mode.
When registering or editing an incident, the available phases are displayed in the incident dialog box in the same order as in the Phase tab. You can change the order by sorting the list in the Phase tab by clicking Sort . Click and drag to move the element up or down. Click OK to save.
Task
Define the text used to message users responsible for tasks. Use merge codes to decide what kind of information you want included in the message. Click Merge code to view a dropdown list of the available codes:
- Source
- Assigned by
- Subject
- Description
- Responsible
- Deadline
- Priority
- Link to task
Log templates
Create log templates that users can access through the running log board or the Incident workspace when adding new log items.
- Click New to add a new template to the list.
- Fill out the name for the template and the subject. Add a description in the simple editor.
- Click OK to save and leave.
In the list view you can see the Name, Subject and when the template was created. Go to to edit or delete the template.
Log export
Define the Header and Footer for the exports of logs. Set as default if you want this on all exports.
Date and time
Set the time zone, date format and time format for the system. Check the box for Show UTC clock on status line to permanently show the time and date.
Categorization Options
Messages, tasks and persons of concern can now be categorized in the admin area. This enables better segmentation of data and properties. E.g. an airline can now say whether the persons of concern (persons in an aircraft) are passengers, flight crew or cabin crew.
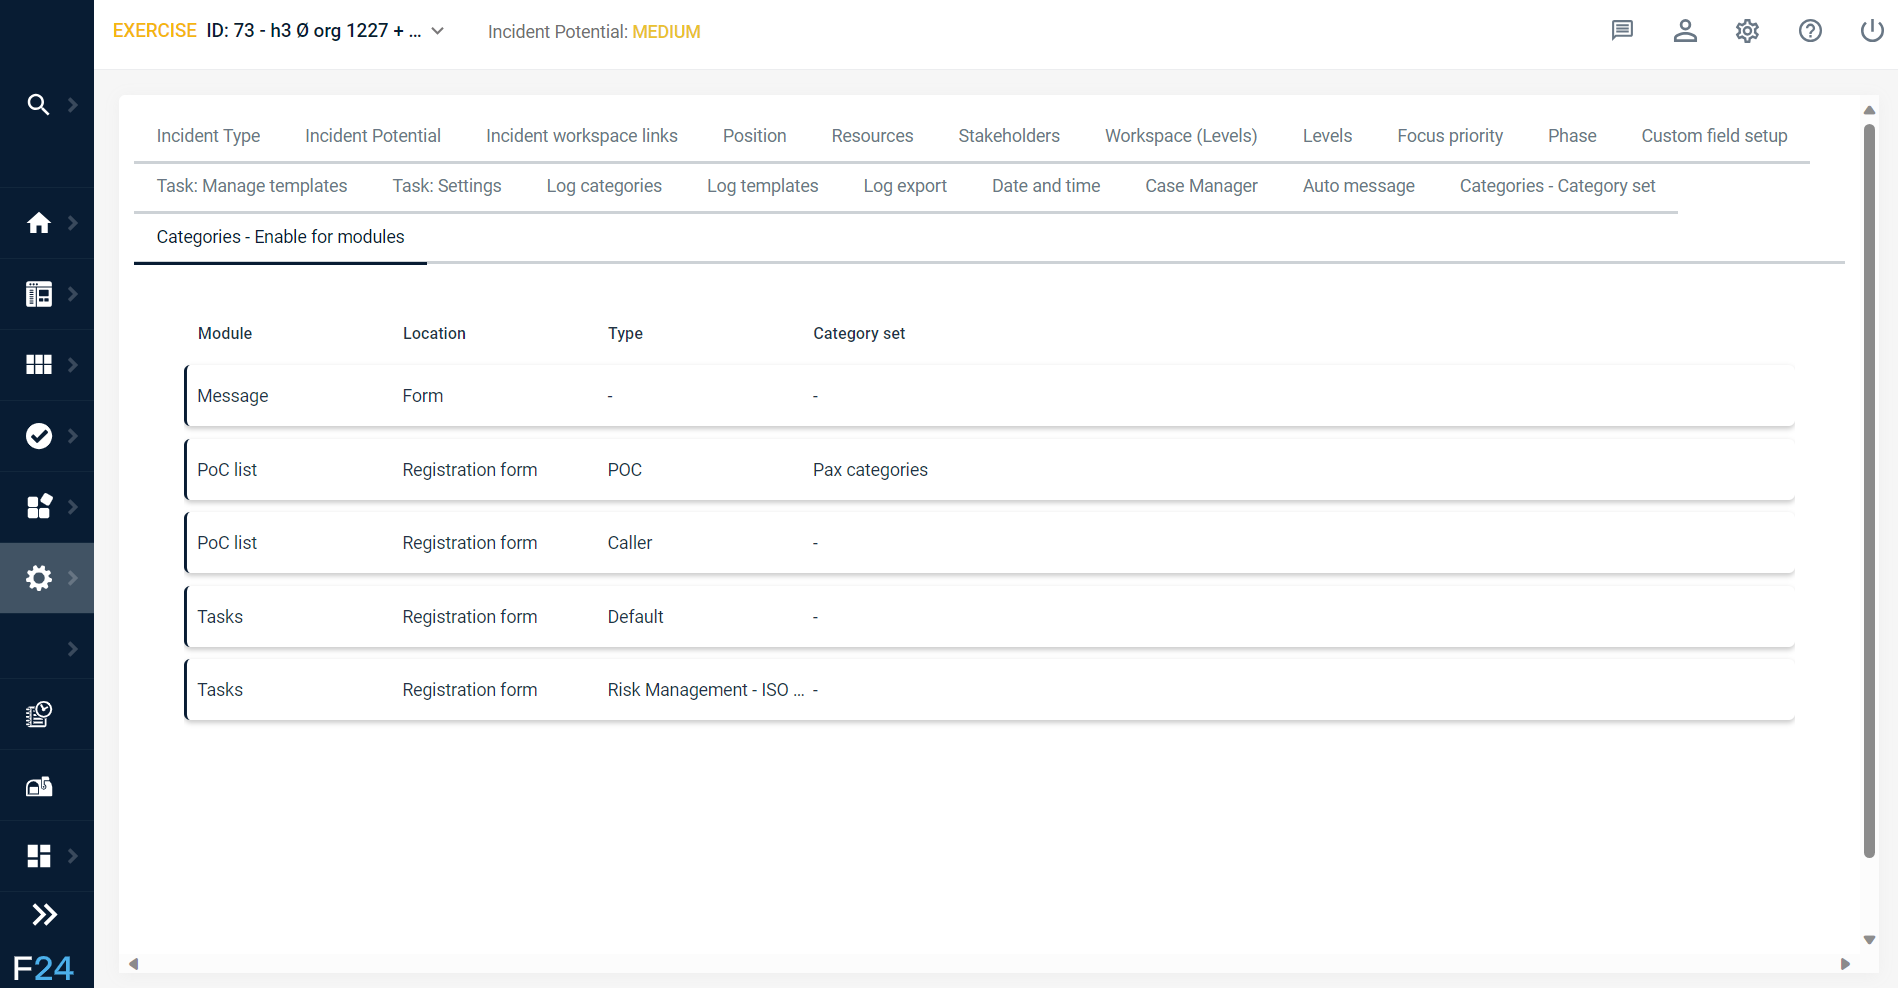
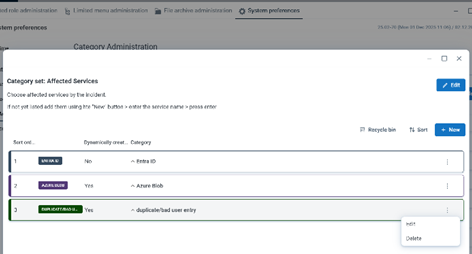
Dynamic values in Categories
As administrator you can also create categories with dynamic values in the Admin Workspace. This allows users to add values to a category list.
This may be useful for categories where you do not yet know all possible values but want to filter or sort by such values later.
As admin you can also specify whether such user created values are shared within one incident or across all.
- Create Category and decide "dynamic" behaviour with toggles
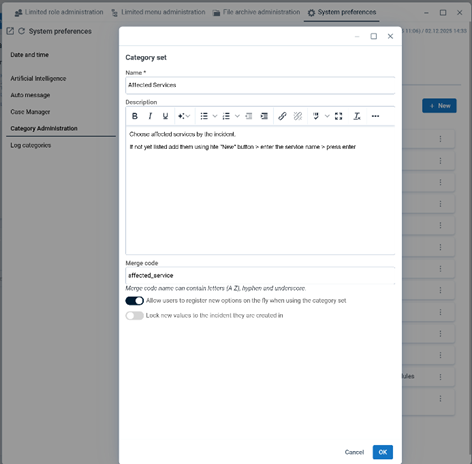
- Add initial values as admin

- Decide in where to show the category field, e.g. running log form

FACT24 CIM Admins can then maintain and clean user created values.
Users will find all existing values when using the field and drop down. If the required value is not present they can now add it to the list to be available for other users or future entries, such as situation updates:
- User: Value not found

- User: Add value - Saved when saving log entry
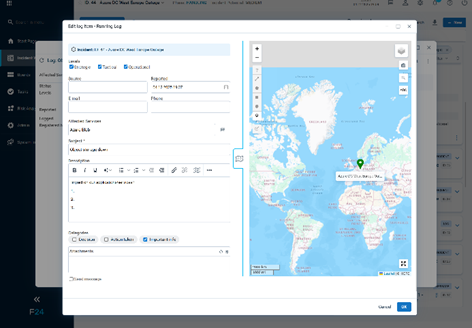
- Next user sees added value
