FACT24 ENS+
Release Notes
Portal Version 3.29
Portal Version 3.28
Portal Version 3.27
Portal Version 3.26
Portal Version 3.25
Portal Version 3.24
Portal Version 3.23
Portal Version 3.22
Portal Version 3.21
Portal Version 3.20
Portal Version 3.19
Portal Version 3.18
Portal Version 3.17
Portal Version 3.16
Portal Version 3.15
Portal Version 3.14
Portal Version 3.13
Portal Version 3.12
Portal Version 3.11
Portal Version 3.10
Portal Version 3.9
Portal Version 3.8
Portal Version 3.7
Portal Version 3.6
Portal Version 3.5
Portal Version 3.4
Portal Version 3.3
Portal Version 3.0
Portal Version 3.2
Getting started
Setup
Managing ENS+ users
Creating your organizational structure
Caller IDs
Address registry
Categories
Dictionary
File manager
Download Center
Your Account
Two-factor authentication (2FA)
Configuration
Persons & Groups
Alarm configuration
Alarms
Launch Forms - Configuration
Message templates
Calendar
Location profiles
Geolocation profiles
Whitelists
Jobs
Events
Telephone quickstarts
Survey
Alarm Templates
Alarm Flow
Interfaces
Operating Cockpit
Alarm Cockpit
Activate and stop alarm
Launch Forms - Trigger
Ad hoc alarm
Alarm monitor
Chat
Phone Conference
Video Conference
Surveys
Reports & Statistics
Loneworking
FACT24 Mediagateway
Microsoft Teams Bot
Web login for persons
Add-on modules
FACT24 ENS+ Incident Management
Telekom Settings Cloud of Things Narrow Band Interface
FACT24 ENS+ External API (REST) – Functionality Scope
FACT24 AI
Migration to ENS+
FACT24 CIM
Release Notes
New functions through FACT24 CIM release V.27.01
New functions through FACT24 CIM release V.26.01
New functions through FACT24 CIM release V.25.03
New functions through FACT24 CIM release V.25.02.01
New functions through FACT24 CIM release V.25.02
New functions through FACT24 CIM release V.25.01
New functions through FACT24 CIM release V.24.03
New functions through FACT24 CIM release V.24.02
New functions through FACT24 CIM release V.24.01
New functions through FACT24 CIM release V.23.02
New functions through FACT24 CIM release V.23.01
Getting started
FACT24 CIM starter - crucial steps
FACT24 CIM essential
FACT24 CIM advanced
Introduction
Start Page
Admin workspace
The FACT24 CIM Roles
Navigation
Search
Levels
Contacts
Locations
Working with incidents and alarms
Tasks and Action Cards
Chat (previously Case Manager)
Task Manager
Action Cards
Functions of Action Cards
Pre-defined Action Cards
Logs
Reports and Statistics
Templates
Risk Analysis
Mobile App (FACT24 ENS+ and CIM)
App Releases
App-Version 3.28
App Version 3.26
App Version 3.24
App Version 3.22
App Version 3.21
App Version 3.20
App Version 3.17
App Version 3.16
App Version 3.15
App Version 3.13
App Version 3.12
App Version 3.10
App Version 3.9
App Version 3.8
App Version 3.7
App Version 3.5
App Version 3.3
App Version 3.2
Download & Basics
FACT24 ENS+ App Section
Basics and Login
General Settings
Account
Location Services
Group Management
Triggering Alarms
Editing Alarms
Active Alarms
Chat in the ENS+ Application
History
Reports
Emergency Plans
Lone Worker Protection
Special Smartphones
FACT24 CIM App Section
Support
Table of Contents
- Risk Analysis (RISK ISO 31000)
- With the Risk Analysis module users can:
- Create templates for standardized risk assessments
- Add title, description, and location to each analysis
- Define context
- Structure and visualize risks digitally for better clarity
- Identify causes and assign preventive measures
- Define consequences with corresponding limiting measures
- Generate a risk matrix to quickly assess likelihood and consequences:
- Assign tasks directly to team members and designate task owners
- Track task progress to ensure timely completion
- Export of Risk Analysis
- With the Risk Analysis module users can:
- All Categories
- FACT24 CIM
- Risk Analysis
Risk Analysis

- Risk Analysis (RISK ISO 31000)
- With the Risk Analysis module users can:
- Create templates for standardized risk assessments
- Add title, description, and location to each analysis
- Define context
- Structure and visualize risks digitally for better clarity
- Identify causes and assign preventive measures
- Define consequences with corresponding limiting measures
- Generate a risk matrix to quickly assess likelihood and consequences:
- Assign tasks directly to team members and designate task owners
- Track task progress to ensure timely completion
- Export of Risk Analysis
- With the Risk Analysis module users can:
Risk Analysis (RISK ISO 31000)
You can access the risk analysis via the item in the navigation bar:

The Risk Analysis in FACT24 provides a comprehensive and structured approach to identifying and managing risks efficiently.
With the Risk Analysis module users can:
Create templates for standardized risk assessments
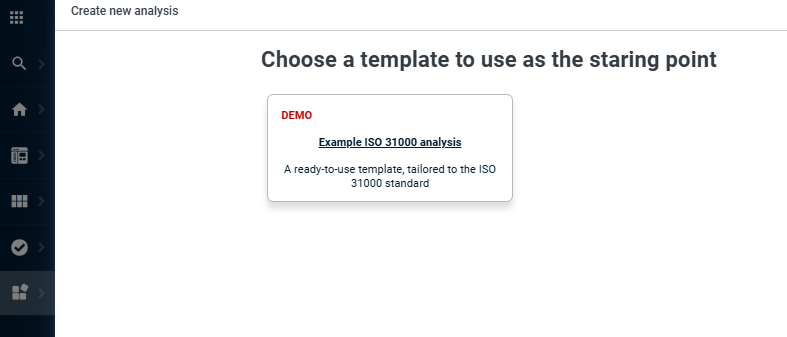
The module is based on templates that the admins can create.
If you then go to +New, you can select an existing template and don't always have to start from scratch.
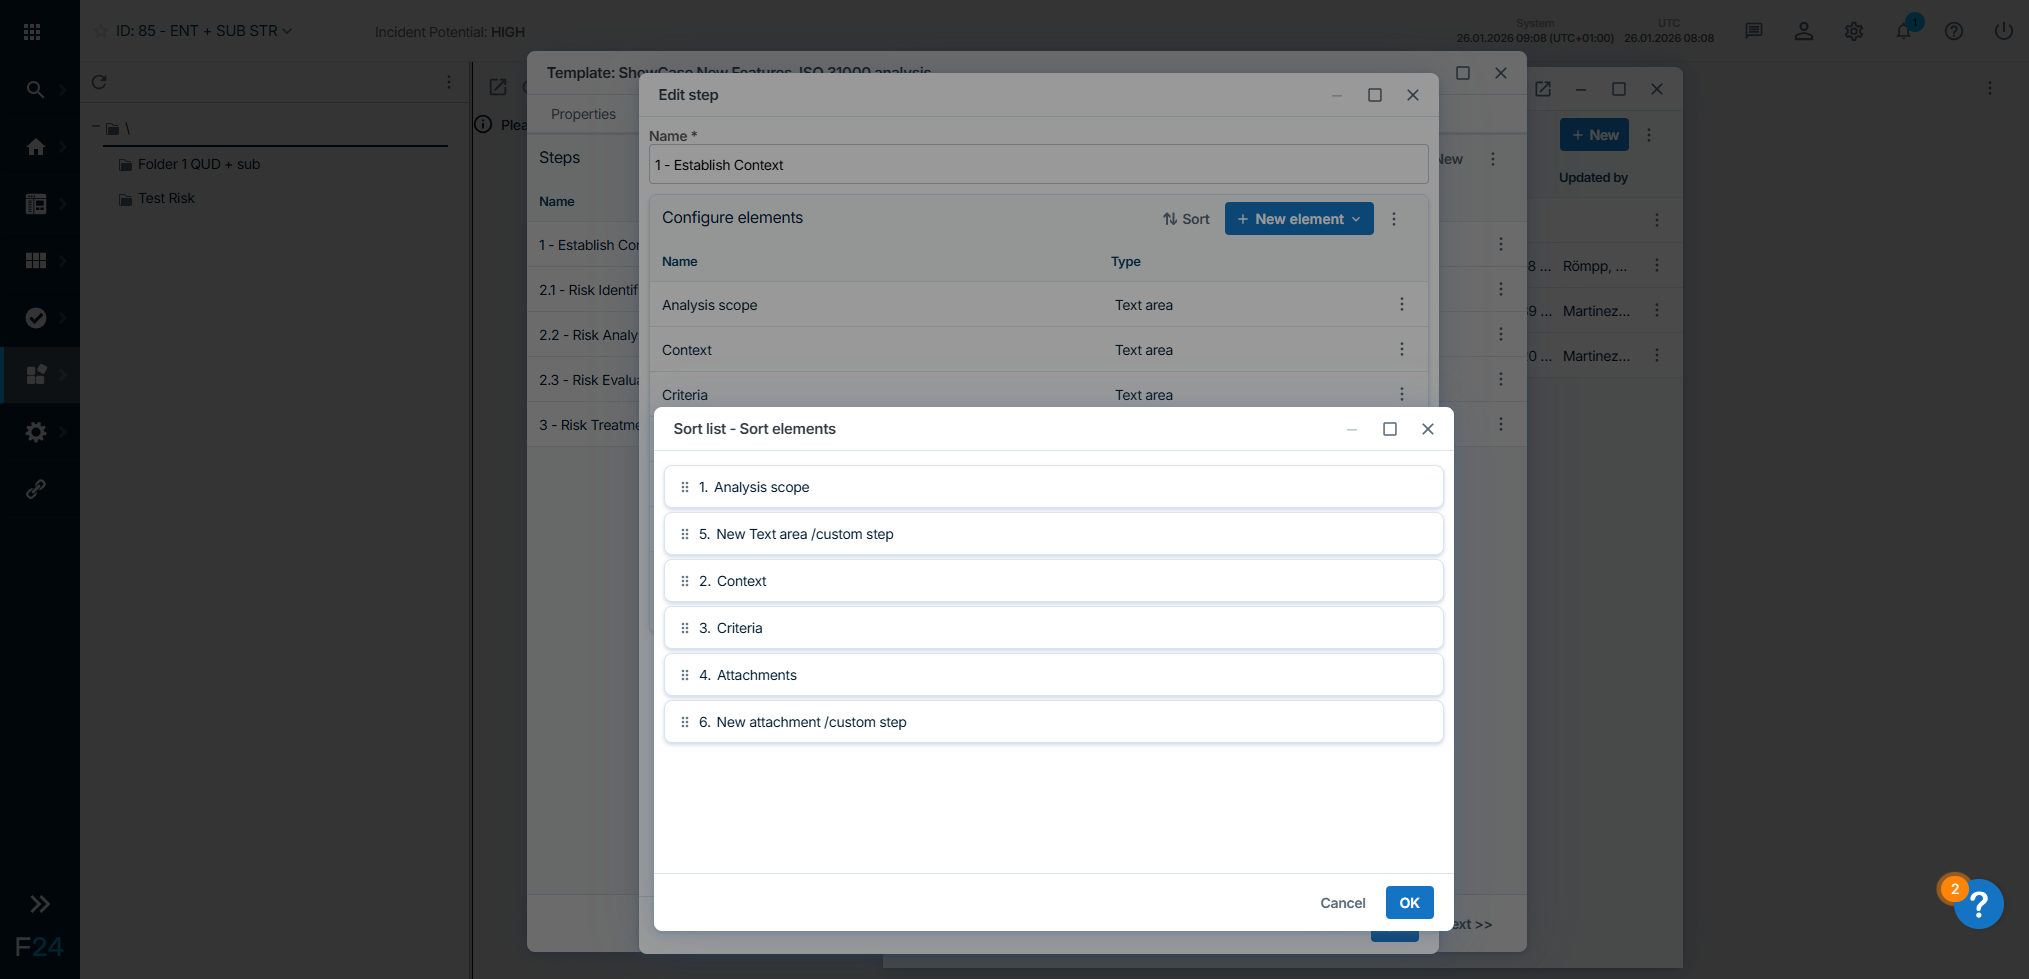
CIM administrators can further customise the templates by:
- Renaming step 1 (ISO: establishing context)

- Adding custom steps to step 1
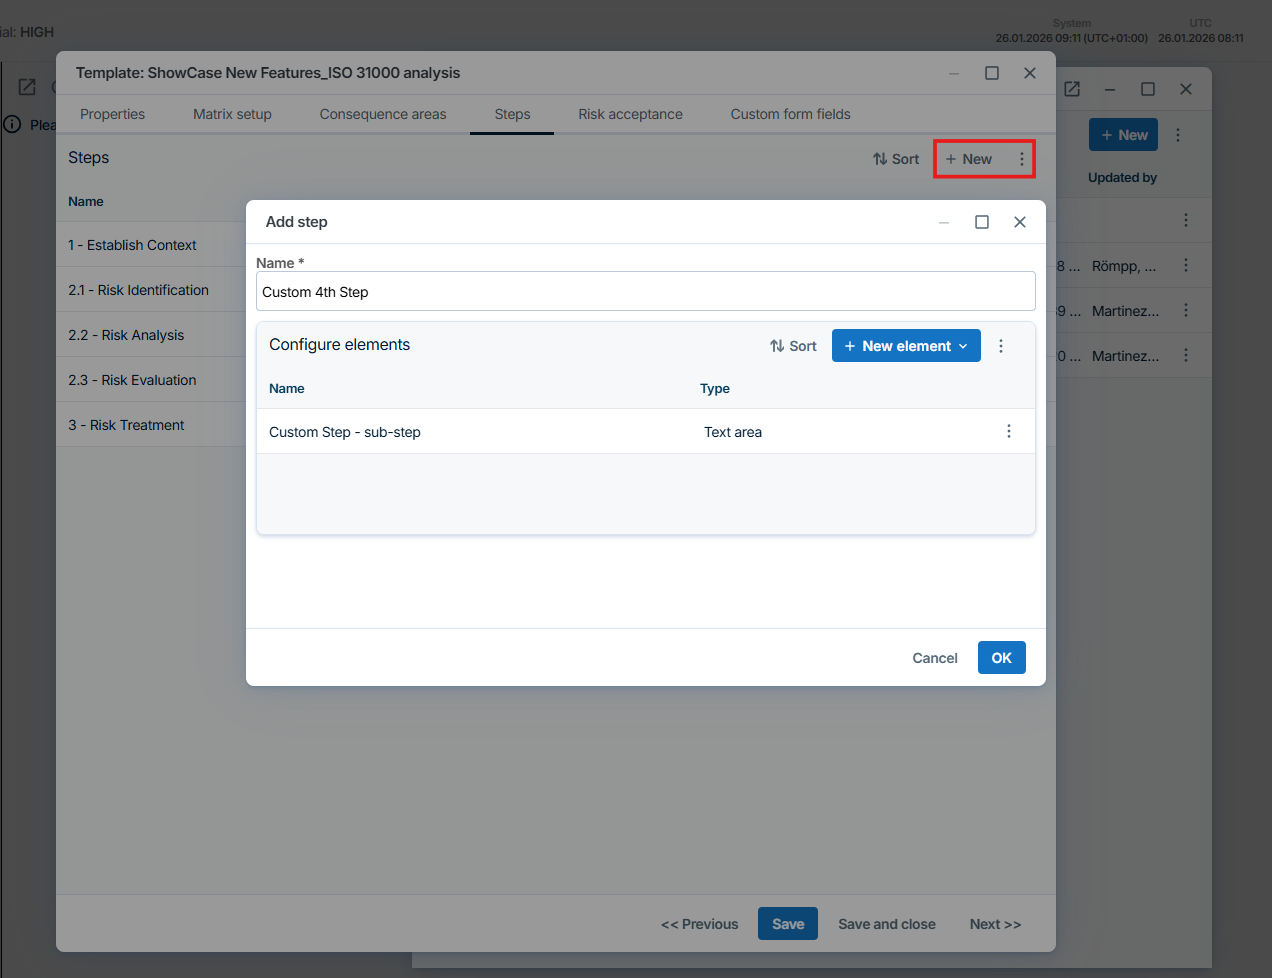
- Creating custom steps with custom content

- Reordering custom steps as needed
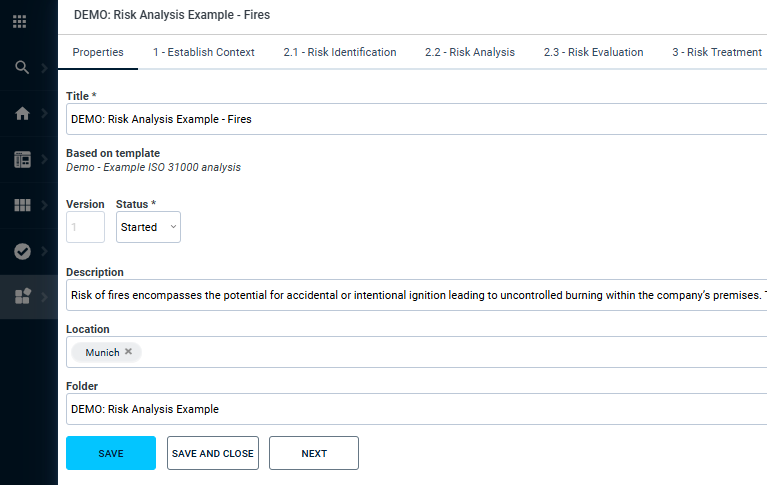
Add title, description, and location to each analysis
If you then create a new risk analysis or edit an existing one, you can create various properties for the risk, such as a title, the version, a description and a location to ensure that it can be displayed for the right stakeholders.
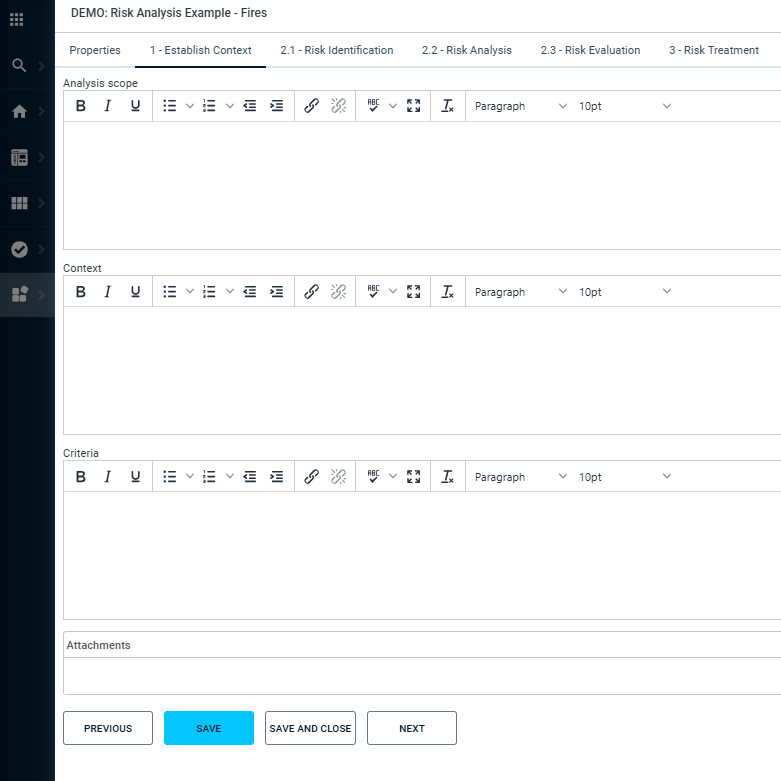
Define context
In the next tab under Establish Context you can enter a text for the scope, context, various criteria and also attach documents such as a site plan, to-do lists, etc.
Structure and visualize risks digitally for better clarity
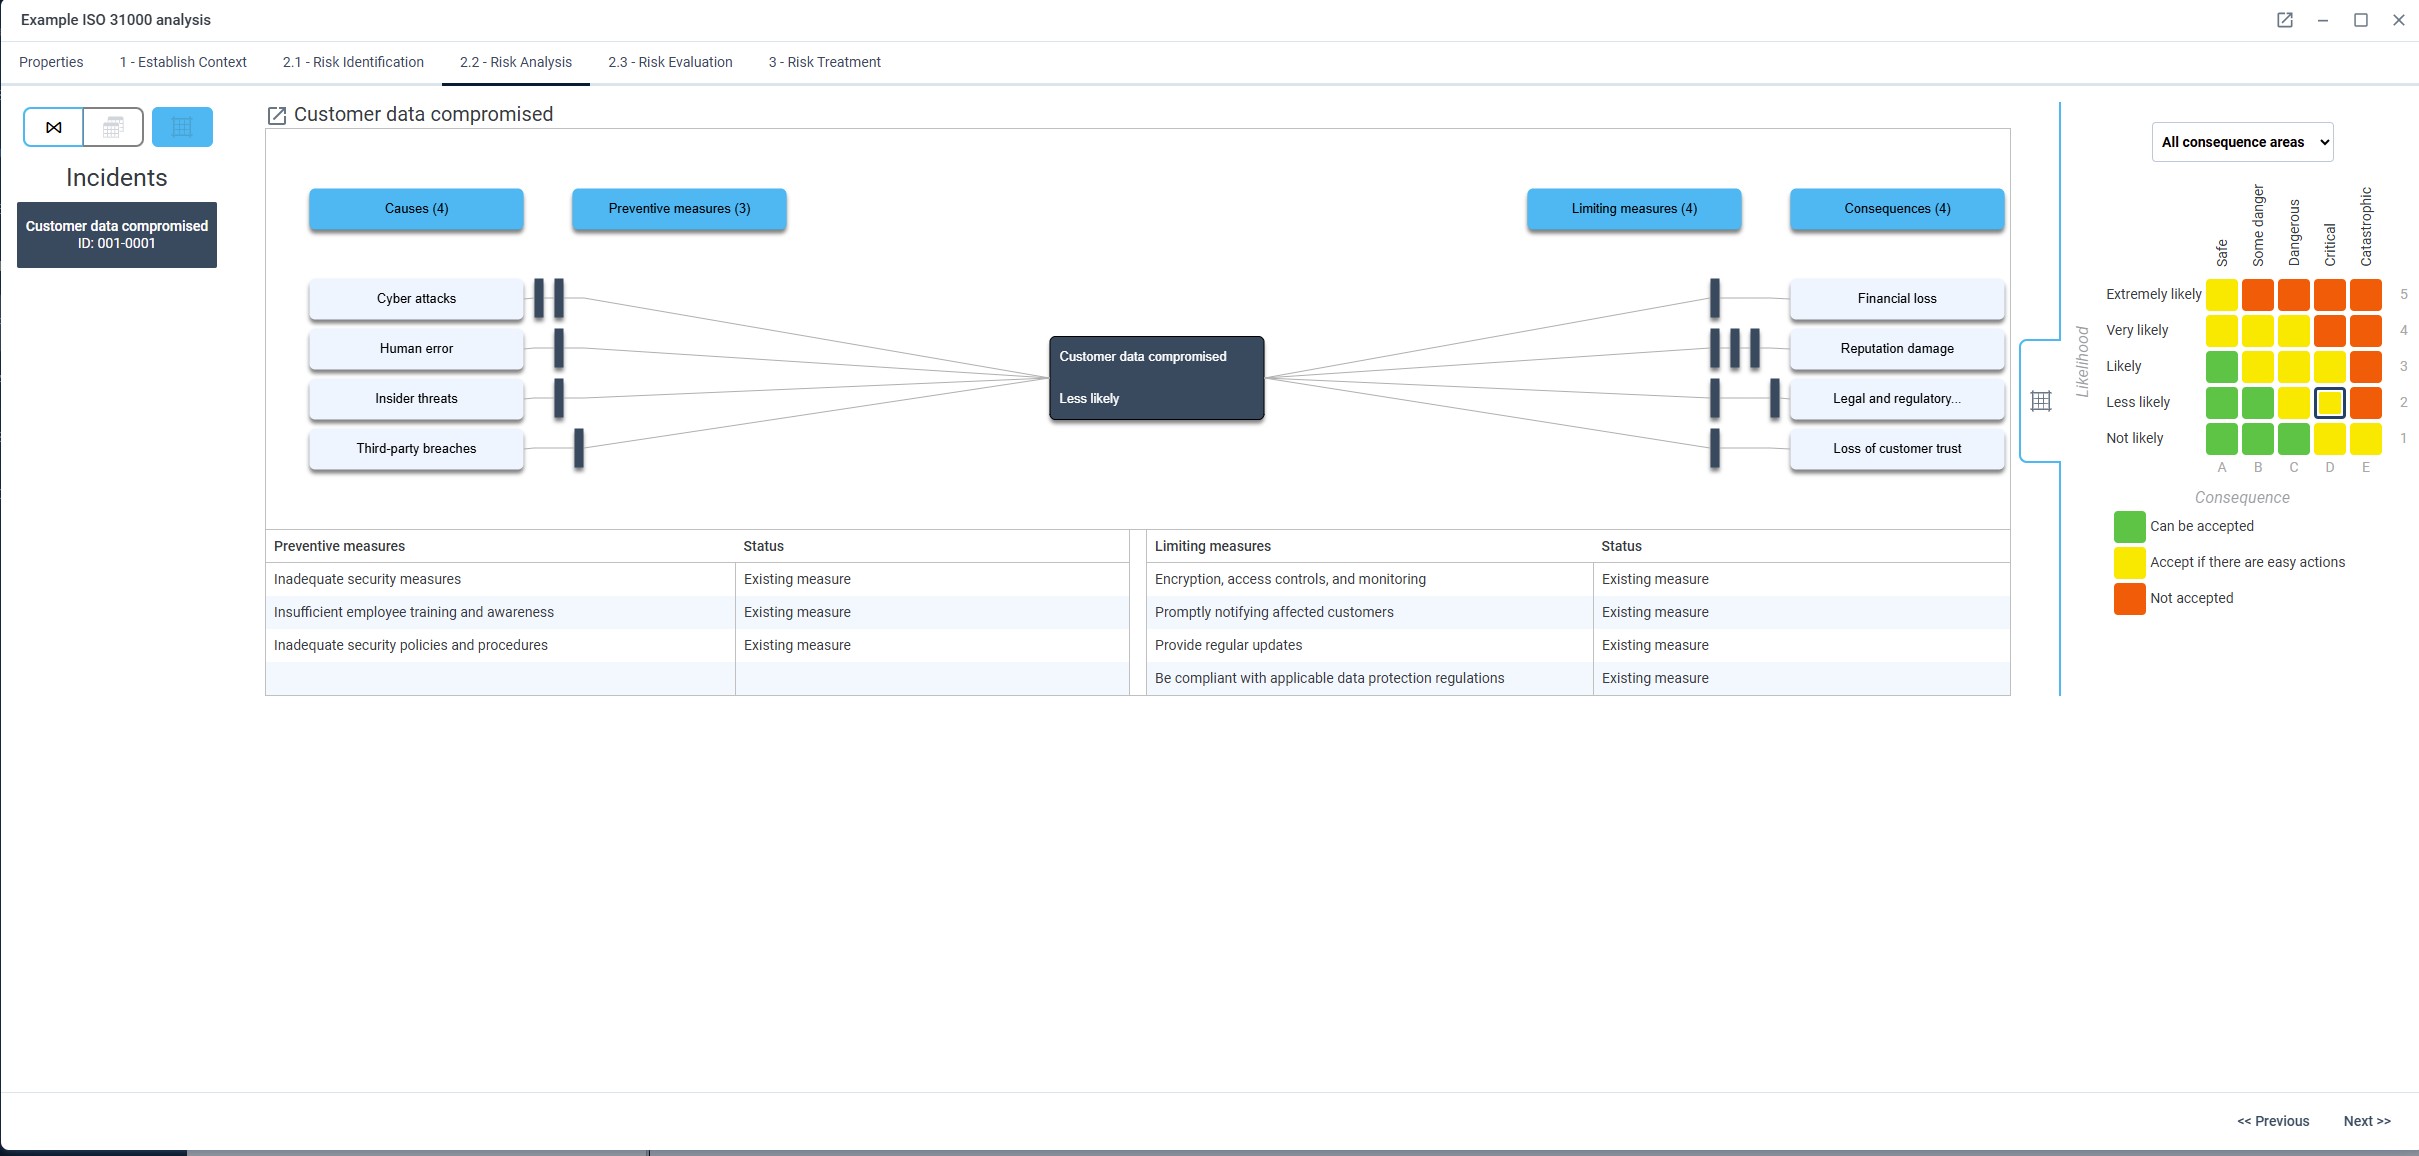
The next tab deals with risk identification. You can create various incidents here. By clicking on the pencil of an incident, you can enter the title, description and a probability of how likely it is that this incident will occur with the existing measures. In the Risk Analysis tab, you will then find your created incidents on the left-hand side.
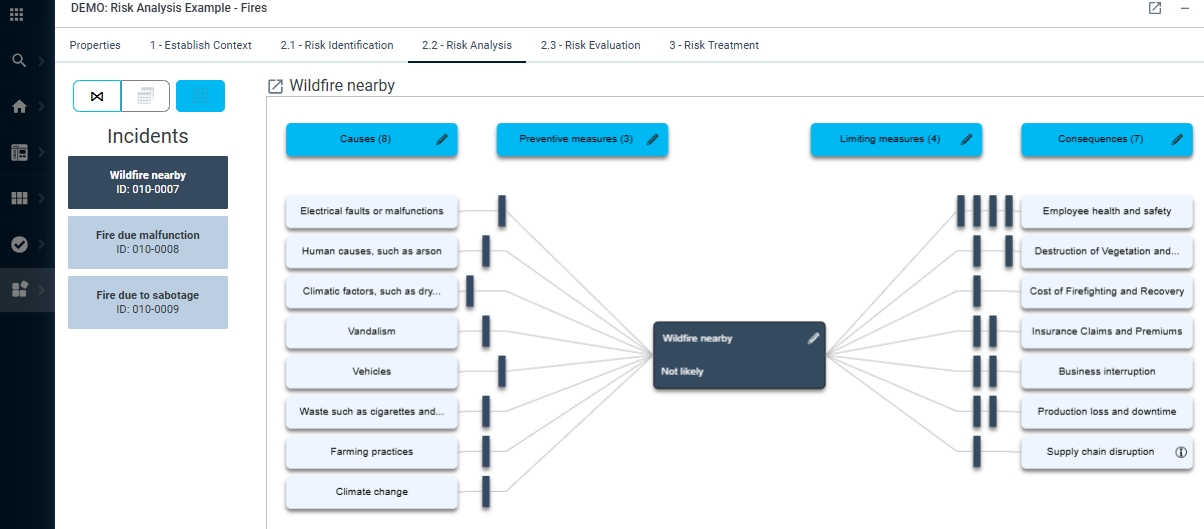
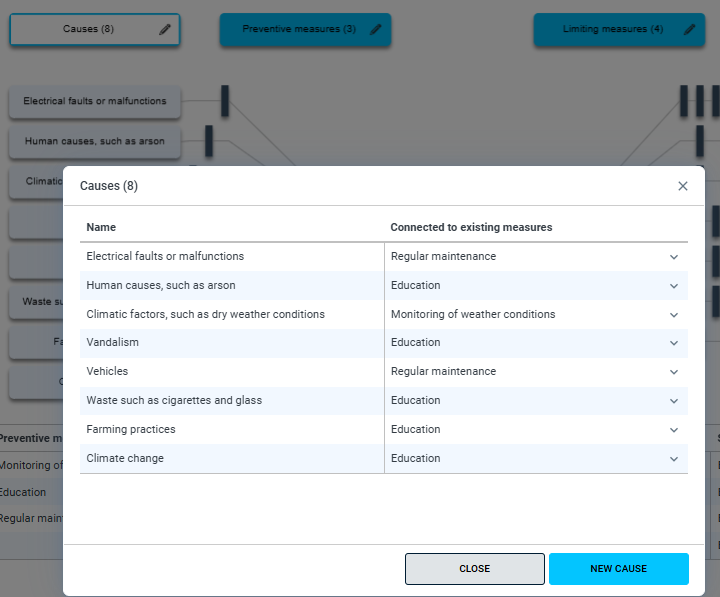
Identify causes and assign preventive measures
Here, you can prepare various causes for the incident and link them to different preventive measures. Additionally, you can directly assign owners to the measures, so that each task has a designated point of contact.
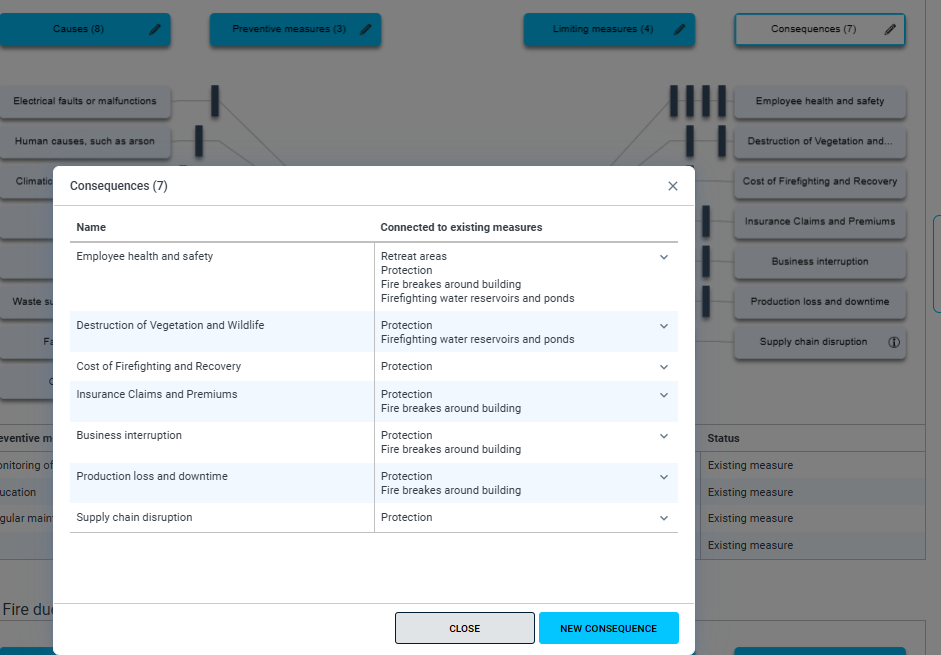
Define consequences with corresponding limiting measures
You can also prepare the consequences of the incident on the right-hand side. These consequences can then be linked to various containment measures, and you can also directly assign owners to those measures.
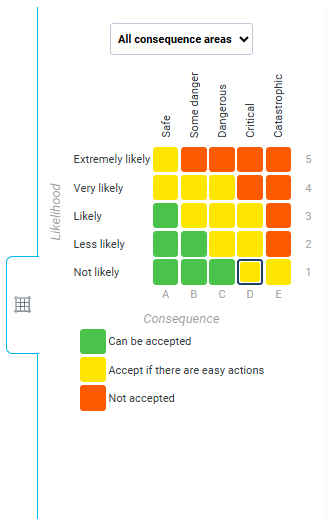
Generate a risk matrix to quickly assess likelihood and consequences:
In the center, you always see the incident along with its probability of occurrence. If you click on the matrix icon on the right, you can visually see - through the use of colors - how likely all or individual consequence areas are (using the dropdown "All Consequence Areas") and how severe the impacts are.
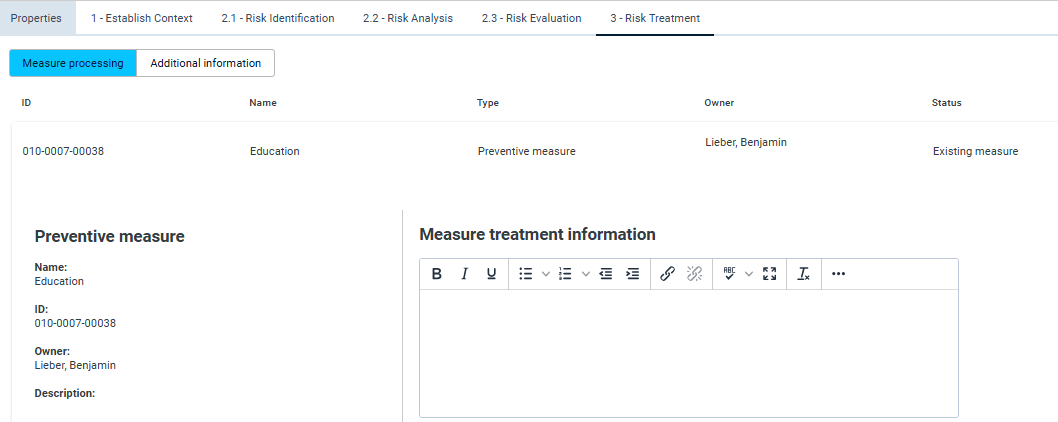
Assign tasks directly to team members and designate task owners
The Risk Treatment tab is essentially about summarizing all the information from the previous two sections. Here, you have both the preventive and containment measures, and you can also select any of these measures to create tasks (by clicking the "+ Task" button)and assign them to individuals.
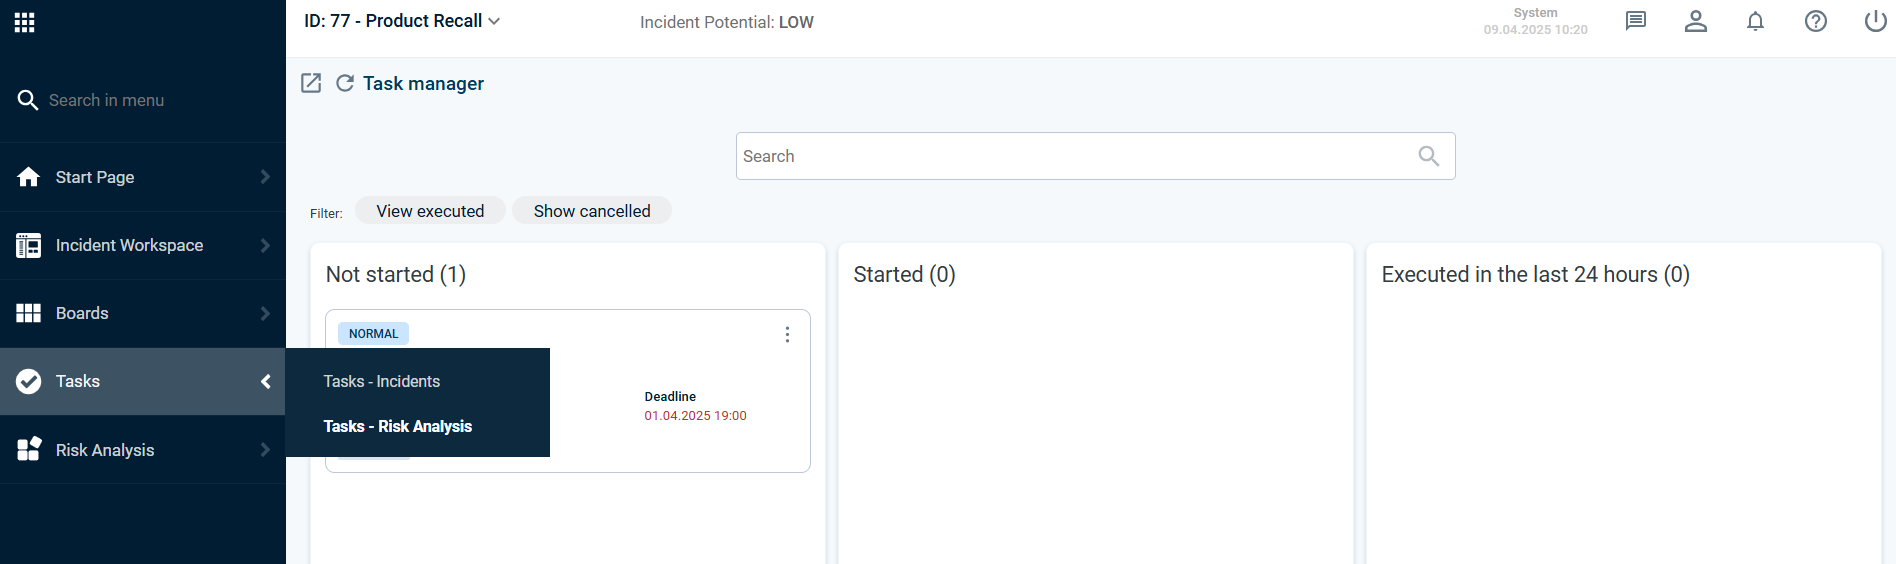
Track task progress to ensure timely completion
Here you can also check whether the tasks have already been started, are still pending, or have been completed.
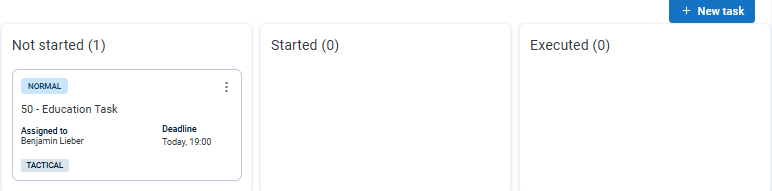
The tasks will then also appear in the navigation under Tasks - Risk analysis, where you can also track the status.
Export of Risk Analysis
It is possible to choose which parts of the analysis should be included in the export and in what order they should appear. Custom steps are also included, providing increased flexibility when using the module.
