Please note that some of these settings are dependent on your product edition and may therefore not be available for you.
Note: Due to releases, there may have been changes in the tool that are not yet shown in the video. (Video version: Q3/2023)
Clickhereto watch the video guide on how to set up an alarm.
Within an alarm, the entire scenario of an alarming or information process is mapped.
Please note the following general information about an alarm:
→ Many alarm groups can be assigned to an alarm.
→ Each alarm is assigned to a organizational unit.
→ For alarms of the root organizational unit (top organizational unit of the hierarchy) groups from all organizational units can be assigned.
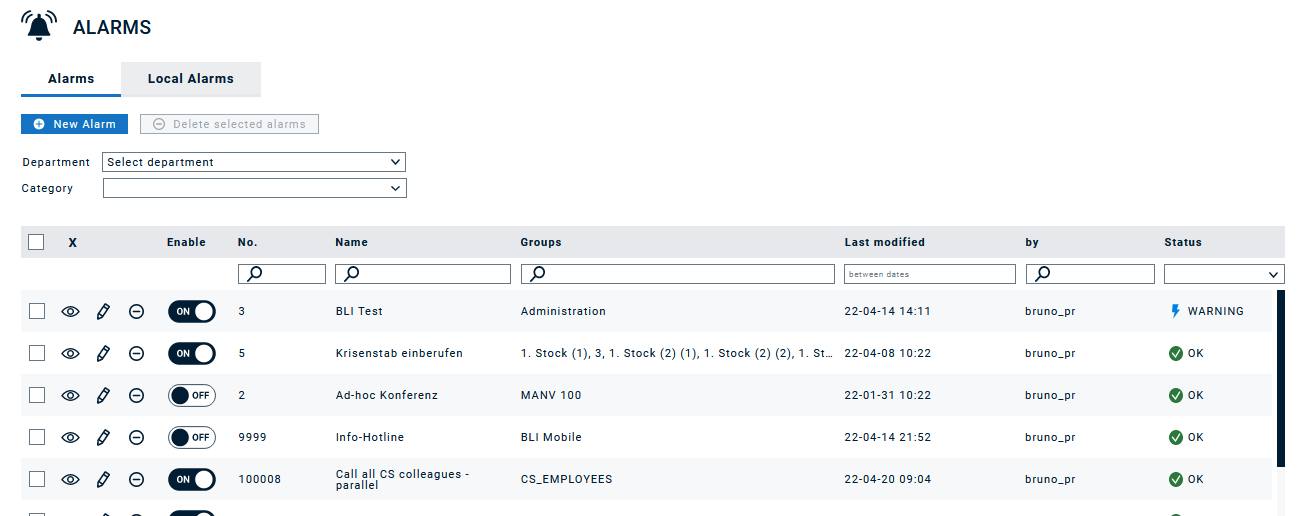
The overview shows a list of all configured alarms. On the left side you can either read an alarm, modify it with the pen button or delete it with the delete button. Furthermore, it is shown when and by whom the alarm was last changed.
The status indicates whether the configuration is «OK». If, for example, no alarm message was configured, an error is displayed. In case of missing groups or overlapping alarm parameters (e.g., bell duration is longer than response time for acknowledgement) a warning is signaled.
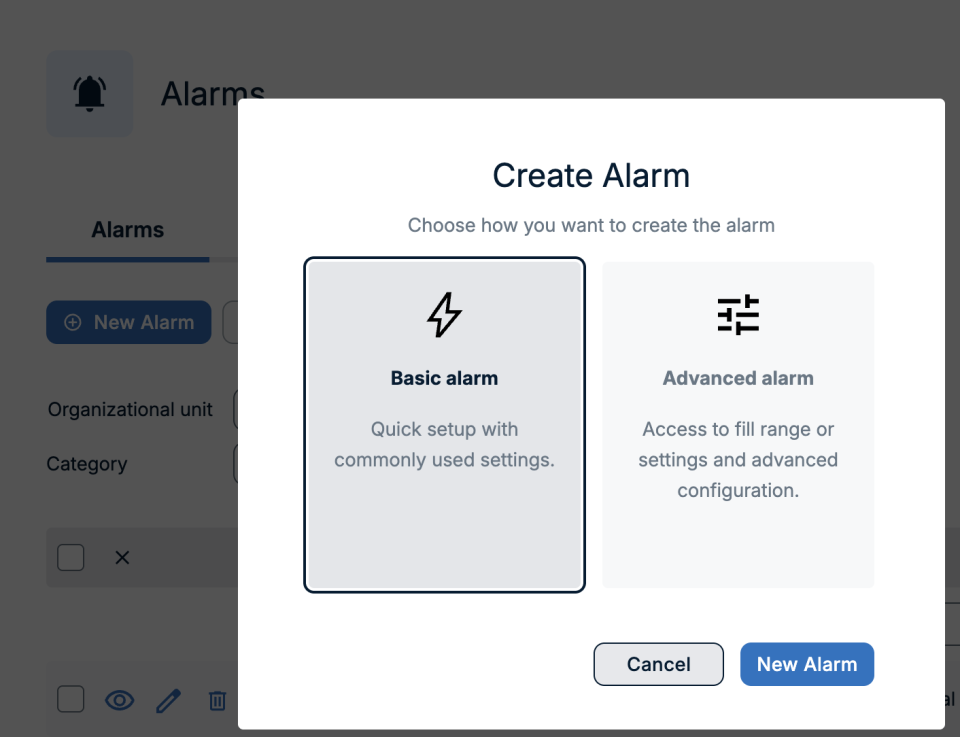
If you click on "New alarm", you will be able to configure a new alarm along five steps, which will be explained in more detail in the following.
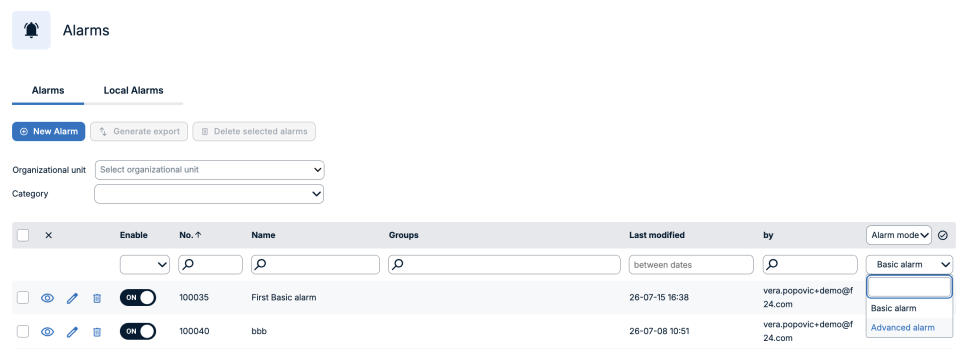
Basic and Advanced Alarms
FACT24 ENS+ now offers two ways in which an alarm can be configured: Basic alarm and Advanced alarm.
Basic and Advanced alarms can be filtered in the alarm overview table. The user should click on the “Pen” and change the “Status” of the alarm into “Alarm mode”. Then the user can filter to Basic alarm or to Advanced alarm.
Basic Alarm
Basic alarm creation is designed for users who create alarms only occasionally and need a simple, straightforward process.
The new step-by-step Alarm configuration setup focuses on the most important and commonly used settings.
The basic alarm will be stored in the Alarm Cockpit and can be launched as any other pre-configured alarm.
It can also be monitored in the alarm monitor, and reports can de downloaded.
The main difference between an ad hoc alarm and a basic alarm is that the ad hoc alarm is not saved in the Alarm Cockpit and the user has to enter all fields manually each time. The basic alarm is stored in the Alarm Cockpit, thus saving users time if they want to be better prepared in a crisis situation.
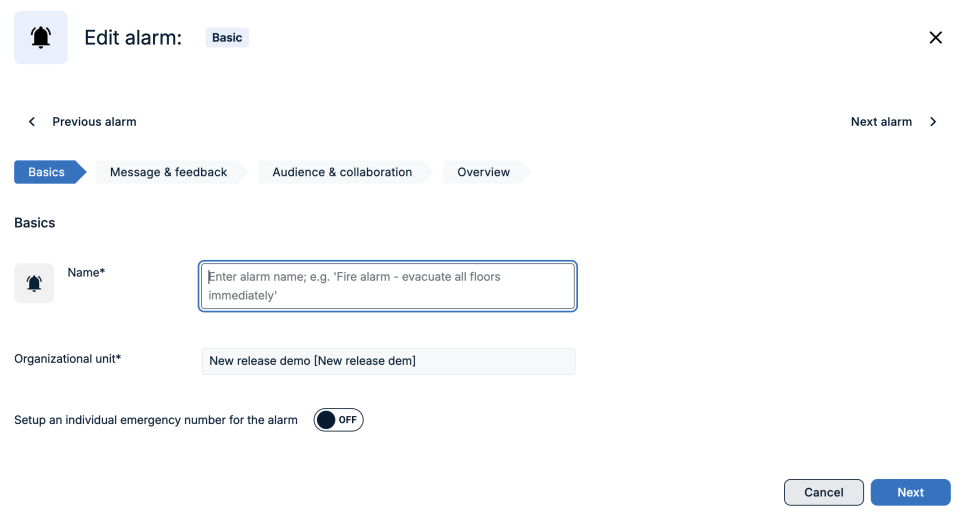
How to setup a basic alarm?
Click on New Alarm
Go to Alarm configuration and click on the “New Alarm” button and select Basic alarm.
Enter an alarm name
Without an alarm name you cannot create an alarm and proceed further.
Click on “Next” so that your basic alarm is saved and you will be guided into the next step of alarm creation
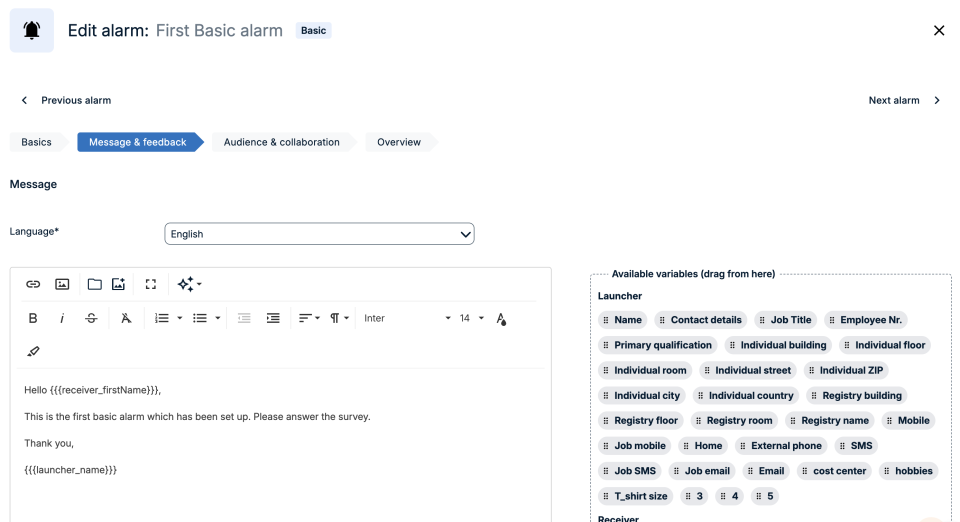
Add a message
Next step in the alarm creation is writing the message that you would like to send.
In this step you can also attach important documents which will be also sent to the recipients as well as request feedback in the form of a confirmation, confirmation or rejection, arrival time, or a predefined response.
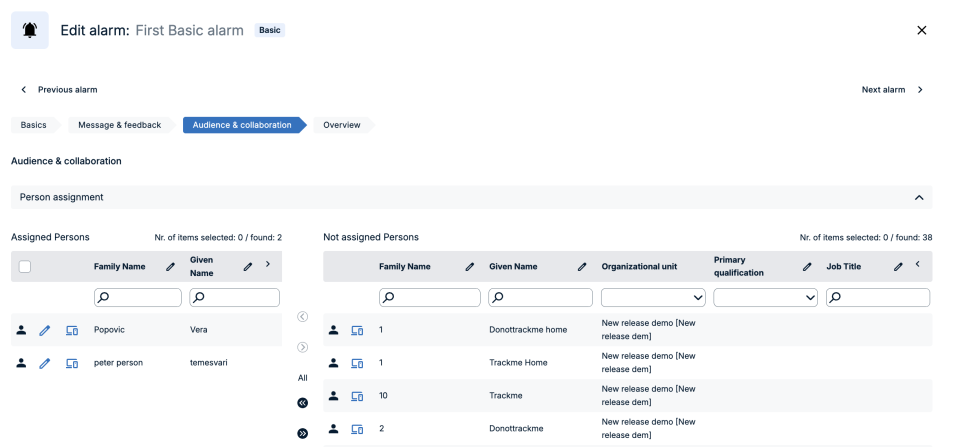
Add an audience
Third step in the alarm configuration is adding the persons and groups you would like to alarm with the message you wrote.
In this step you can also decide if a chat, audio or video conference are needed for further collaboration and communication during the alarm.
In case you are unsure which device a certain person has, or want to check additional person details, based on the user's permissions in the system, a blue device button will be shown.
This button allows the User to check person details which are already configured on the person page (example: first name, last name, employee ID, language, device, group membership etc).
The person's details cannot be edited here. If needed person details can be edited on the person page.
Get an overview
The last step in the Basic alarm configuration is to check that everything you have entered so far is correct.
This is done in the Overview page where the User can see all alarm settings in one place. The User can also choose here to add a group or persons if they are missing or adjust the message in the alarm by clicking on the “pen”. This will redirect the user to the dedicated step in the basic alarm creation where changes can be made.
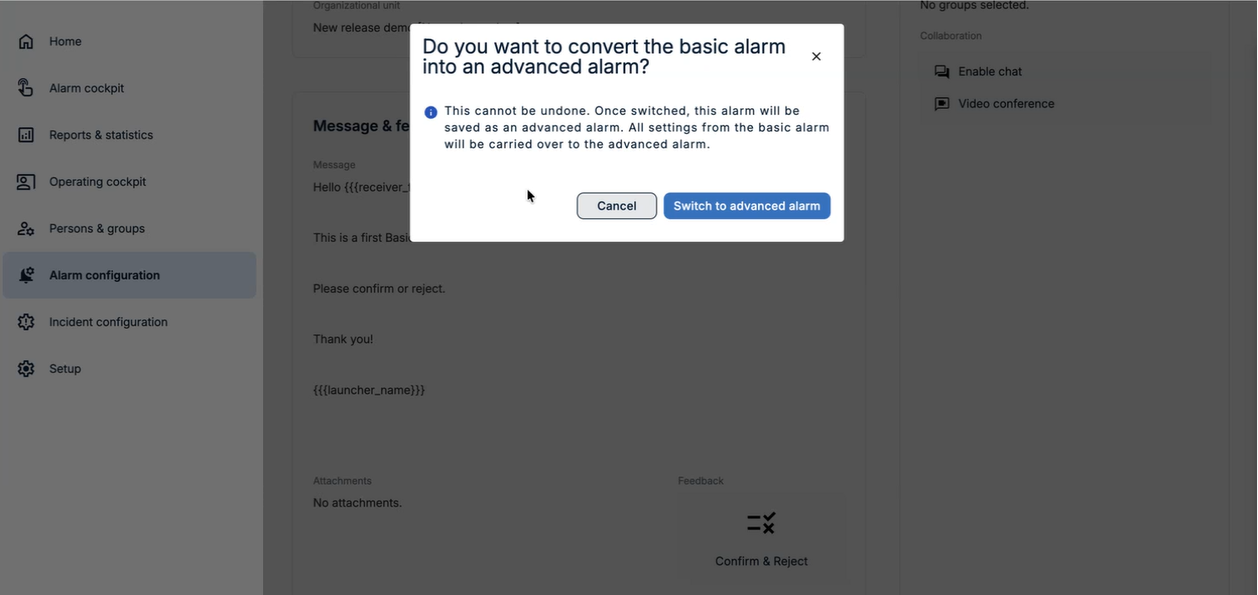
Advanced Alarms
Advanced alarm creation is for experienced users or users who need to create more complex alarms and alarming scenarios.
The advanced alarm opens up the full potential of FACT24 ENS+ alarm configuration.
The Basic alarm can be converted into an Advanced alarm which allows the user to get access to full range of settings and advanced configuration. Once a Basic alarm is converted into an advanced alarm it cannot be reverted back into a Basic alarm.
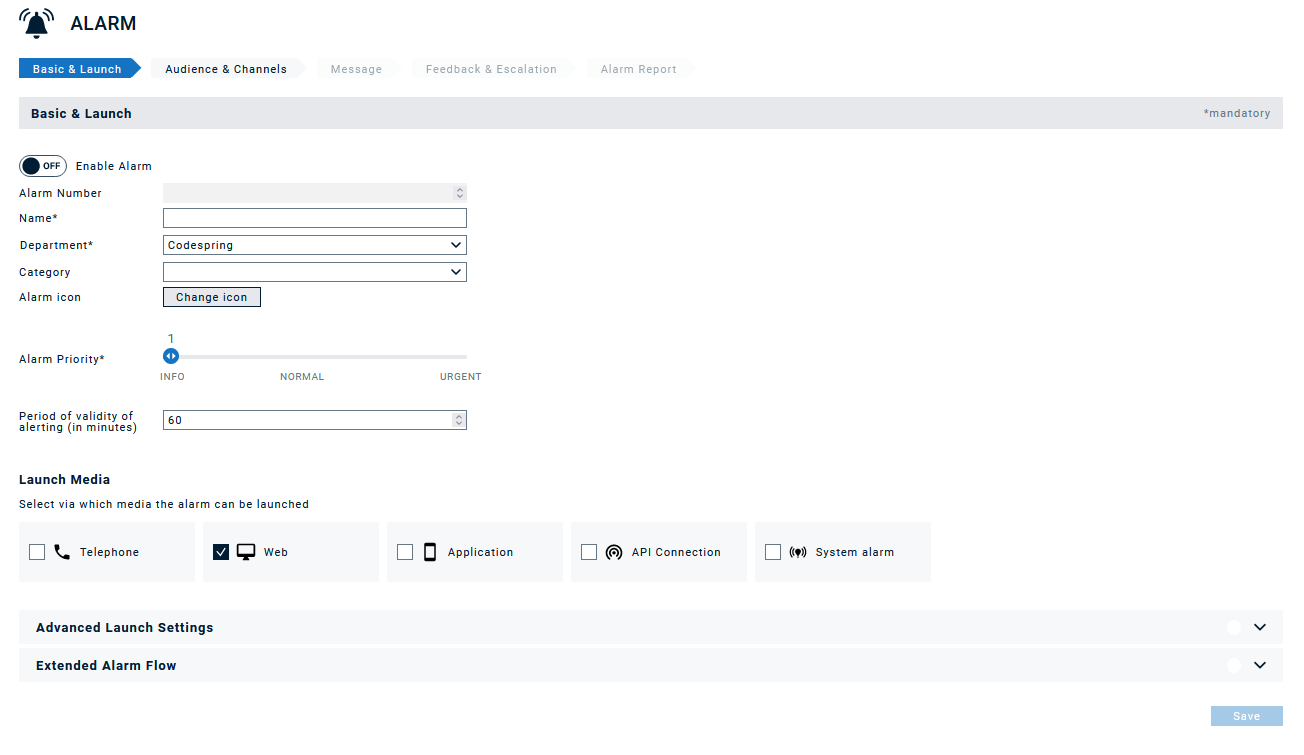
Basics & Launch
In the first step, you define basic settings such as alarm name, alarm validity, the media, via which an alarm can be triggered, and any parallel processes that should be triggered together with the alarm.
Basics & Launch
Enable: This toggle must be set to "on" in order for this alarm to be available to be triggered.
Alarm Number: This number is assigned automatically by the system.
Name: The name can be freely defined and is limited to 225 characters.
Organizational unit: Here the organizational unit is assigned once during the initial configuration. This cannot be changed afterwards, since the organizational unit is assigned the corresponding depart-mental groups, calendars, whitelists, sub alarms and so on.
Category: A category can be assigned to each alarm. This is used for grouping in the alarm monitor and within the alarm report.
Alarm icon: In this field you can select an icon which will be displayed in the app to trigger the alarm from there.
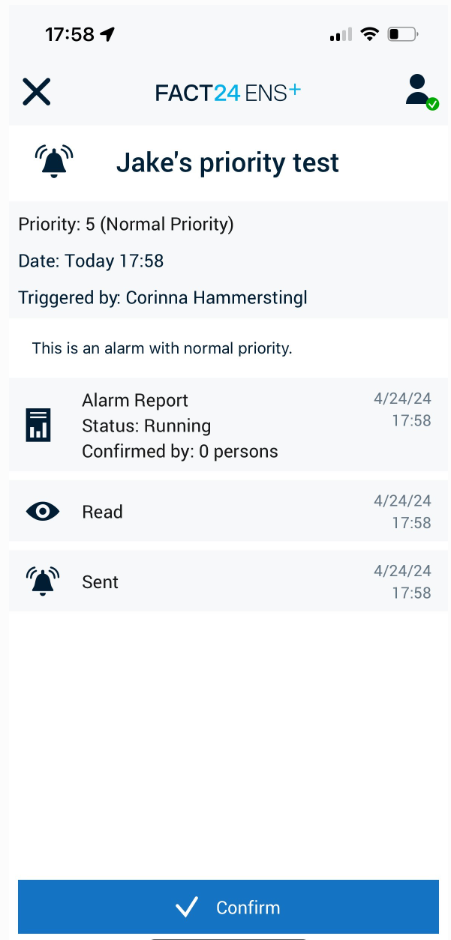
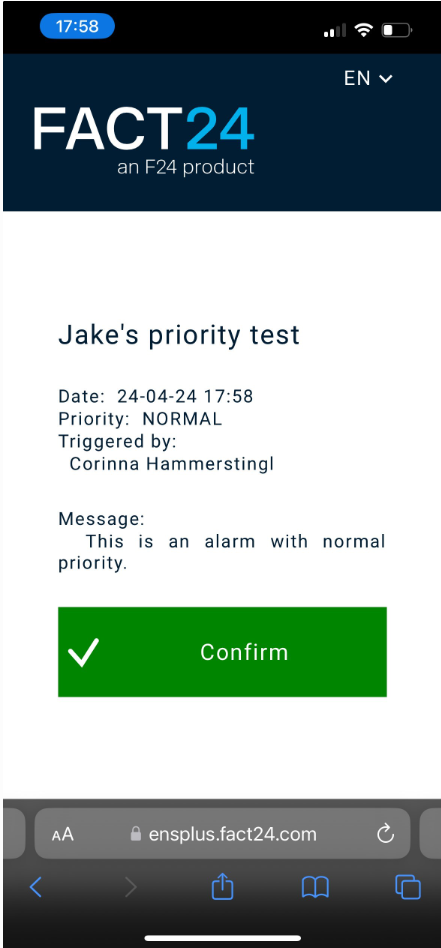
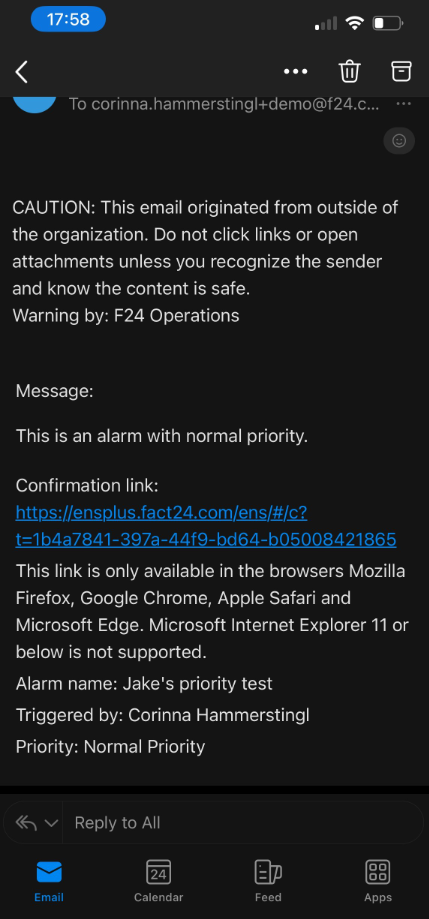
Alarm priority: The prioritization of the alarm is displayed in the app, in the desktop and in the confirmation of an alarm by e-mail, SMS or fax (if the corresponding switch is activated in the message setting).
Mobile App
Desktop
E-Mail
Alarms with a high priority are also given preferential treatment when alarms are raised by telephone if several mass alarms are raised at the same time and the special call tone is activated in the app.
Note that the numbers shown in the web portal will be interpreted as follows: 1-3 as “Info”, 4-7 as “Normal” and 8-10 as “Urgent”.
Validity of the alarm: Here the master time of an alarm is defined, after which the alarm is ended in every state. This is also the maximum duration of a telephone conference if the alarm type «Conference» has been selected. Note that you can extend the validity of alarms up to 30 days (and multiple times) for already running alarms on the alarm monitor.
Launch via: Select all media by which the alarm shall be available for trigger.
Telephone:
If this option is selected and "Setup an individual emergency number for the alarm" is switched off, this alarm can be triggered by users calling one of the system phone numbers (Finding your way around for where to find them), entering their phone ID and PIN (Managing ENS+ users for how to set these up for a user), and the alarm ID. Please note that the same restrictions as in the web portal apply, so only users with access to this alarm are entitled to trigger it via phone.
If this option is selected and "Setup an individual emergency number for the alarm" is switched on, you can assign one of the numbers available to you to this alarm. Anyone calling this phone number could then trigger the alarm and additional alarm triggering settings will be available (see below). This option might not be available for you as either it is not part of your package or you have already used all phone numbers available to you for other alarms or the information hotline. In these cases, please reach out to your account manager.
Web
Application: Note that in order for an alarm to be available via app, it has to be added to a profile.
API Connection: email, REST API, SMS, alarm media gateway, third-party systems
System alarm: makes this alarm assignable to other alarms and functions of the cloud, e.g., for default alarms in the app profiles as well as for monitoring gateways and internal system monitoring
Advanced Launch Settings
Advanced settings
Do not trigger alarm if it was triggered in the last seconds: The setting ensures that an alarm is not launched several times within a defined time.
Do not start triggering only if it was triggered with the same message: Setting is only available if prior toggle is "on". If the same alarm but with a different message is triggered within the selected time frame, it will be activated.
Do not start triggering only if it was triggered with the same caller id: Setting is only available if first toggle is "on". This option does not start an alarm if twice the same phone number wants to launch an alarm by phone within the defined time.
Start alarm with delay: The alarm is only launched after a predefined time delay, either with relative or fixed time definition.
PIN for telephone / application launch: For the launch via individual emergency number and application, the alarm launch can be secured with a four-digit PIN.
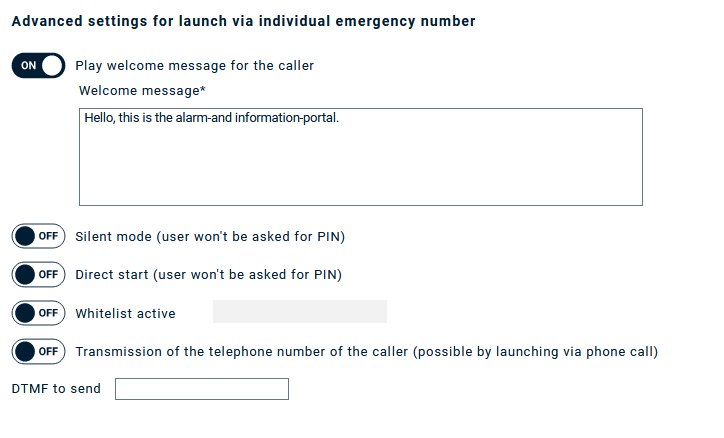
Advanced settings for launch via individual emergency number
Play welcome message for the caller: Customize the welcome message the caller will hear before the alarm will be triggered. The language for the text to speech module is select within the alarm in the message section.
Silent mode: Direct release without sound and announcement. Overwrites the PIN function. This does not work in conjunction with a conference.
Direct start: Alarm is launched directly by selection. Function over-writes PIN function.
Whitelist active: The Whitelist serves as a safeguard. Only call numbers that are entered in the whitelist may launch the alarm. If the subscriber is not on the whitelist, the caller receives a busy signal.
Transmission of the telephone number of the caller: In this case, the call number of the launcher of the alarm is transmitted so that the alarm receivers are called directly with the so-called CLIP of the caller.
DTMF to send: This function transmits a DTMF signal to the alarm launch. This is required for emergency call end devices to signal that the alarm has been successfully accepted.
Extended Alarm Flow
Start local alarm: If an alarm media gateway is connected, the local alarm with the same alarm number as the cloud alarm is launched. If this alarm number does not exist on the alarm media gateway, the local default alarm is launched. The alarm is started on the local media gateway.
Set the availability of the following alarms: The status of the selected alarms is set / changed when this alarm is launched (either to "enabled", "disabled" or simply the opposite of what the latest status was).
Stop the following alarms, if this alarm was triggered: Up to 3 other alarms can be selected here, which are to be stopped when this alarm is launched.
Parallel alarm enabled: Up to 3 alarms can be selected here, which are to be started in parallel with the con-figured alarm.
If you use FACT24 CIM in addition to FACT24 ENS+, you can also auto-register an incident and/or a case in FACT24 CIM via the alarm. For more information go to the Alarms in CIM Article.
Click "Save" at the end of this step.
Audience & Channels
In the second step you configure the groups and persons to be alarmed, which channels / devices to use, and the alarm type. Here you define whether you would like to alert all participants in parallel or sequentially, or if you would like to start a conference.
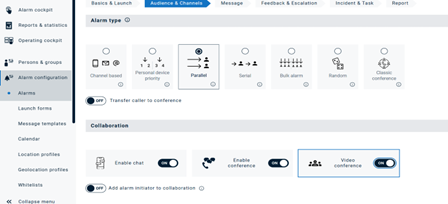
Alarm Type
That's a fundamental setting that defines the alarm process.
Channel based
Persons will be alarmed in parallel but only via the channels selected here. As for device based alarming, you can define alarm steps, where in the first round only a couple of channels are used, in the second round another set of channels and so on. As for device based alarms you can define how many seconds the next step should be delayed. Different to device based alarms, here you overwrite the personal preference for specific devices, for example: you will alarm all persons via email first, independent from whether email is their most preferred device.
Personal device priority
Persons will be alarmed in parallel but not on all devices at the same time but step-wise one after the other. You can define how many devices should be part of a step and how many seconds the next step should be delayed. Persons are alarmed based on their individual device-preference as set in their person settings.
Parallel
All participants are alerted in parallel on all their selected devices.
Serial
The participants are called one after the other within the alarm group according to the defined order of priority.
Important notes:
• The acknowledgement function for the SMS & email media is not available.
• The solution only jumps to the next subscriber if an alarm is Launched by a voice call. If further communication channels are configured in the alarm, e.g. app, it is necessary that the escalation is activated under Acknowledgement and Escala-tion, so that the individual time for the escalation to the next target subscriber takes effect.
Serial alarm type will overwrite any time offset in the group configuration.
Bulk alarm
The selected number of people is alarmed in parallel until an escalation to the next batch starts. This allows to optimize for capacity constraints in telephony systems. It can be defined how many communication channels are used in parallel.
If a subscriber within an alarm is alarmed via twelve phone numbers, 12 channels are occupied simultaneously. If the subscriber acknowledges via a phone number, 12 voice channels are enabled again.
The Bulk Alarm is designed for telephone alarming so that the system can be adapted to the capacity of the customer's trunk line.
Important notes:
The acknowledgement function for the SMS & email media is not available.
Bulk alarm type will overwrite any time offset in the group configuration.
Random
This is a special form of serial alarm with a random alarm of the participants within a group in order to avoid the same person being alerted first, second, third, etc. each time this alarm is triggered.
Important notes:
The acknowledgement function for the SMS & email media is not available.
Bulk alarm type will overwrite any time offset in the group configuration.
ClassicConference
A classic conference is set up automatically and the participants can participate in the conference via inbound / outbound call.
If this option is selected, you can choose to also transfer the caller, i.e., the person launching the alarm, to the conference.
There is also an option to end the conference when the caller leaves the conference.
Alternatively, you can also use the conference function in the "Collaboration" area, which offers the same conference functions but can be combined with any alarm type.
Enable chat: Opens a chat function for the app users so that they can exchange information. The chat room stays open until it is closed. The chat is available to all participants who have received this alarm. The chat can also be used via the web interface, so all users with access to this alarm will also have access to the chat.
Activate conference: Enables the creation of a telephone conference room to which alerted participants can dial in after notification, regardless of their feedback. Dialling into the conference is also possible via callback, e.g. if an alarm is missed. It remains active for up to 30 days or can be closed prematurely by the user, depending on the edition with a limited maximum number of active participants.
Enable video conference: If the option is turned on, then after launching the alarm all alarm members will get a link either via email or SMS, assuming that these devices are added to the Alarm. Learn more about video conferencing in ENS+ here.
Add alarm initiator to collaboration
If the 'Add alarm initiator to collaboration' function is set, the initiator is automatically added to the corresponding collaboration sessions.
This only works if the alarm is triggered in one of the following ways:
- Phone call – The caller's number must be linked to a person in the same enterprise as the alarm. If more than one person has the same phone number, the first match will be used.
- Mobile application or PC client – The alarm is triggered directly by a person using the app or client.
- Lone worker alarm – The alarm is triggered by a lone worker device or feature associated with a person.
• For chat: The person is simply added to the conversation.
• For conference room: The person is notified on all available, licensed devices.
• For video conference: The person is notified via both Email and SMS
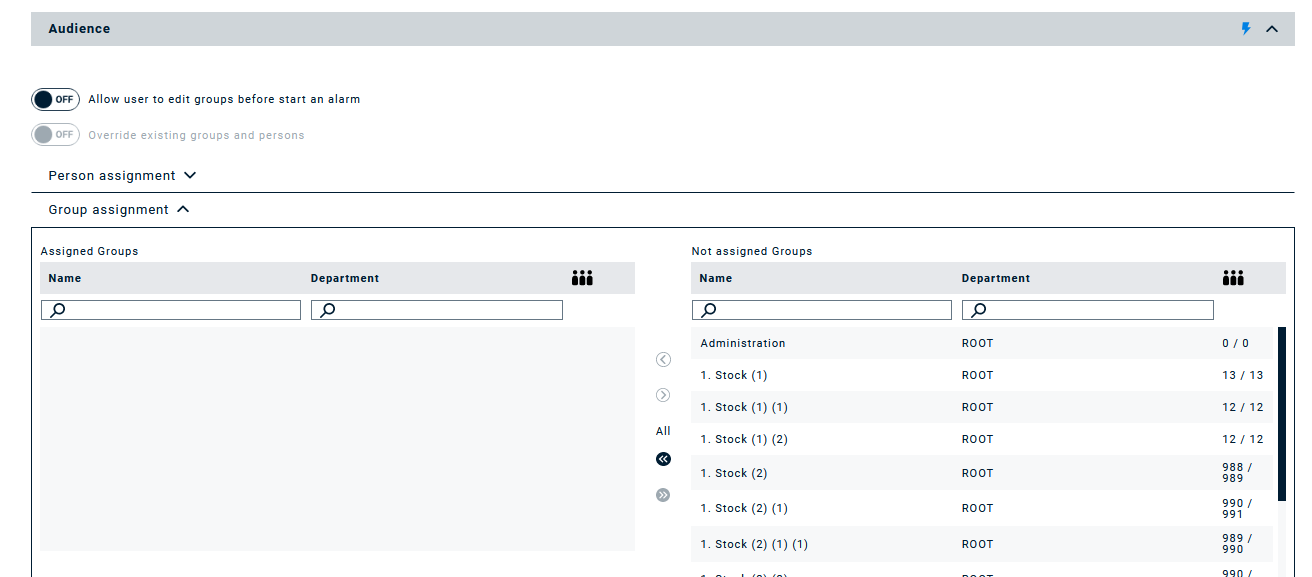
Audience
In this area, one or more groups can be assigned to an alarm. The solution is designed in such a way that groups from the same organizational unit and directly subordinate organizational units can be selected. If a person is in several groups with the same communication channels, this is detected, and the person is only alerted once.
Apart from groups, it is also possible to assign single persons to an alarm. If individual persons are assigned, the devices have to be selected within the alarm configuration. For groups, the device selection per person is performed within the group configuration.
Allow user to edit groups prior to start of alarm: Before triggering the pre-sets via API or web portal, the user may change the respective settings. This refers to changing both, assigned groups and persons.
Overwrite existing groups and persons: This setting is only active when the above option is set to "on" and allows not only to expand the pre-sets but also to overwrite groups and persons for the particular trigger.
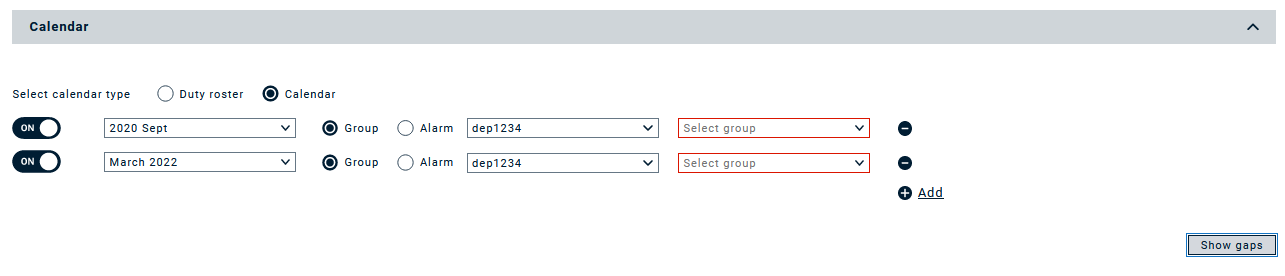
Calendar
With adding a calendar or a duty roster as part of the alarm configuration, you can define time-based deviations from the default alarm settings. When the alarm is launched at a time that falls into a selected Annual or Week calendar, it will either jump to an alternative alarm or alert an alternative group. If you add a Duty roster to an alarm, persons as assigned to their shifts will be alerted. Only if the alarm is triggered at a time not covered by a configured calendar or no person is assigned to a shift in the duty roster, the default audience configured in the previous step will be alarmed.
Annual or Week calendar
You can select one or several calendars. With "show gaps" you can see for which time periods this will be the case.
If annual calendars and week calendars have been configured within an alarm, it is always first checked whether an annual calendar takes effect at the given time.
Thus, regardless of the position in the configuration, an annual calendar always has priority over a week calendar. If two identical calendar types (e.g., Week calendar) cover the same period, the calendar with the higher position is always used.
For a calendar, either an alternative alarm or an alternative group can be configured. For an alternative alarm, all alarm settings of the alternative alarm apply.
Duty roster
Different from the Annual or Week calendar, you can only select one duty roster at a time. The persons as configured in the selected duty roster will be alarmed based on their shifts.
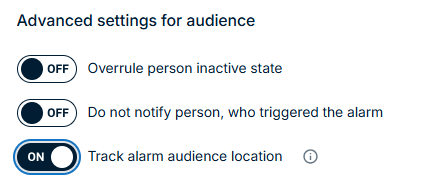
Advanced Audience & Channel Settings
Overrule person inactive state: Regardless of the status of the user (e.g., offline status), the alarm is transmitted to the participant.
Do not notify person, who triggered the alarm: The person who triggered the alarm is not alerted even if it is a member of the selected alarm group
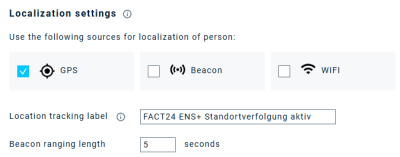
Track alarm audience location: ENS+ can monitor the location of persons during an alarm. To use this feature, the following conditions must be met:
Location tracking is enabled for the alarm on the Audience page.
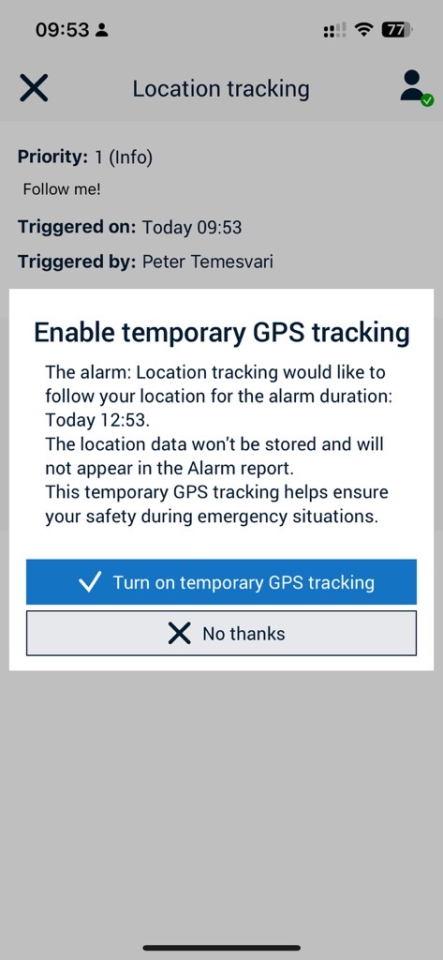
There are cases when users do not enable location tracking in the app because they don’t want their position to be continuously shared with others, or they want to reduce the app’s power consumption, as continuous GPS monitoring in the background requires energy. However, even in such cases, critical situations may occur when it is extremely helpful for operators to know the location of the affected individuals.
The app resolves this conflict of interests by asking the user, after receiving an alarm, whether they agree to temporarily share their location. If the user enables this option, their location will be shared for the duration specified in the message (which corresponds to the planned duration of the alarm). After that, location sharing will automatically stop.
The alerted persons are using the ENS+ App
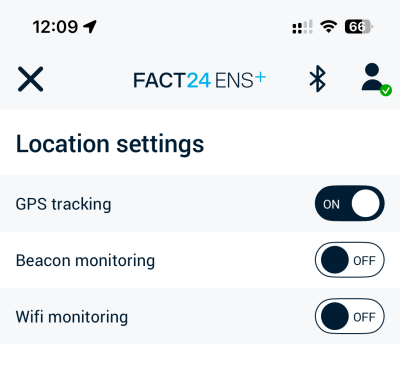
GPS tracking is enabled in the App.
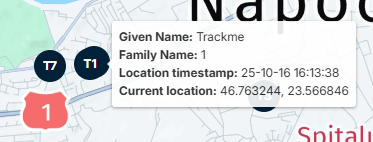
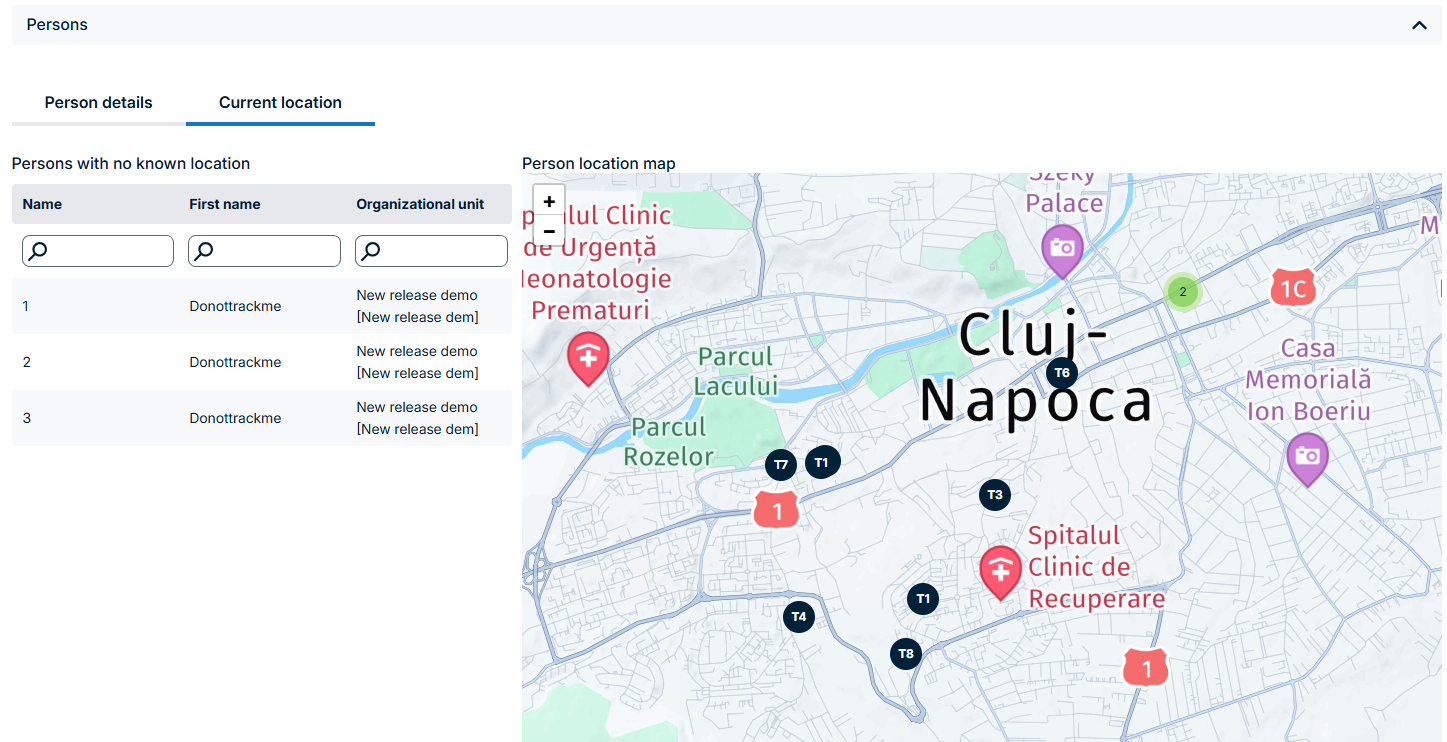
Once active, the location of the alarm audience is tracked during the alarm and for one hour afterward. The live locations are displayed on the Alarm Monitor. Each person is represented by a bubble showing their monogram. Hovering over a bubble reveals detailed information, including the timestamp of the location update and the device type that sent it.Next to the map, ENS+ also displays information about persons who were notified but did not provide feedback or location data.
Location data is not stored permanently and will not appear in the Alarm Report.
The FACT24 app can also transmit multiple location sources when an alarm is triggered or confirmed. If for example WiFi or Beacon positioning is enabled alongside GPS, both data types are sent to the system.
Advanced settings for telephone channel
Period of ringing for a device: Here you can set the ring duration of the call.
Use default caller ID: If this is switched on, the custom caller ID set as default in Caller ID for that organizational unit will be used. If it is switched off, you can select any caller ID available for the alarm’s organizational unit from the drop-down. If you like to use any other phone number, you will have to verify it first, following the steps described here – Caller ID
Click "Save" at the end of this step.
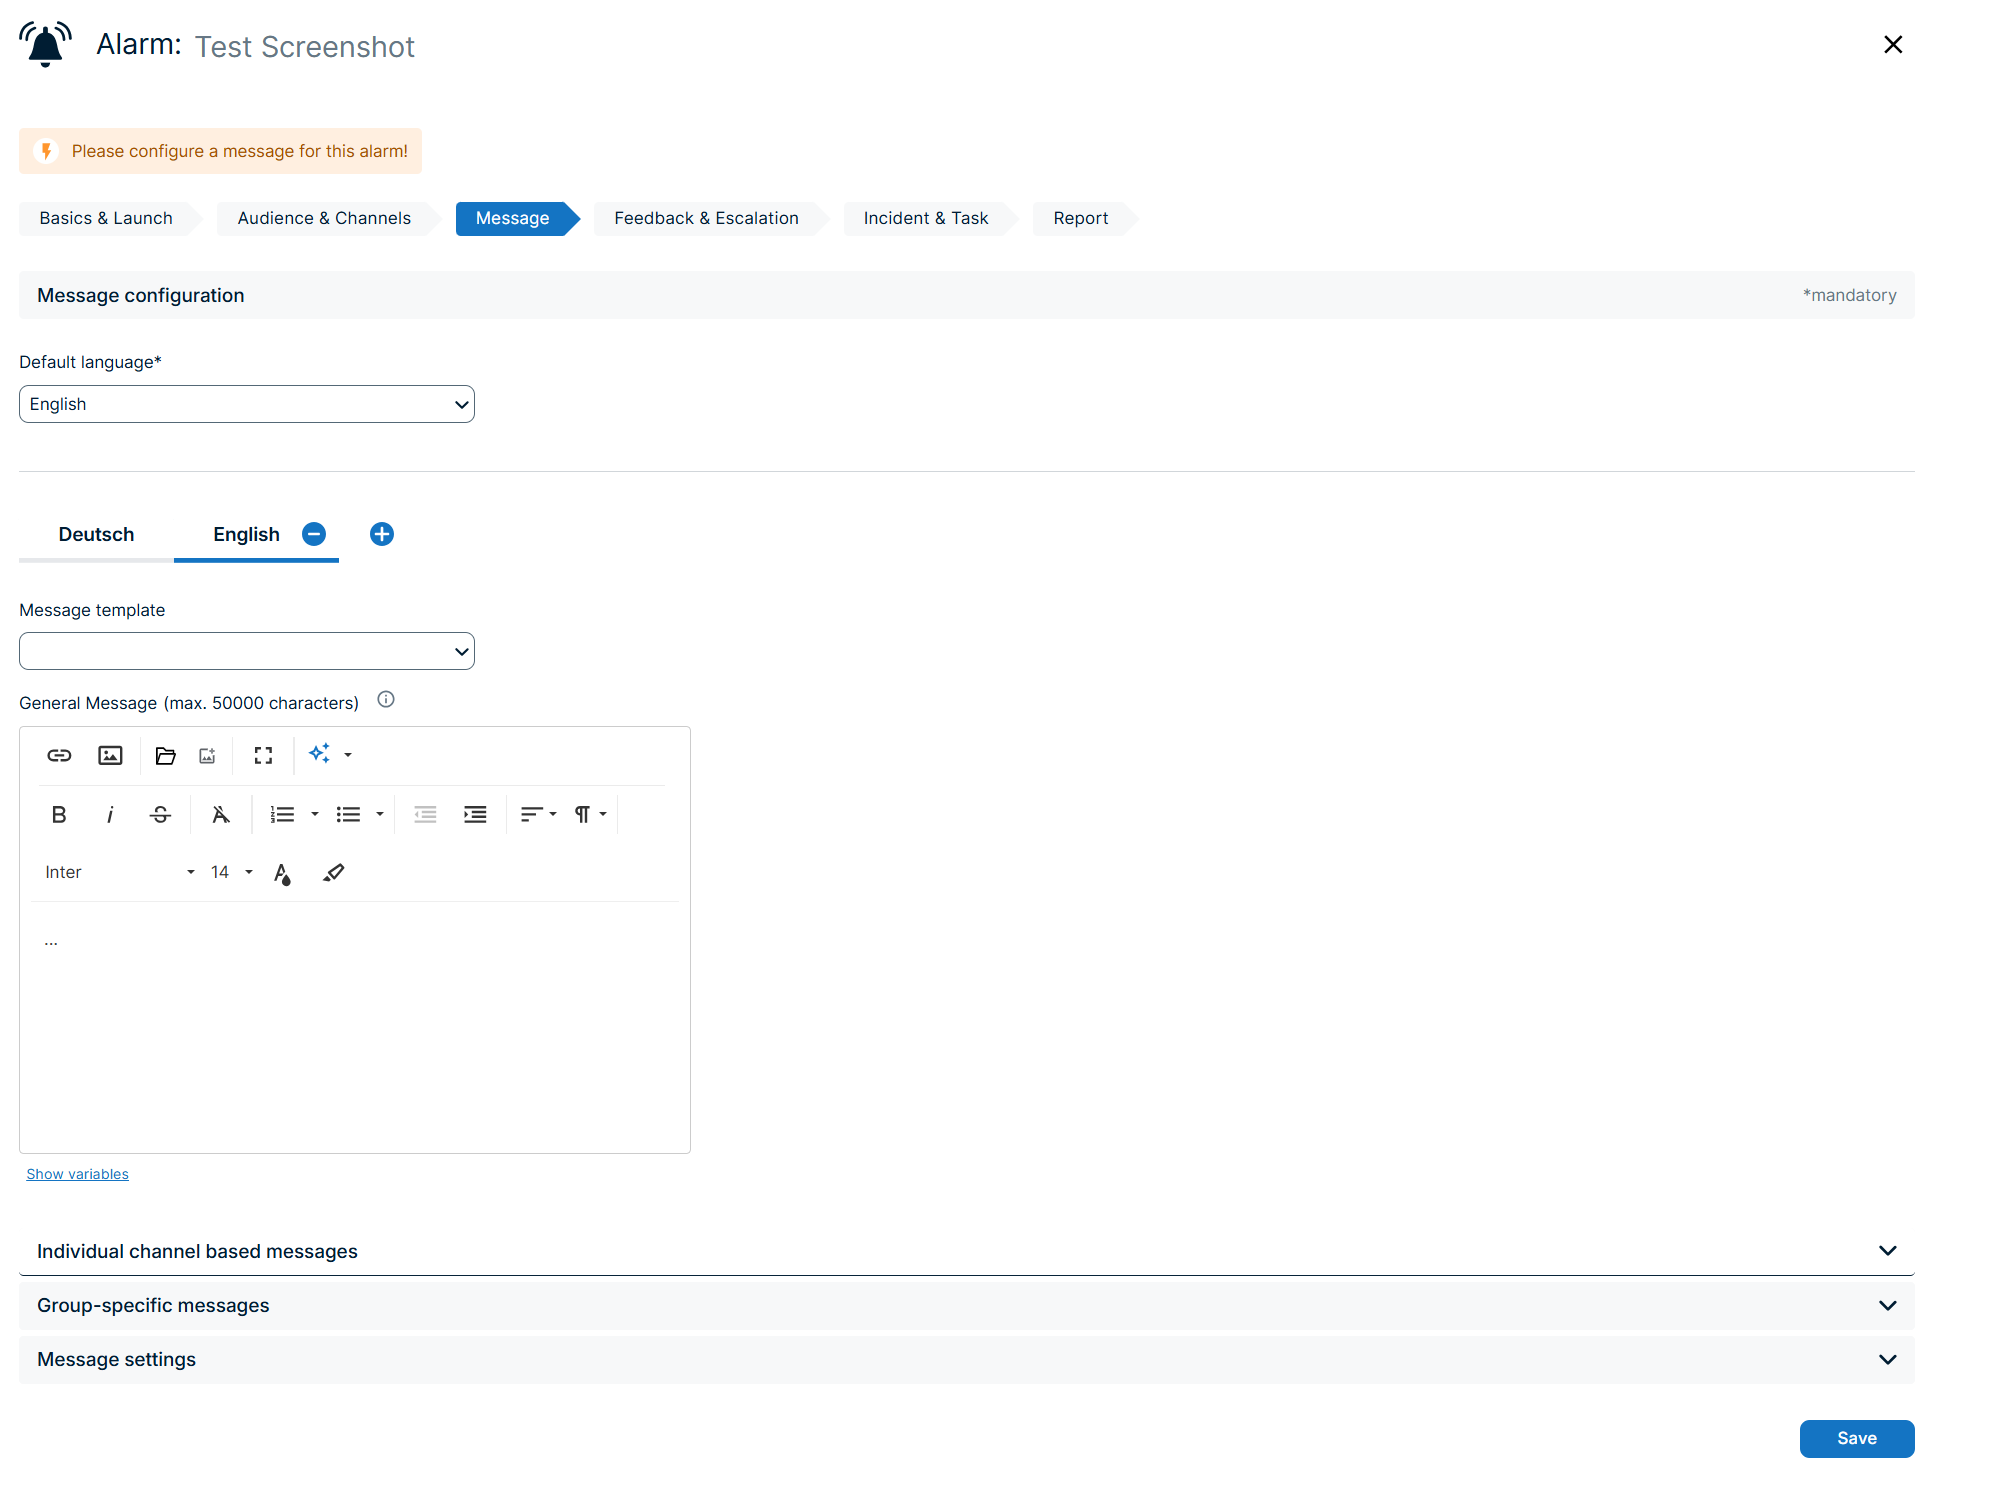
Message
In the third step, you configure the message for the alarm.
Message
Language: First, you have to select a default language for the alarm, so that the correct text-to-speech voice is used for a playback via voice call.
An alarm can be created in up to 5 languages. For example, people who have specified English as the language will then receive an English alarm message with an English subject and attachment, while Spanish people will receive the message in Spanish if they have configured this in the alarm.
If a person has not specified a language or has specified a language other than the languages specified in the alarm, the alarm message will still be sent to the person in the default language.
Message template: Select an already created template for your message. If you choose to do that, all fields will be automatically populated based on the selected template. You can also select to only use header and signature of the selected template and define the message itself just for this alarm. In addition, you can decide to start from a template but then edit the text for this specific alarm by clicking on “Edit”.
General message: If you decide to write an alarm-specific message and not to use a template, fill in the "General message" field. The maximum message length is 50000 characters including formatting and images. This message is used for all media unless an individual message is configured for a medium in the "Individual channel based messages" section of this page. Note that if the message is transferred via voice call, SMS or fax it will be cut after the respective (lower) character limit.
AI functionalities are available in the HTML text editor.
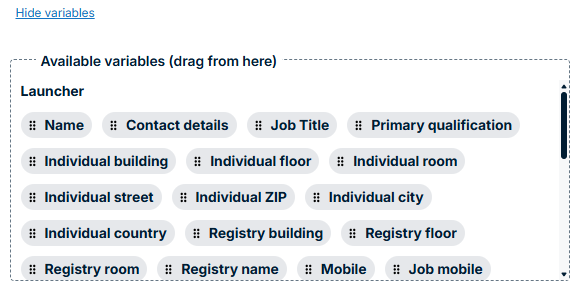
Below the message editor, there is a Show/Hide Variables link.
When clicked, it displays the full list of available variables.
Variable text components are not supported for parallel alarms. Consequently, they are not resolved in the report and are instead displayed as variables or placeholders.
Information about the Launcher Person
You can configure this data on the Person page.
Name: The person’s given name and family name
Individual room: The room number from the person’s individual address
Contact details: The person’s highest-priority phone number among their registered devices
Job title: The value of the job title field
Primary qualification: The value of the primary qualification field
Custom properties: If custom properties are enabled for the enterprise, additional person-specific properties (visible on the Person page) can also be used as variable components.
If you start an alarm as a User, these fields will remain empty in the alarm message.
Information about the Receiver Person
The following variables are available, with data taken from the Person page:
Given name
Family name
account email
PIN
App device
Primary qualifications
Custom properties (if enabled for the enterprise)
Information about the Alarm
These variables provide details about the alarm itself:
Name - the name of the alarm
Launch date/time - The date and time when the alarm was started
Number - The alarm number
Attachment: For Email and App media you can add an attachment either by browsing the file manager or by uploading a new file. Up to 3 attachments can be added per alarm. The maximum attachment size is 10 MB per file. The approved file formats are listed here.
Alarm symbol settings: For receiving media that display the alarm icons, e.g., the Smartphone APP, the colour and background of the icon can be changed. For this purpose, a colour table is available in a drop-down list. Via the media gateway this colour value can be overwritten for corresponding interfaces, e.g., OIP.
Channel-specific messages
Expand this accordeon if you like to define specific messages for different channels. Please note that for channels, for which no specific message is defined, the General message will be used.
Voice message: The voice message can be configured here. Once the voice message has been saved, it is possible to listen to the existing voice message by entering a phone number and, if necessary, record an alternative voice message. Please note that the web browser (press F5) must be updated after recording by telephone so that the voice message is displayed. If a particular voice message has been configured, the name or the phone number of the launcher is not added to the message.
SMS message: A message for the medium SMS can be configured here. It is recommended to keep the SMS message as short as possible, as there are charges for sending SMS messages depending on your selected package.
Fax message: Here you can save a message for the medium Fax.
Email and app message: Here the message for the media email and app is defined. For the app message, it depends on the account setting, if the defined subject or the alarm name gets transferred as the headline.
Link: URL links can also be transmitted for email and app media. → Displayed URL name = short text for the hyperlink. → URL = The desired link is stored here.
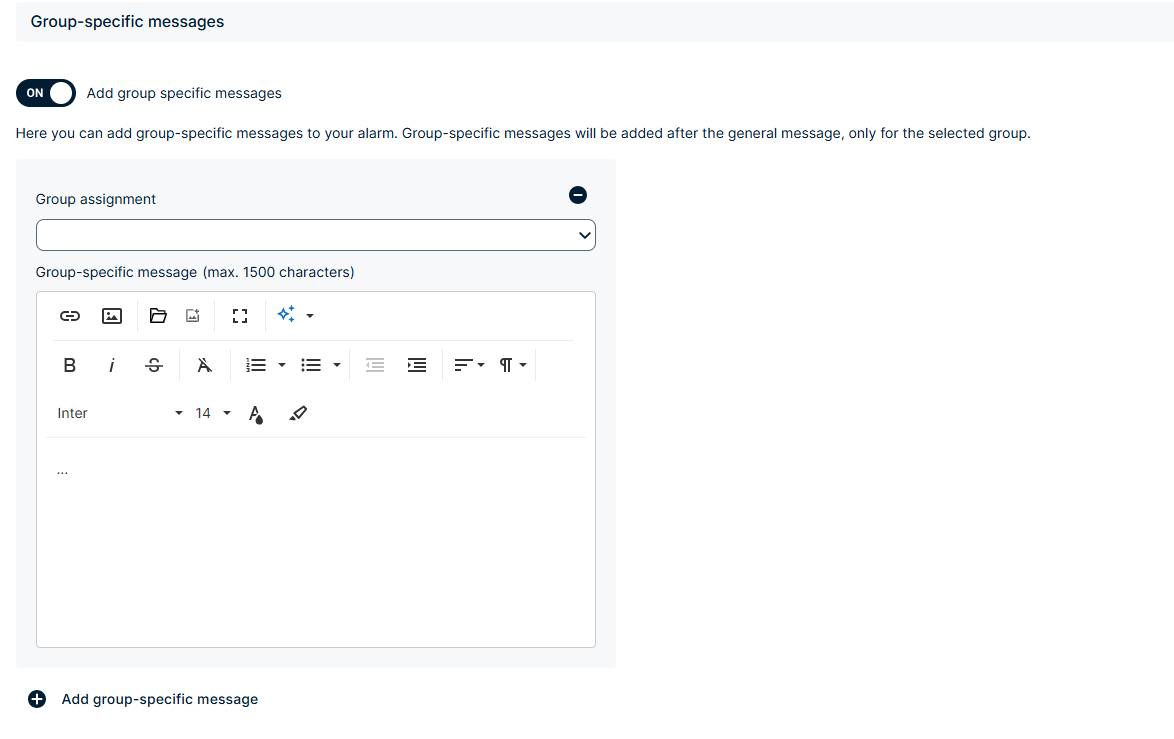
Group-specific Message
You can add a group-specific message to an Alarm, in addition to the general Alarm message.
as a first step, you must select which group the message should go to
The group-specific message appears after the main message, but before the confirmation message.
The message intended for the group can be defined at the Alarm level. It is not possible to set a group to automatically bring a message with it.
The function supports all types of groups: normal groups, calendar-based groups or escalation groups.
In case of a telephone alarm, the voice message is generated based on the language set in the Alarm.
The Transfer message to related alarms feature won’t transfer the group-specific message.
If a person is assigned to multiple groups, and these groups have group-specific messages, then the person will receive just one notification per channel. This also means that he won't get different messages from the same alarm via the same channel. (he will get just one SMS, with one group-specific message)
The Alarm report shows which group-specific messages have been sent.
Settings
General message settings
Allow user to edit message before start of an alarm: If this option is active, the dynamic message of the subsystem is transmitted. A pre-requisite is that the message has a minimum of 8 and a maximum of 612 characters. The static alarm text specified under «Message» is also overwritten when the alarm is launched via the dashboard and a custom message is entered. This applies to all media when transmitting a text message. Furthermore, this option also applies if the message is to be taken over from a pre-alarm.
Number of plays of the voice message: Here you specify how often a voice message is to be played.
Transfer message to related alarms: This parameter ensures that the messages are transmitted to downstream alarms. This can be the case if a calendar accesses an alternative alarm, a parallel alarm is started, or an escalation alarm is launched.
Add launcher name to the message: Adds name of launcher to the alarm message, if the launcher is configured as a person with according device in the system.
Add static location information: If this function is enabled, the location information from the "Room" field in the person configuration is added to the alarm message.
Add contact details: This function allows the first stored device of the person triggering the alarm to be transmitted with the alarm message. Only the first device is used - no further numbers/devices are taken into account here.
In the case of telephone alarms, the phone number and/or caller name are only added if no recorded WAV file is used.
Settings if launch via phone is selected
Record dynamic message: The caller can record a voice message dynamically. The recorded message is only transmitted via the voice communication channel
Add caller id to the message: This function extends the alarm message with the information of the number calling to launch the alarm.
Advanced settings for voice channel
Play welcome message: Here you can specify whether a general welcome message should be played. If this is switched on, you can change the text in "Voice message settings" to a custom text, depending on your selected product edition.
PIN request before transfer of alarm: The user must first enter a PIN for a voice call to hear the message. The PIN is set individually in the person configuration. Depending on your product edition, you can here change the default voice text component. Please note that this functionality is only available if Direct SIP is used as voice provider for your account.
Custom cancel and goodbye message: Depending on your product edition, you can here change the default voice text components for cancel and goodbye messages of the voice engine.
Click "Save" at the end of this step.
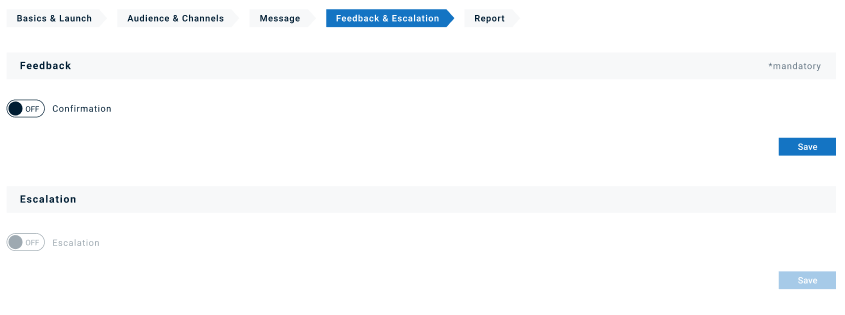
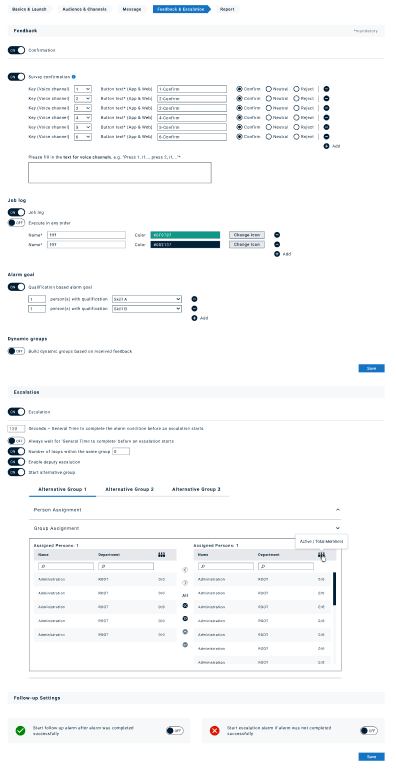
Feedback & Escalation
In the forth step, you can configure whether or not you would like to receive feedback. You can define an alarm goal and configure an escalation for the case that the alarm goal is not met during the alarm validity period. This forth step can be either very short or rather extensive:
Shortest possible version: no feedback, no escalation.
Long version with extended settings.
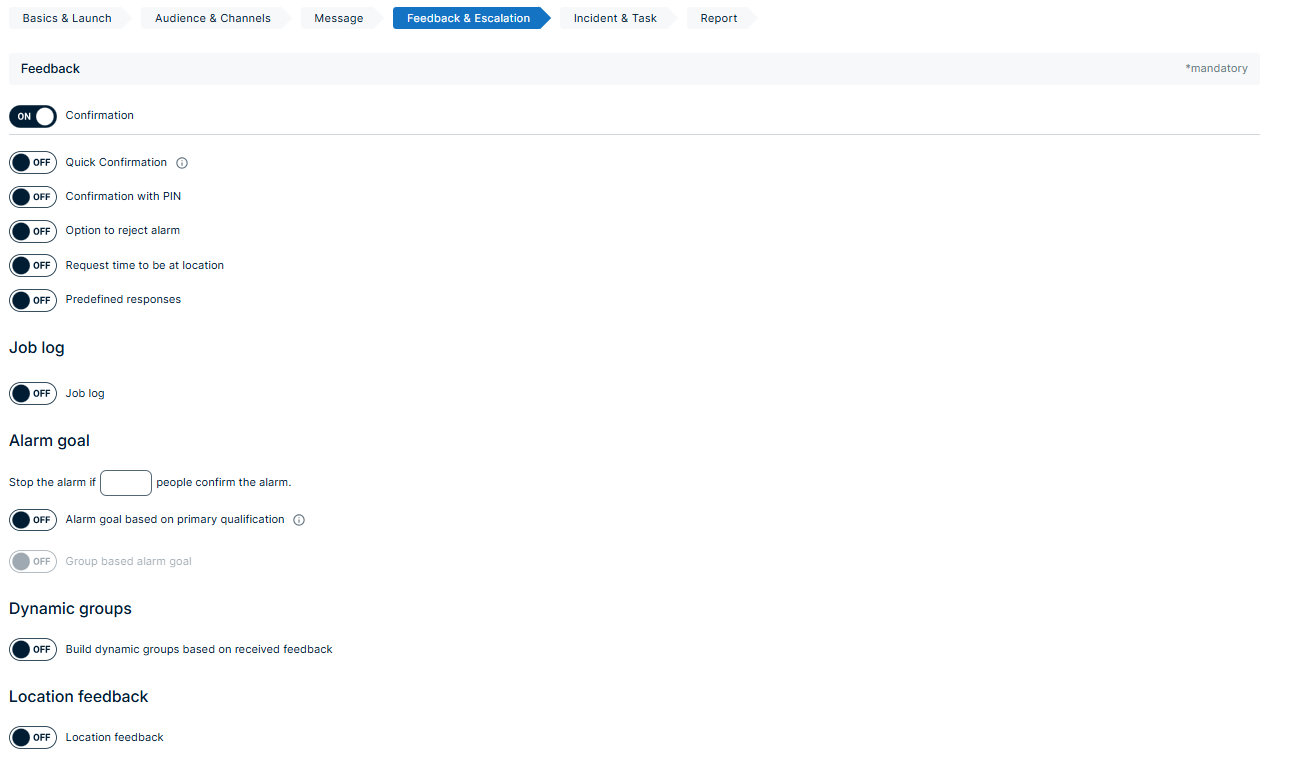
Feedback
Note: Due to releases, there may have been changes in the tool that are not yet shown in the video. (Video version: Q3/2023)
Confirmation
A confirmation can be configured for an alarm, which is necessary if the alarmed participants are to give a qualified feedback on their availability or their response time. The following configuration options are available for the alarm types «Parallel», «Performance», «Random» and «Serial» - depending on your product edition. Also depending on your product edition, you can again change the default voice text components for voice channels for these configuration options.
Confirmation: If this option is set, the participants can acknowledge an alarm positively. For a voice call this is done by pressing key 1 via DTMF.
Note that the following options will only be visible in the tool if you toggle confirmation to "on".
Missed calls can also be called back after some time to listen to the alarm message and confirm the alarm.
Please note that alarms with conference calls can only be listened to but not confirmed. To dial into an existing conference, please use the specific telephone number for conference dial-in.
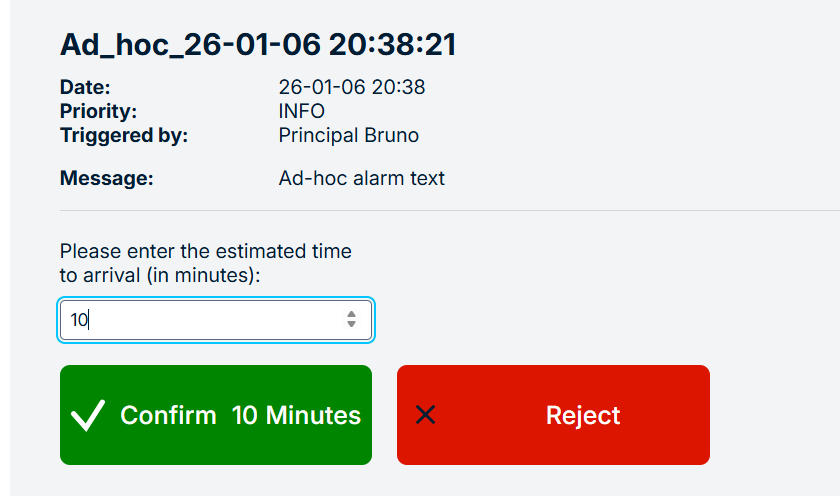
Quick confirmation: voice text cannot be customized in this case. The following response options are available: 1. At location within 30 minutes / 3. At location within 60 minutes / 0. negative feedback, participant has received the message but cannot be available for this alarm.
Confirmation with PIN: Only available for alarms transmitted via voice calls. The recipient must then enter his four-digit PIN for acknowledgement.
Option to reject alarm: If this option is set, a participant will be given the option to actively reject an alarm.
Request time to be at location: This option asks the participants for their required time to be at the location.
Allow initial feedback to be changed: If this option is set, alarm recipients can change their feedback again while the alarm is still running. This is helpful, for example, if you have specified as a feedback how long it will take you to reach your destination and this time has now changed due to a traffic jam or similar. This option is supported if you select any feedback option with time to be at location or survey.
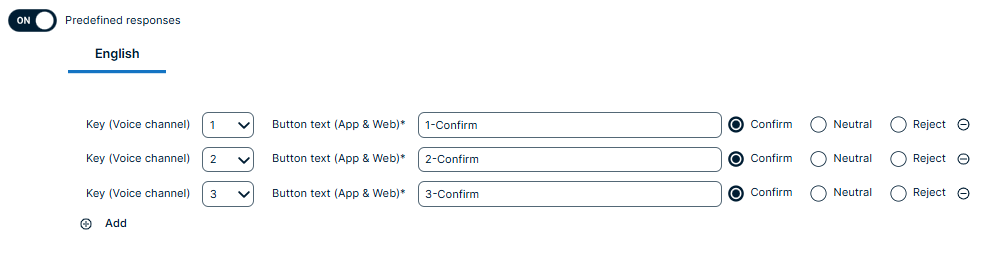
Predefined reponse: You can define 10 custom response options. For each of these response options, you have to specify whether they should be considered as a confirmation (positive), an alarm rejection (negative), or neutral. This is relevant for reaching your alarm goal, escalation, and reporting. In addition, you have to specify the text that shall be played by the voice engine for voice channels. This text should give clear instructions regarding which number signifies which response option.
Note: Quick confirmation and Survey confirmation cannot be combined with any other confirmation option.
Alarm type "Conference": If the alarm type «Conference» has been selected in the general settings, participants have to acknowledge the alarm positively in order to participate in the conference - so all other confirmation options won't be available and confirmation is switched to auto-on. The function «Direct conference participation» enable the participants to participate directly in a telephone conference. Therefore no acknowledgement is necessary.“Reject joining to the conference if…people already joined to the conference." sets a maximum limit to the number of desired conference participants.
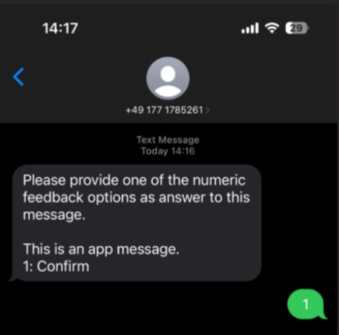
Numeric confirmation via SMS: To make the confirmation by SMS (if 2-way SMS is activated for the account or organizational unit) clearer, the text “Please enter one of the numerical feedback options in response to this message” has been added to the SMS message so that it does not have to be included in the actual alarm message.
Job log
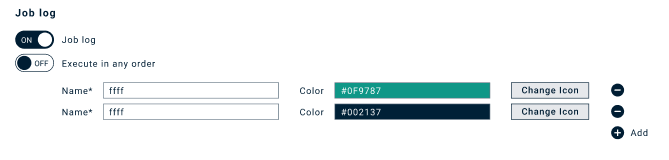
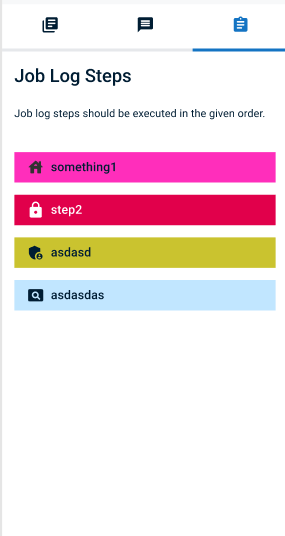
If a job log is configered, persons accepting the alarm via the smartphone app are asked to work through a list of jobs - either in a predefined or any order. Only one job log can be written per alarm, so the function is deactivated after the job log is completed. Several persons, however, can work on it at the same time.
View in configuration
View for person in app
Alarm goal
General alarm goal: Stop the alarm if selected number of persons has been confirmed the alarm.
Qualification-based alarm goal: Choose this option if you want to make sure to reach x people with qualification A, y people with qualification B, and z people with qualification C. Please note that only persons with the selected qualifications set as primary qualification will be notified. All persons not matching any of the alarm conditions configured will be excluded from the alarm process (including any escalations). If the required number of participants with a certain qualification has positively acknowledged within the alarm group, no further participants with the identical qualification will be called. There is also a general skill «Without qualification», which allows the system to alert the de-fined number of participants who do not have a stored primary qualification.
Only individuals for whom this qualification is set as the primary qualification will be displayed.
Group-based alarm goal: Choose this option if you would like to specify per group how many persons shall be reached. You can also set a goal for all persons that were added directly.
Note that the alarm will be stopped as soon as the defined number of persons per group was reached. Each person will only be counted once.
Please make sure that persons are only part of one of these groups to ensure that they get counted in the ‘right’ group. If a person is assigned to multiple groups but with different devices, it depends on the device used for the confirmation for which group the person will be counted. If a person belongs to several groups with same devices, it will be counted first in any (random) static group it is assigned to, then in any (random) filter-based group, and last in any (random) time-based group.
If a person is assigned to multiple groups but with different devices, it depends on the device used for the confirmation for which group the person will be counted.
If you add persons and groups when triggering the alarm, they will be added with the goal to reach “all persons” in that group.
If a group is empty when the alarm is triggered, the alarm won’t be considered successful, and if set, an escalation will be initiated.
Please note that when a group-specific alarm goal is selected, loops will be the only escalation option available.
Dynamic groups
This option is only active if the alarm requests a confirmation. The dynamic group allows you to create groups based on the confirmation. The grouping is based on positive and negative confirmations (this also includes unreached participants).
The groups are then available for the configured validity time of the alarm and can be used to send a message or configure an alarm. The group is named after the original group and is supplemented by a dynamic part (date + time) and «confirmed» and «not confirmed». People are added to the dynamic group with the communication channels that were assigned within the alarm when it was started.
Example: The setup of a person looks like this in the original alarm:
Default group: App
Escalation 1: SMS
Escalation 2: Mail
Escalation 3: Mobile
In this case, 4 devices are added to the dynamic group.
Location Feedback
When you activate location feedback, the FACT24 app collects GPS location data from those providing feedback, regardless of whether it is positive/neutral/negative feedback or a time confirmation. Administrators who collect confirmations from alerted individuals can thus also see the location of each person.
This location data is displayed in the alert report.
If GPS is deactivated in the profile, the app does not send location feedback.
Escalation
Note: Due to releases, there may have been changes in the tool that are not yet shown in the video. (Video version: Q3/2023)
The following settings will only be available if at least one confirmation option is switched "on".
Escalation: This option must be activated so that an escalation can take place if the defined number of participants has not been reached.
General time to complete the alarm condition before an escalation starts: Within this time the defined group members must give a positive feedback so that the alarm condition is fulfilled. If this has not been done, an alarm escalation is started.
Only available for the alarm types Serial, Random and Performance
Time for individual acknowledgement of an alarm: This configuration controls how much time a subscriber has in order to confirm the alarm, before the next subscriber in the alarm group is alerted.
Always wait for the general «confirmation time» before starting an escalation: If you selected that the alarm can be launched by voice call and your recipients are only called on a phone channel, this parameter is relevant for you. It allows the system to only enter the escalation phase when the general confirmation time has elapsed. If this option is not set, an immediate escalation occurs.
Number of loops within the same group: With this configuration it is defined how often an alarm is to be repeated within a group if the general confirmation time has expired and the defined alarm condition has not been fulfilled. The number of repetitions also applies to the «Alternative Groups». Important note: If a subscriber was only alerted via SMS medium, the SMS will not be sent again within the same escalation level.
Enable deputy escalation: If this escalation is set, all deputies for the participants will be alerted if the general acknowledgment time has expired, the set number of repetitions was unsuccessful, and the defined alarm condition was not met. A person's deputy is configured in the person managementsystem. Important note:This function is NOT available for skill-based alerting.
Start alternative group: This option allows alternative groups to be alerted if the general acknowledgement time has expired and the defined alarm condition has not been met. Up to three alternative "groups" can be configured. In this case, a "group" can comprise several pre-configured groups and persons.
Follow-up Settings
Start follow-up alarm after alarm was completed successful: If an alarm has been successfully completed, another alarm can be started. This is not to be confused with an escalation, where the alarm condition is not met.
Start escalation alarm if alarm was not completed successfully: This option enables an alternative alarm to be started if the general acknowledgement time has expired and the defined alarm condition has not been met. Important note: If the scenario is configured in such a way that a participant can perform a negative acknowledgement, this participant will no longer be alerted within the alarm if he has performed a negative acknowledgement. This function is cancelled by starting a new alarm.
Click "Save" at the end of this step.
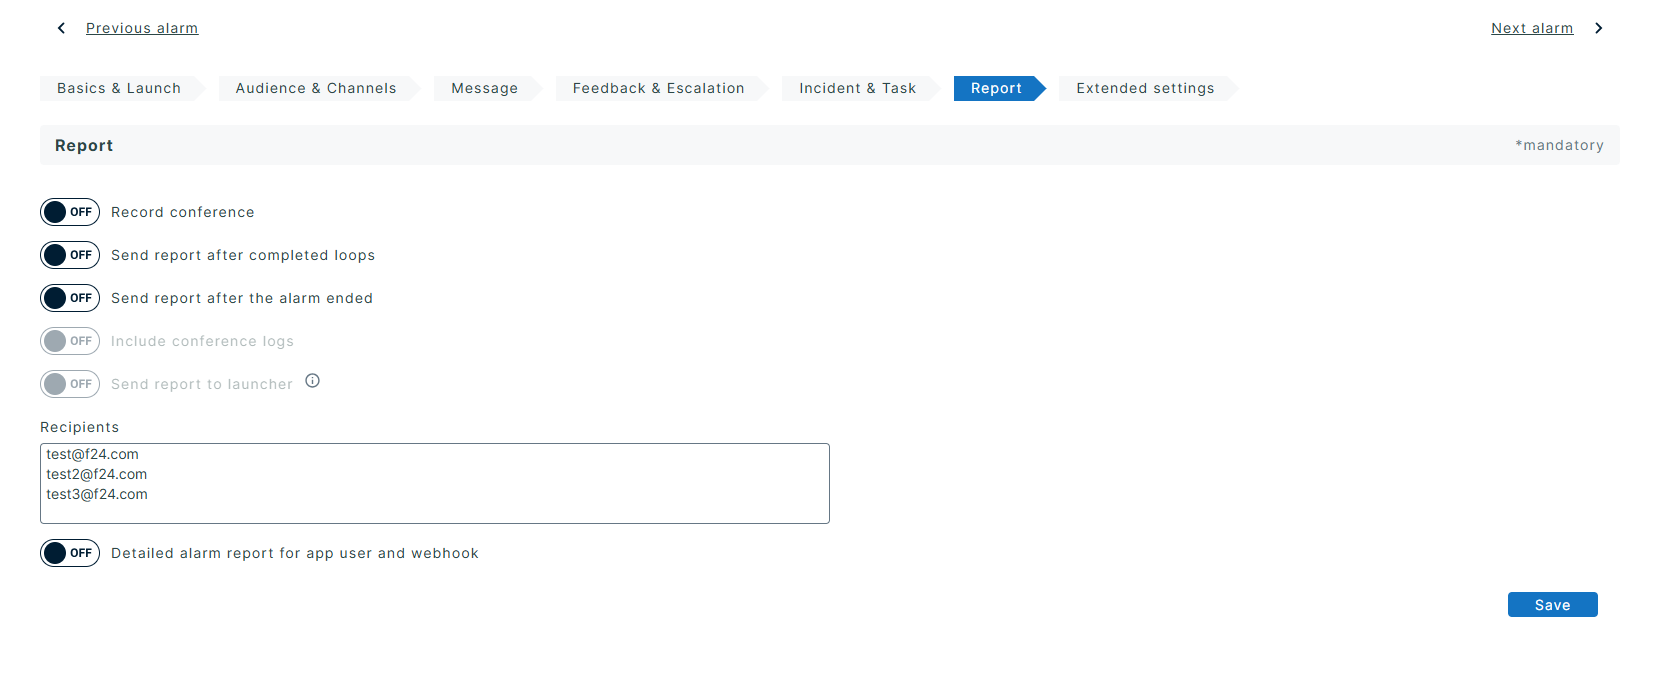
Alarm report
In this final step the transmission of alarm reports is configured.
Record conference: This option allows you to record a conference call. Recording is only active if at least two participants are in a conference room at the same time.
Send report after completed loops: This parameter ensures that the email addresses specified under ‘Recipients’ receive an interim report after each run of the alarm escalation process. A ‘loop’ refers to a complete run of the escalation process, including the configured repetitions and escalation levels. An interim report is sent upon completion of each run.
Send a report after the alarm has ended: After the alarm is completed, a result report is sent to the entered e-mail address.
Include conference logs
Send report to launcher: Report will be sent via email to users and persons with account email address. If a person without account email address triggers an alarm, no report will be sent.
Recipients: List of email recipients for the reports.
If you want to add several email addresses to the recipient list, write them one below the other without a comma (see screenshot) or separated by a semicolon.
Detailed alarm report for the app user and webhook: This option allows app users and webhook connections within an alarm to see who has already acknowledged the alarm. This option is supported for up to three people with positive acknowledgement.
Click "Save" at the end of this step and congratulations for a successful alarm configuration.
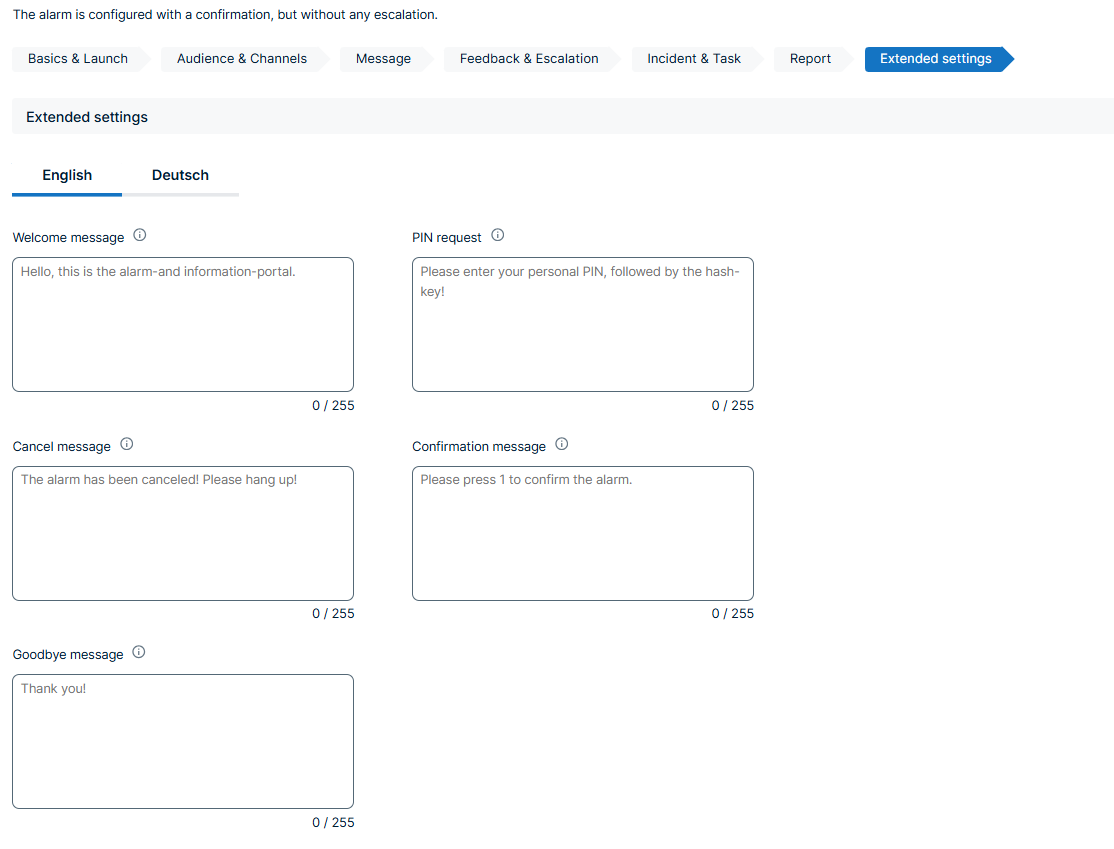
Extended settings
In the advanced settings, you can configure the following messages:
- Welcome message: Compose your welcome message here (e.g. ‘Hello, this is the alarm and information portal.’)
- PIN request: PIN request for transmitting the alarm. (e.g. ‘Please enter your personal PIN, followed by the hash key!’)
- Cancellation message: Enter your cancellation message here. (e.g. “The alarm has been cancelled! Please hang up!”)
- Confirmation message: The person receiving the alarm via a phone call will hear this confirmation message. (e.g. “Please press 1 to confirm the alarm.”)
- Goodbye message: Enter your goodbye message here. (e.g. “Thank you!”)
If you want to broadcast the message that is already highlighted in grey, you do not need to enter anything.
Generate Alarm Export
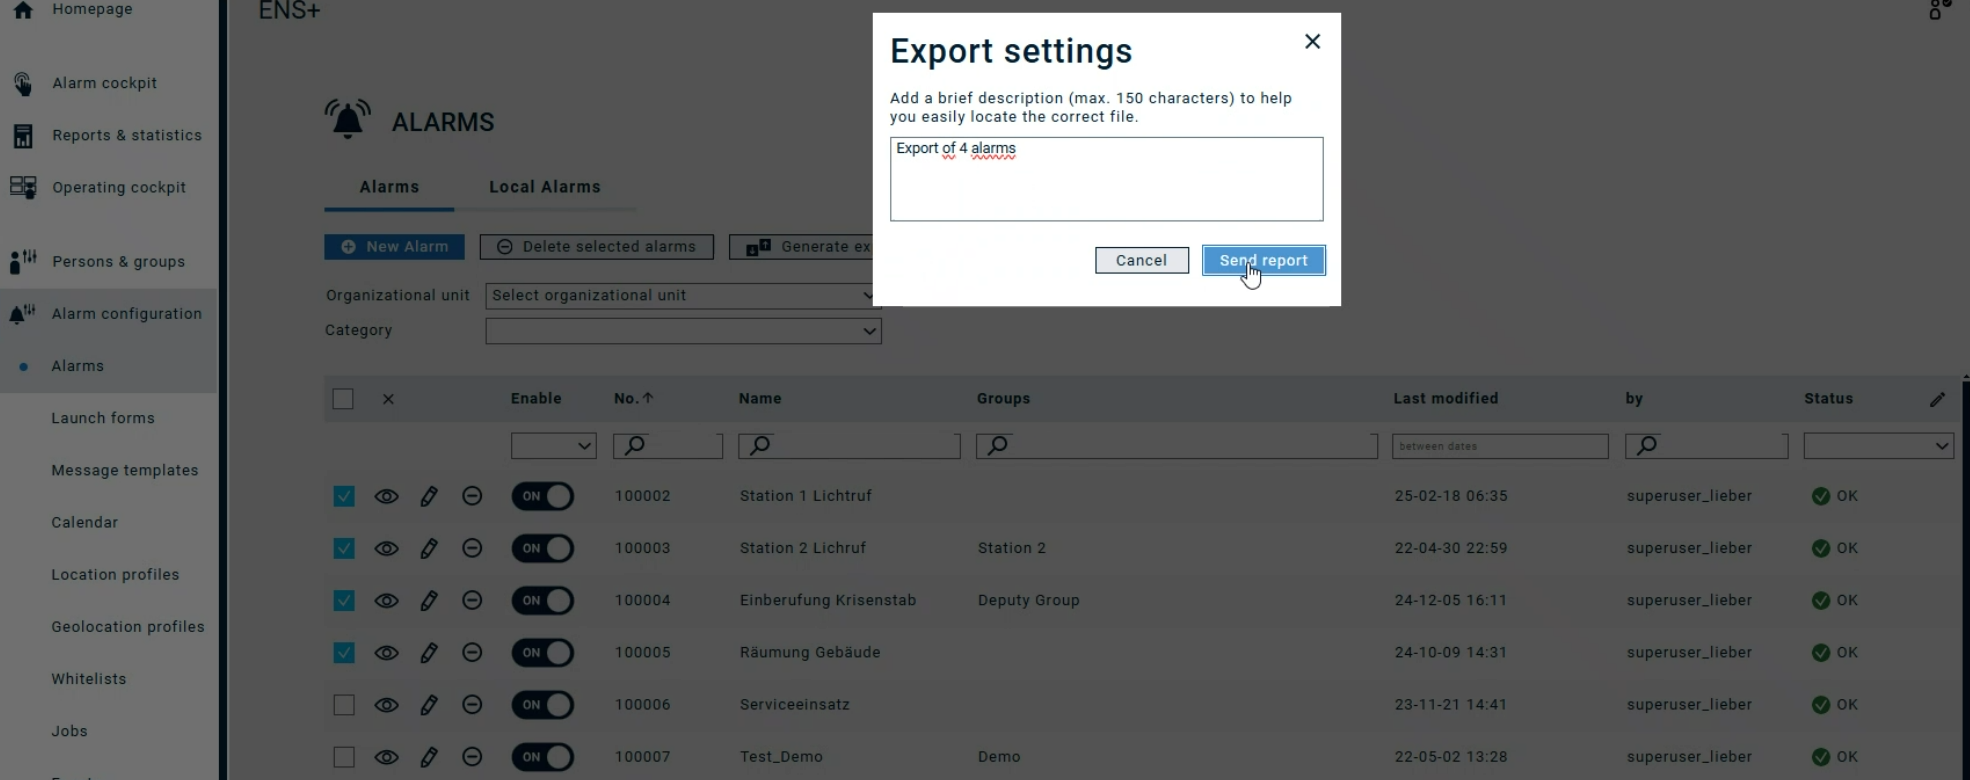
You can select all alarms you want to export in the alarm configurator under "Alarms" and add a description to the export.
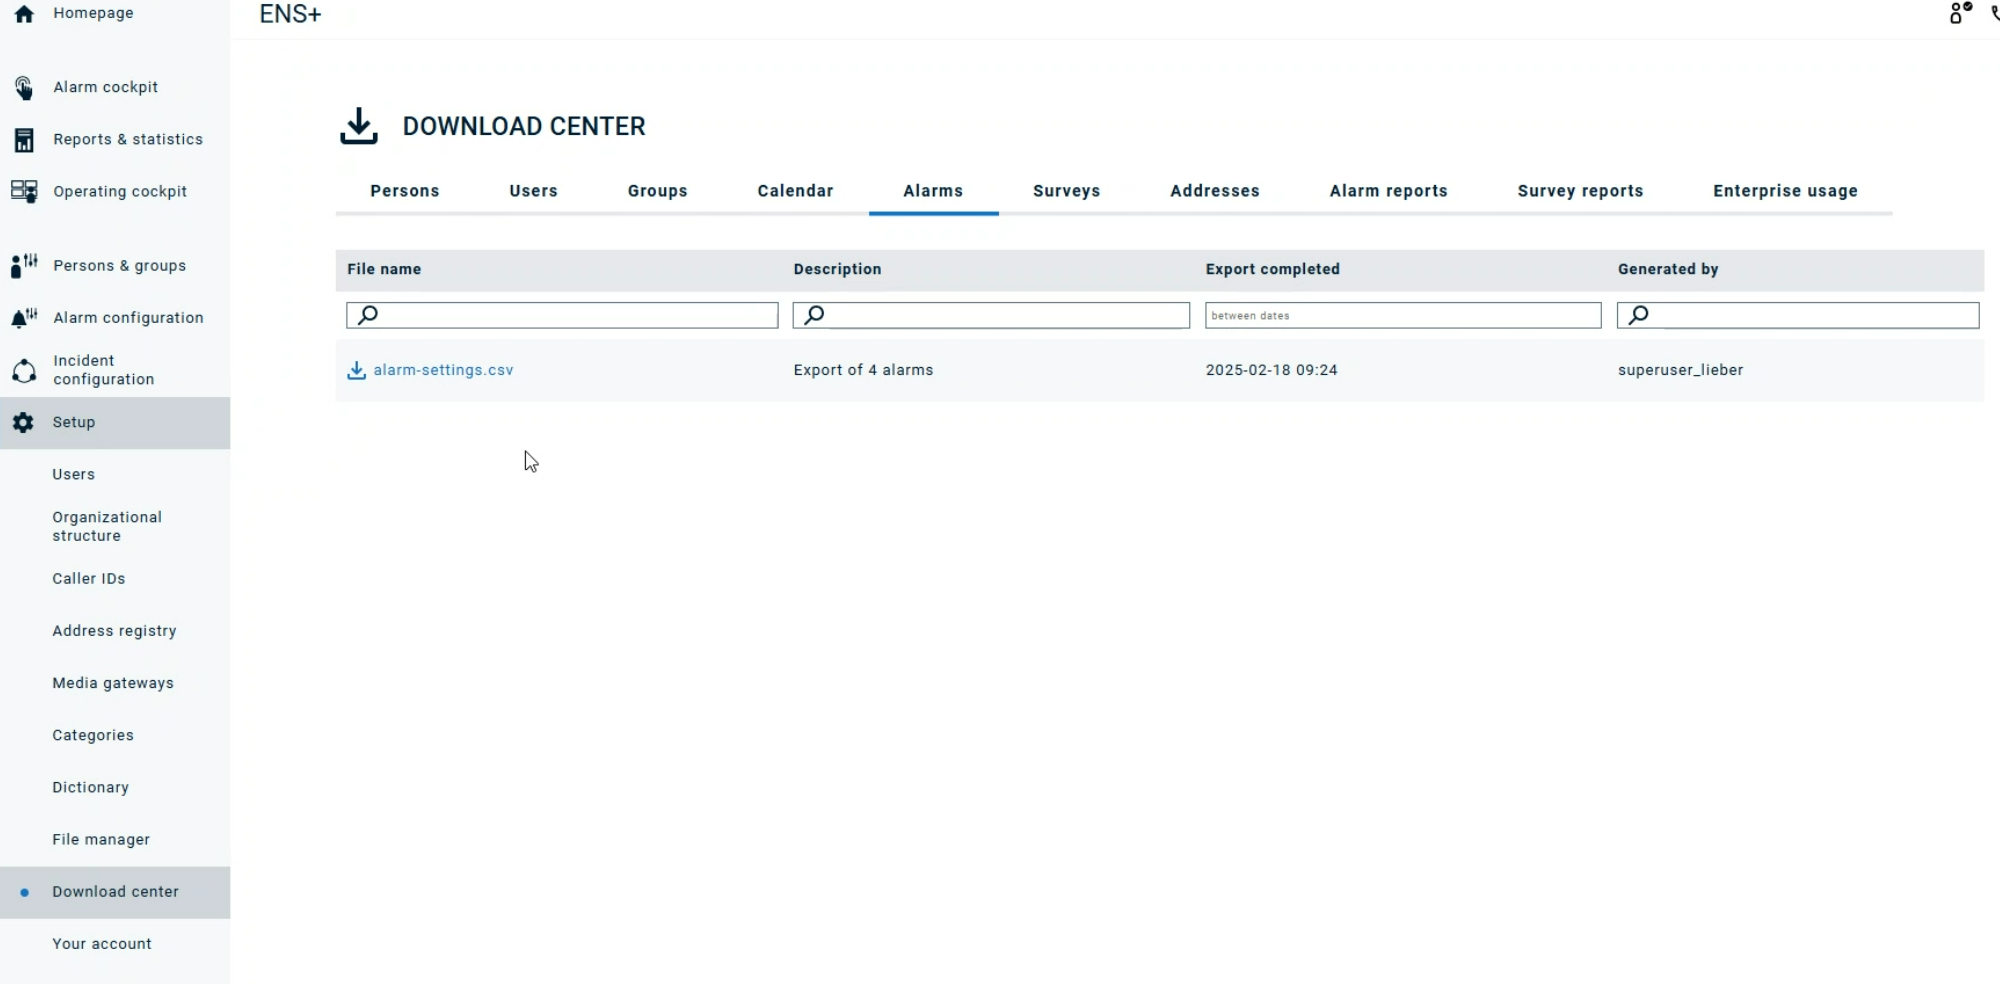
The CSV/xlsx export of alarms can then be found under Setup in the Download Center in the Alarms tab.


 Location data is not stored permanently and will not appear in the Alarm Report.The FACT24 app can also transmit multiple location sources when an alarm is triggered or confirmed.